Westinghouse WWT6084J5WA Скачать руководство пользователя страница 19


19

1. Press Power (      ) 

EXWWRQ

, turn the 

program selector to the required 

program.

The relevant light will light up. 

-

Your washing machine is now in 

STAND-BY-MODE and ready to 

wash your clothes. 

-

The buzzer will sound.

-

Once you select a program, the 

program selected will stay at that 

position for the whole of the cycle.  

-

The selector dial can be turned 

either clockwise or anticlockwise.

-

The display shows the program 

duration.

-

2. If you want your laundry to be 

washed with functions different from 

the one proposed by the machine, 

press Water Level, Soak, Rinse and 

Spin option buttons.

If the settings shown on the control 

panel are what you want to use, 

press the Start/Pause touchpad to 

start your wash. 

NOTE: 

To start a program, press the Start/Pause  

(       ) button, a default program duration 

will be displayed on the screen.

3. If you want to define the end of the 

washing program, press the “Delay 

End” button repeatedly to choose 

your machine end time.

Different functions can be combined 

which is dependent on the program 

selected. When these buttons are 

pressed, the corresponding pilot 

lights come on. 

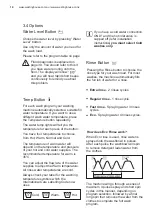
When you select the Rinse & Spin 

program, there will be a delay of at least 

2 minutes before the washing machine 

starts to spin. 

This delay is a drain out period to ensure 

the bowl is empty of water, which is 

necessary before spin commences. Even 

though you may have only put wet clothes 

into an empty bowl, the delay before spin 

will still occur to be safe and to protect 

your washing machine.    

NOTE

Press the Start/Pause again. The 

program will continue.

It is possible to change only some 

options after the program has started.

Press the Start/Pause button to enter 

PAUSE mode.

1.

Change the options.

2.

Press Start/Pause button again. The 

program will continue.

3.

If you have started your wash and you 

wish to stop it for some reason, press the 

Start/Pause button to enter PAUSE mode. 

The time remaining is shown then 

“       ”.

You can turn the Program Selector Knob 

to a new program position at any time. If 

you do move the Program Selector Knob 

the effect will be different depending on 

the status of the machine at the time you 

do this, as follows:    

When the machine is in PAUSE mode, 

moving the Knob to a new position will 

result in the machine resetting to the 

start of the new program.
When the machine is running, moving 

the Knob to a new position will result in 

the machine continuing the wash and 

the display will show “        ” and 

flashing with 3 consecutive short beeps 

to remind you that this option is not 

allowed.

4.6 Setting a Program

4.8 Interruption Of A Program

4.9 Changing A Program

4.10 Changing The Options

4.7 Starting a Program

Содержание WWT6084J5WA

Страница 1: ...TOP LOAD WASHING MACHINE WWT6084J5WA WWT7084J5WA...

Страница 2: ...operated in accordance with this manual You may not be able to claim on the Westinghouse manufacturer s warranty in the event that your product fault is due to failure to adhere to this manual IMPORT...

Страница 3: ...SHING HINTS 21 5 1 Sort Your Washing Into Separate Wash Loads 21 5 2 Pre treatment Sprays And Stain Removers 22 5 3 Detergent 22 5 4 A Guide To Stain Removal 22 6 INTERNATIONAL WASH CODE SYMBOLS 24 7...

Страница 4: ...ll people using the appliance are thoroughly familiar with its operation and safety features Save these instructions and make sure that they remain with the appliance if it is moved or sold so that ev...

Страница 5: ...packaging components e g plastic film polystyrene can be dangerous to children danger of suffocation Keep them out of children s reach Keep all detergents in a safe place out of children s reach Make...

Страница 6: ...should you attempt to repair the machine yourself Repairs carried out by inexperienced persons may cause injury or serious malfunctioning Contact your local Service Centre Always insist on genuine spa...

Страница 7: ...hat the fluid is removed from the garment before placing it in the machine Never pull the power supply cable to remove the plug from the socket always take hold of the plug itself Never use the Top lo...

Страница 8: ...t Levelling Adjustable Right Left Mains Cable Water Inlet Hose Outlet Hose Drain Hose See installation instructions sheet to fit position drain hose Rear Feet Fixed Old inlet hose should be discharged...

Страница 9: ...9 Bleach Dispenser option Fabric Softener Dispenser Agitator Lint Filter Frame Filter Detergent Bleach Dispenser see page 17 Lint Filter see page 25...

Страница 10: ...y set the water level if you wish We recommend you use the auto sensing water level option to ensure there is just the right amount of water for the wash load in the machine In other words it will usu...

Страница 11: ...l button I Delay End button C Temp button J Soak option D Rinse button K Child safety lock option E Spin button F Power button G Start Pause button 3 CONTROL PANEL 3 1 Control Panel Description two co...

Страница 12: ...want to rinse and spin e g Clothes items you have hand washed in a wash tub Spin For very wet clothes to remove the water Machine Clean Clean the tub 2 kg 2 kg 2 kg 2 kg 2 kg 2 kg 2 kg 2 kg 2 kg Maxim...

Страница 13: ...60 Dirty 90 High Mid Low No Spin Rinse Extra Regular Fast FR Temp Hot Warm Normal Cold Delicate Gym Ware Eco Save Bedding Machine Clean Rinse Spin Spin Water Level Auto Full Medium Low Remark Default...

Страница 14: ...button Always check your label for the washing temperature symbols which the International Care Labelling Code now uses If you have a cold water connection ONLY and the hot inlet valve is capped off...

Страница 15: ...start the program To start the selected program press the Start Pause button If you have started your wash and you wish to stop it for some reason press the Start Pause button to enter PAUSE mode Sta...

Страница 16: ...he appliance unsupervised with the door closed without having to worry that children might be injured by or cause damage to the appliance Soak Option Set this option AFTER pressing the Start Pause but...

Страница 17: ...small items will wash cleaner than a load of all large items 4 Powder Liquid Detergent Bleach Connect the mains plug to the mains socket 1 Pull the dispenser drawer forward out from its position Liqu...

Страница 18: ...ring fill when there is some water in the washbowl by tilting the washing tub as picture below 3 Turn Program Selector to a Full Load 60 position 1 Bleaching of clothes can help to remove stains heavy...

Страница 19: ...spin This delay is a drain out period to ensure the bowl is empty of water which is necessary before spin commences Even though you may have only put wet clothes into an empty bowl the delay before s...

Страница 20: ...isplay will show and flashing with 3 consecutive long beeps Remove the laundry from the appliance Make sure that the washing tub is empty Keep the lid ajar to prevent the mildew and odours Press the P...

Страница 21: ...If for example you see residuals of detergent or soils on some items please read the section Residues on washed items paragraph Over time you will learn what is the best set up of programs detergent a...

Страница 22: ...of soiling The type and quantity of detergent will depend on the type of fabric load size degree of soiling and hardness of the water used Information on the hardness of the water in your area can be...

Страница 23: ...ated spirits Remove any residual marks from white fabrics with bleach Red wine soak in water and detergent rinse and treat with acetic or citric acid then rinse Treat any residual marks with bleach In...

Страница 24: ...l solvents Dry cleaning in perchloroethylene petrol pure alcohol R 111 R 113 Dry cleaning in petrol pure alcohol and R 113 DO NOT dry clean Warm iron max 150 C Lukewarm iron max 110 C DO NOT iron Max...

Страница 25: ...sperse 4 Switch off the electricity at the power point 2 Remove the softener dispenser cup and filter column from the centre of the agitator 1 Unclip the filter bag from the column 2 Turn the bag insi...

Страница 26: ...l it stops then lift up and pull out from the recess 1 To do this proceed as follows Clean the dispenser drawer with water and a brush e g an old toothbrush 2 Dry the drawer 3 Remove the water inlet h...

Страница 27: ...e wet clothing especially swimwear in the bowl for too long before you wash it metal objects such as bobby pins dressmaking pins and nails body oils and grease from very dirty or sweaty clothes being...

Страница 28: ...out of balance or vibrates excessively when spinning Water on floor Water in wash bowl Out of balance switch off Open lid redistribute load and close lid Lid not fully closed Close lid and press Start...

Страница 29: ...ect wash program Reselect program and rewash Clothes still dirty after wash program Bra wire or other thin items caught between inner and outer washbowls If the item is visible remove it with pliers U...

Страница 30: ...e button then check the drain hose for blockage Press Start Pause to continue the wash If water level in wash bowl is low and water is flooding the floor rotate the PROGRAM KNOB to Rinse Spin program...

Страница 31: ...rbed Power Supply line Main board defective Power supply voltage too high Wrong or disturbed Power Supply line Main board defective Power supply voltage too low Wrong or disturbed Power Supply line Ma...

Страница 32: ...lothes that come into close contact with the skin e g underwear T shirts Ageing of clothes Iron deposits in the wash water Use of chlorine bleaches on fabrics with resin finishes Incorrect drying 1 Re...

Страница 33: ...Minimum fuse protection 10 A Water supply pressure Maximum Minimum 0 8 MPa 0 08 MPa Maximum dry clothes capacity Extra Dirty 120 Dirty 90 Full Load 60 Daily 45 Fast 20 Delicate Gym Wear Eco Save Beddi...

Страница 34: ...se 3 Tilt the washing machine a little from back side and insert the Bottom Cover into slot at the bottom of the machine as shown on picture until it comes to the end 4 Use gloves Cut the plastic pack...

Страница 35: ...polystyrene piece to the top panel again 6 Lie down the washing machine on its back side taking care not to damage cabinet by placing two of the corner packing pieces between the machine and the floo...

Страница 36: ...levelled and does not rock Turn the taps on and check that there are no leaks from the connections Turn off the water taps and move the washing machine into its final position Make sure that the inle...

Страница 37: ...rranty Check that your domestic electrical installation can take the maximum load required 2 0 kW also taking into account any other appliances in use When the appliance is installed the power supply...

Страница 38: ...disposed of correctly you will help prevent potential negative consequences for the environment and human health which could otherwise be caused by inappropriate waste handling of this product For mo...

Страница 39: ...39 NOTE...

Страница 40: ...40 www westinghouse com au www westinghouse co nz NOTE...

Страница 41: ...41 NOTE...

Страница 42: ...42 www westinghouse com au www westinghouse co nz...

Страница 43: ......

Страница 44: ...G0034730 001 A12246408 www westinghouse com au www westinghouse co nz...

Отзывы: