background image

7

Fr


PRÉPARATION

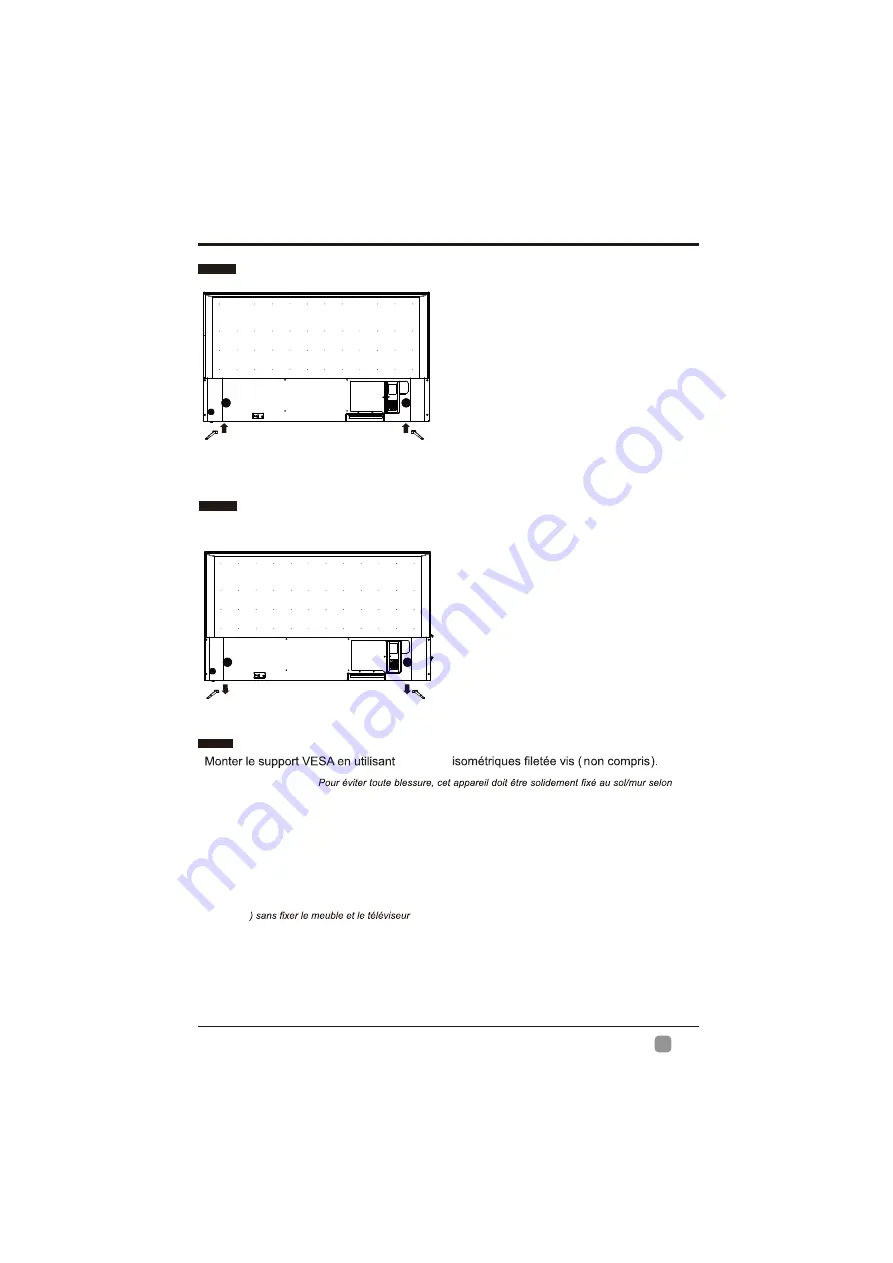
 Installation du socle

 Retrait du socle en vue d’un montage mural

t

 1.

 Couchez le téléviseur face vers le bas 

sur une surface plate et coussinée pour 
éviter de l’endommager ou de rayer l’écran.


t

 2. 

Fixez le support de stand gauche à l'unité 

principale en utilisant les 2 vis fournies .


t

 3. 

Fixez  le support de stand droite à l'unité 

principale en utilisant les 2 vis fournies .

t

 1. 

Couchez le téléviseur face vers le bas 

sur une surface plate et coussinée pour 
éviter de l’endommager ou de rayer l’écran.

t

 2. 

Desserrez les 4 vis en tenant le socle, 

puis retirez-les. 


t

 3. 

Fixez le support mural au téléviseur en 

utilisant les trous de fixation à l’arrière du 

téléviseur. Installez ce téléviseur en suivant 

les consignes comprises avec le support 
mural. 


Vis Montage mural


4*M8*10

 MISE EN GARDE

les instructions d'installation.

MISE EN GARDE:

Ne jamais placer un téléviseur dans un endroit instable.Un téléviseur pourrait tomber
 et causer de graves blussures ou la mort.Plusieurs blessures,surtout 
aux enfants,peuvent être évitées en prenant de simples pré cautions comme:
     -Utiliser les supports recommandés par le fabricant du téléviseur.
     -Utiliser uniquement des meubles pouvant supporter sécuritairement le téléviseur.
     -Assurer que le téléviseur ne dépasse pas le bord du meuble.
     -Ne pas installer le téléviseur sur les meubles élevés(par exemple,armoires ou 
     étag

ères

à un support ad

équat.

     -Ne pas placer le téléviseur sur un linge ou d

’autres mat

ériaux qui pourraient être 

     situés entre le téléviseur et le meuble-support.
     -Informer les enfants sur les dangers de monter sur les meubles pour toucher 
     au téléviseur ou régler les contrôles.
Si votre téléviseur actuel est est retenu ou déménagé,les mêmes 
considérations mentionnées ci-haut s'appliquent.       

( M4x24)

( M4x24)

Содержание WE65HN4108

Страница 1: ...USER S MANUAL MANUEL DE L UTILISATEUR MANUAL DEL USUARIO WE65HN4108 ...

Страница 2: ...for Wall Mounting Wall Mounting Screws Remote Control Connecting External Devices 9 Customizing TV Settings 10 Initial Setup Streaming My Media Viewing Photos Listening to Music Watching Videos TV Settings General Picture Audio Network Channel Time Lock APP settings Source Parental Control 21 Troubleshooting 23 Maintaining 24 25 OTT APP Service 26 ...

Страница 3: ...he safety and operating instructions should be retained for future reference t Heed all warnings All warnings on the appliance and in the operating instructions should be adhered to t Follow all instructions All operating and use instructions should be followed t Do not use this apparatus near water The appliance should not be used near water or moisture for example in a wet basement or near a swi...

Страница 4: ... indicated in the battery compartment may shorten the life of the batteries or cause batteries to leak Do not mix old and new batteries Do not mix Alkaline Standard Carbon Zinc or Rechargeable Nickel Cadmium or Nickel Metal Hydride batteries Batteries should be recycled or disposed of as per state and local guidelines Do not attempt to recharge disposable batteries Do not short circuit battery ter...

Страница 5: ...4 En PREPARATION What s Included Quick Connect Guide Quick Connect Guide User Manual User Manual Remote Control with Batteries Warranty Card Warranty Card TV Set TV Stand Four Screws M4x24 ...

Страница 6: ... Standby mode t CH Press to select a channel t VOL Press to adjust the volume LED IR POWER Indicator Illuminate blue when the TV is turned on Illuminate red when the TV is in standby mode IR Infrared Receiver Receive IR signals from the remote control POWER ...

Страница 7: ...computer or other devices with a VGA interface 7 PC AUDIO Input Connect to a computer audio output 8 DTV TV Input Connect to the antenna VHF UHF socket with the RF coaxial cable 9 Headphone Socket Connect to the Headphones 10 AUDIO Input Connect to the AUDIO L R output sockets on external audio devices 11 COMPOSITE COMPONENT IN Connect to AV devices with composite component Y Pb Pr video and audio...

Страница 8: ... WARNING Never place a television set in an unstable location A television set may fall causing serious personal injury or death Many injuries particularly to children can be acoided by taking simple precautions such as Using cabinets or stands recommended by the manufacturer of the television set Only using furniture that can safely support the television set Ensuring the television set is not ov...

Страница 9: ...to turn to TV mode 14 VOL Adjust the volume 15 CH Select the channel 16 17 Stop the playback Freeze the picture Display the favorite channel list Add or delete Favorite channels 18 Skip to the beginning of the previous chapter track photo 19 Skip to the beginning of the next chapter track photo 20 Reverse playback rapidly 21 Advance playback rapidly 22 23 Start playback or pause 24 25 P MODE Selec...

Страница 10: ...9 En CONNECTING EXTERNAL DEVICES Soundbar LAN HDMI 2 HDMI 1 VGA HEADPHONE ...

Страница 11: ...e TV will enter Standby Mode and the red LED indicator will illuminate In Standby Mode press the button on the main unit or on the remote control to turn the TV on The red LED indicator will turn blue the Arrow buttons to highlight and select your desired mode and press OK 5 If channels cannot be found this frame will be displayed automatically Westinghouse ...

Страница 12: ...at offers effortless and endless music enjoyment and discovery Just start with the name of one of your favorite artists songs genres or composers and Pandora will do the rest It s easy to create personalized stations that play only music you ll love AccuWeather Displays the current weather conditions and the temperature anywhere in the world in centigrade or Fahrenheit To obtain the best result to...

Страница 13: ...MIZING TV SETTINGS MY MEDIA Press MENU button to display the main interface then use the Arrow buttons to highlight MY MEDIA and press OK like Note Portable drives should be inserted before entering MY MEDIA menu ...

Страница 14: ...G TO MUSIC Use the Arrow buttons to highlight the MUSIC option and press OK then it will jump to confirm the inserted drive press OK to enter After entering MUSIC use the Arrow buttons to select the music file and press OK to enter After entering the music file use the Arrow buttons to select the desired music then press the playing button to display When the music is playing the music Function Ba...

Страница 15: ...deo is playing the video Function Bar will be displayed Use the Arrow buttons to select the desired function available on the bar TV SETTINGS Press the MENU button on the main unit or on the remote control to display the main interface Then use the Arrow buttons to highlight TV Settings and press OK to enter Then use the Arrow buttons to cycle among the following options and select the desired one...

Страница 16: ... Off CC on Mute Basic Selection CC1 CC2 CC3 CC4 Text1 Text4 OFF Advanced Selection Select from Service 1 to Service 6 Option Mode Font Style Font Size Font Edge Style Font Edge Color FG_ Color BG_Color FG_ Opacity BG_Opacity OTHER SETTINGS HDMI EDID Select the HDMI version Mode 1 HDMI 1 4 Mode 2 HDMI 2 0 Inlink Set the options Inlink Control Device Power Off TV Power On Audio Receive Inlink Device...

Страница 17: ...t and dark levels in the pictures COLOR Control the color intensity SHARPNESS Adjust crispness level in edges between light and dark areas of the picture TINT Adjust the balance between red and green levels COLOR TEMPERATURE Cycle among color temperatures Normal Warm Cool ADVANCED OPTION Set the following options Noise Reduction Reduce the noise level of the connected device Off Weak Middle Strong...

Страница 18: ...IO OUTPUT Select the digital audio output mode between PCM RAW SURROUND SOUND Turn On Off to provide an enhanced listening experience AUTO VOLUME Turn On Off to automatically control volume levels AUDIO LANGUAGE Select audio language among English French Spanish NETWORK Press MENU to display the main interface use the Arrow buttons to highlight TV SETTINGS and press OK NETWORK to enter and adjust ...

Страница 19: ...ter and adjust each option setting AIR CABLE Select antenna between Air and Cable AUTO SCAN Select the Auto Scan feature to scan your available cable channels FAVORITE Set the selected channel as a favorite channel SHOW HIDE Show Hide the selected channel CHANNEL NUMBER Display the current channel number CHANNEL LABEL Display the current channel label ...

Страница 20: ... main interface use the Arrow buttons to highlight TV SETTINGS and press OK LOCK to enter and adjust each option setting Note the default password is 0000 CHANGE PASSWORD Use 0 9 buttons to input the old password and then input the new 4 digit password SYSTEM LOCK Select to turn system lock On Off The following options USA Canada RRT Setting and Reset RRT will only be accessible when you turn the ...

Страница 21: ...r the account information ESN Electronic Serial Number SOURCE Press SOURCE on the remote control or on the main unit to display the source menu then use the Arrow buttons to cycle among the different input sources TV AV COMPONENT HDMI1 HDMI2 HDMI3 VGA USB then use the Arrow buttons to highlight the desired source and press OK to confirm NETFLIX VERSION Show Netflix Version Exception while opening ...

Страница 22: ...ch ratings you consider are acceptable for different viewers For example if you choose TV PG more restrictive ratings will be automatically blocked some viewers will not be able to see TV PG TV 14 or TV MA rated programs You may block the auxiliary video source entirely Use the Content Blk option to block program Content based on individual parameters such as Strong Dialog Bad Language Sex Scenes ...

Страница 23: ...rade Meaning TV Y All Children Content not offensive to most viewers TV Y7 Directed to Older Children Considered suitable for children over 7 may contain fantasy violence scenes TV G General Audience Considered suitable for all audience children may watch unattended TV PG Parental Guidance Suggested Suggested unsuitable for younger children may contain suggestive language bad language sex and viol...

Страница 24: ...witching on This is normal the image is muted during the TV startup process Please contact your service centre if the picture has not appeared after 5 minutes No or poor color or poor picture Adjust the settings in the Picture menu Try another channel The problem may be caused by the broadcaster Check if video cables are connected properly Horizontal Vertical bar or picture shaking Check for local...

Страница 25: ... letters Check if TV is connected correctly Try powering off and unplugging TV to reset TV Try resetting the WIFI router and also check for interference or WIFI channel problems Problems with video streaming Check if internet connection is fast enough for streaming HD or 4K videos has connection issue Can t use Vudu and Pandora Vudu is only available in US and Pandora only avaliable in limited cou...

Страница 26: ... Vs 120 Hz 60 Hz Display Resolution 3840 x 2160 HDMI Support 3840 x 2160 60Hz Panel Resolution 3840 x 2160 Aspect Ratio 16 9 Dynamic Contrast Ratio Panel 3000 1 Response Time G To G 6 ms Lamp Life Typ Hours 20 000 hours Horizontal Viewing Angle At CR 10 176 Vertical Viewing Angle At CR 10 176 Wall mount LxW mm 400 200 VESA mm ...

Страница 27: ...help https productforums google com forum categories youtube smart tvs t VUDU You can call the following telephone for more help 888 554 8838 t Pandora You can send E mail to Pandora for more help pandora support pandora com t AccuWeather You can send E mail to AccuWeather for more help CustomerService AccuWeather com Please call Westinghouse E lectronics a t 800 701 0680 f or t he l ocations o f ...

Страница 28: ...ural Vis de montage mural Télécommande Connexion des appareils externes 9 Personnalisation des paramètres du téléviseur 10 Diffusion MES MÉDIAS Visionnementdephotos Écoutedemusique Regarder des vidéos PARAMÉTRES TV Géréral Image Audio Réseau Canal Heure Verrouillage Paramétres de APP Source Contrôle parental 21 Dépannage 23 Entretien 24 Caractéristiques technique 25 OTT APP Service 26 ...

Страница 29: ... Nous vous conseillons de conserver les consignes liées à sécurité et au fonctionnement de l appareil pour consultation future t Observez toutes les mises en garde Vous devez suivre toutes les consignes liées au fonctionnement et à l utilisation de l appareil t Suivez toutes les consignes Vous devez suivre toutes les consignes liées au fonctionnement et à l utilisation de l appareil t N utilisez p...

Страница 30: ...r les piles en respectant la polarité comme indiqué dans le compartiment de la batterie peut raccourcir la durée de vie des batteries ou piles risqueraient de fuir Ne pas mélanger piles neuves et anciennes Ne pas mélanger des piles alcalines standard carbone zinc ou rechargeables nickel cadmium ou nickel métal hydrure rechargeables Les batteries doivent être recyclées ou éliminées conformément aux...

Страница 31: ...léments compris Guide de Connexion Rapide Garantie Carte Guide de Connexion Rapide Garantie Carte Manuel d utilisation Manuel d utilisation Télécommande et piles Poste de télévision Socle de télévision Four Vis 4 2 x 4 M ...

Страница 32: ...touche pour choisir un canal Appuyez sur cette touche pour régler le volume LED IR t t 5 NPJO EF NJTF TPVT UFOTJPO Apparaît en bleu lorsque le téléviseur est allumé Apparaît en rouge lorsque le téléviseur est en mode veille IR Récepteur infrarouge Reçoit les signaux IR de la télécommande VOL POWER 7VF BSSJâSF ...

Страница 33: ...e interface VGA 7 Entrée PC AUDIO Se raccorde à la sortie audio d un ordinateur 8 Entrée DTV TV HF UHF à l aide du câle coaxial RF 9 Prise pour écouteurs Se raccorde aux écouteurs 10 Entrée Audio Se raccorde à la prise AUDIO L R de connecteurs de sortie des appareils audio externes 11 COMPOSITE COMPOSANT IN Se raccorde aux appareilsAV avec prises de sortie vidéo et audio pour composite composants ...

Страница 34: ...4 M8 10 MISE EN GARDE les instructions d installation MISE EN GARDE Ne jamais placer un téléviseur dans un endroit instable Un téléviseur pourrait tomber et causer de graves blussures ou la mort Plusieurs blessures surtout aux enfants peuvent être évitées en prenant de simples pré cautions comme Utiliser les supports recommandés par le fabricant du téléviseur Utiliser uniquement des meubles pouvan...

Страница 35: ...r au menu précédent 12 EXIT Pour quitter le menu OSD 13 TV Appuyez sur pour mettre en mode TV 14 VOL Pour sélectionner un canal 15 CH Pour régler le volume 16 17 Arrêter la lecture 18 Passer au début de la précédente chapitre piste photo 19 P Le gel de la photo Afficher la chaîne préférée asser au début de la prochaine chapitre piste photo 20 Inverser rapidement la lecture 21 Avancer rapidement la...

Страница 36: ...9 Fr CONNEXION DES APPAREILS EXTERNES Soundbar LAN HDMI 2 HDMI 1 VGA HEADPHONE ...

Страница 37: ... en mode Veille et le témoin DEL rouge s allumera Une fois sous ce mode appuyez sur la touches de l appareil ou de la télécommande pour allumer le téléviseur Le témoin DEL rouge passera au bleu n o i t a r u g i f n o c e d t n a t s i s s a l r u e s i v é l é t e l z e m u l l a s u o v e u q s i o f e r è i m e r p a L 5 S il est impossible de trouver des canaux cette fenêtre s affiche automati...

Страница 38: ...te du travail pour vous Il est ainsi facile de créer des postes de radio qui ne joueront que la musique que vous aimez AccuWeather Indique la température et les conditions météorologiques du moment partout dans le monde en degrés Celsius ou Fahrenheit PERSONNALISATION DES PARAMÈTRES DU TÉLÉVISEUR pour obtenir le meilleur résultat pour regarder la vidéo sur votre 4k tv 4k 1 tu as besoin d une conne...

Страница 39: ... bouton MENU MES MÉDIAS et appuyez sur OK Sélectionnez parmi les photos musique et vidéo pour voir ce que vous aimez Durs portables doivent être insérés avant d entrer dans le menu MEDIA PERSONNALISATION DES PARAMÈTRES DU TÉLÉVISEUR ...

Страница 40: ...trer Après avoir entré MUSIC utilisez les touches fléches pour sélectionner le fichier musique et appuyez sur OK pour entrer Après avoir entré le fichier musique utilisez les touches fléches pour sélectionner le musique souhaitée puis appuyez sur le bouton de lecture pour afficher Lorsque le musique est en cours la barre musique de la fonction sera affiche Utilisez les touches fléches pour sélecti...

Отзывы: