background image

6

En


PREPARATION

10

COMPONENT

AU

IO

900

MI

A N

OPTICA

PC AU I O

G A

MI

MI

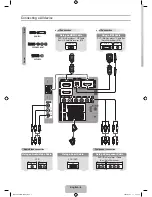
Rear View

1. Power Cord
Connect to AC power outlet.
2. OPTICAL Output
Connect a digital sound system to this
jack.
3. USB Port
Connect to a USB storage device to play compatible movie and photo
4. LAN
Network connection port.
5. HDMI Input
Connect to a (HD) signal input device.
6. VGA Input
Connect to a computer or other devices with a VGA interface.
7. PC AUDIO Input
Connect to a computer audio output.
8. DTV/TV Input
Connect to the antenna (75ÿ VHF/UHF) socket with the RF coaxial cable.
9. Headphone Socket
Connect to the Headphones.
10. AUDIO Input
Connect to the AUDIO (L/R) output sockets on external audio devices.
11. COMPOSITE/COMPONENT IN
Connect to AV devices with composite/component (Y/Pb/Pr) video and audio output sockets. 

COMPOSITE VIDEO and COMPONENT(Y/PB/PR) share with AUDIO IN (L/R).

Содержание WD65NH4190

Страница 1: ...USER S MANUAL MANUEL DE L UTILISATEUR MANUAL DEL USUARIO WD65NH4190...

Страница 2: ...radio frequency energy and if not installed and used in accordance with the instructions may cause harmful interference to radio communications However there is no guarantee that interference will not...

Страница 3: ...emote Control Connecting External Devices Customizing TV Settings Initial Setup Navigating the Setup Settings Apps Media ViewingPhotos PlayingMusic Source Setup System Channel Support Lock Picture Net...

Страница 4: ...ould not be exposed to dripping or splashing Objects filled with liquids such as vases should not be placed on apparatus WARNING The batteries shall not be exposed to excessive heat such as sunshine o...

Страница 5: ...e for long period or when the batteries are exhausted Install only new batteries of the same type in your product Failure to insert batteries in the correct polarity as indicated in the battery compar...

Страница 6: ...s Included Quick Connect Guide Quick Connect Guide User Manual User Manual Remote Control with Batteries Warranty Card Warranty Card TV Set TV Stand HDMI Cable Four Screws M4x16 810265F7B00070 860255F...

Страница 7: ...signal sources MENU Display the main menu CH Press to select a channel Press to adjust the volume POWER Indicator Illuminate blue when the TV is turned on Illuminate red when the TV is in standby mod...

Страница 8: ...gnal input device 6 VGA Input Connect to a computer or other devices with a VGA interface 7 PC AUDIO Input Connect to a computer audio output 8 DTV TV Input Connect to the antenna 75 VHF UHF socket wi...

Страница 9: ...the Right Connecting Base to the main unit using the 2 provided pcs provided screws t Lay the TV face down on a flat cushioned surface to avoid damaging or scratching t Untighten the 4 pcs screws hold...

Страница 10: ...information such as the current channel and input source 17 Stop the playback 18 Skip to the beginning of the previous chapter track photo 19 Skip to the beginning of the next chapter track photo 20...

Страница 11: ...9 En CONNECTING EXTERNAL DEVICES...

Страница 12: ...ress O to The ON MODE Power under Home Mode shoul The SLEEP MODE Power should be less than 0 5 W If channels can not b found this frame will y 5 7 8 9 Found 0 Check your antenna or cable connections a...

Страница 13: ...lect Setup menu and then press buttons to navigate and select the available menu Channel Support Audio Network Channel Support System Lock Audio Support Lock Channel Picture System Lock Picture Suppor...

Страница 14: ...res or composers and Pandora will do the rest It s easy to create personalized stations that play only music you ll love Toon Goggles A subscription video on demand platform that offers animated fun a...

Страница 15: ...a and use to enter the media and use to select the desired option NOTE After entering Media press buttons to select Photos and then select the disk type to enter Then use buttons to navigate in the pi...

Страница 16: ...to select the desired video then a subscreen will pop up Press O to display the video After entering Media press buttons to select Music and then select the disk type to enter Then use buttons to nav...

Страница 17: ...nu Then press to enter source and use buttons to select different input sources among TV HDMI1 HDMI2 HDMI3 USB VGA AV Component and press OK button to Setup Press the MENU button on the main unit or o...

Страница 18: ...buttons to select System menu and then press OK button to enter Press buttons to select the following setting options and then press buttons to adjust each option s setting Wide Zoom 16 En CUSTOMIZING...

Страница 19: ...dly to select the number of minutes directly Time Zone J Mountain Central Eastern Atlantic Newfoundland Daylight Saving Time Select to turn On Off daylight saving time Other Setting Set other settings...

Страница 20: ...d then Select Auto Scan to search the available Air or abl t c r c t Press buttons to select u ort menu and then press O button to vie USER S MANUAL MANUEL DE L UTILISATEUR MANUAL DEL USUARIO WD65NH41...

Страница 21: ...word for Select to turn On Off system lock The following options J J accessible when you turn the system lock on TV TV RATING Press O button to lock or unlock TV rating MPAA Select MPAA rating N A G P...

Страница 22: ...ntrast Adjust the difference between light and dark levels in the pictures For User mode Color Control the color intensity For User mode Adjust the level of crispness in the edges between light and da...

Страница 23: ...o adjust each option s setting Select two types of network Wireless Network or Wired Network X Deactivate Vudu and clear the account information Electronic Serial Number Auto Show the network status T...

Страница 24: ...Reco ended M a o e internet s eed Allow the selection of an audio enhancement technique Standard Music Movie User Alternative you may press the MODE button to select the sound mode directly Control th...

Страница 25: ...viewer For example if you choose TV PG more restrictive ratings will be automatically blocked the viewer will not be able JQ JQ JQ source entirely Blocks the signal sent by the equipment such as VCR c...

Страница 26: ...dren Content not offensive to most viewers Directed to Older Children Considered suitable for children over 7 may contain fantasy violence scenes General Audience Considered suitable for all audience...

Страница 27: ...sleep timer is set Check whether the Auto Standby is activated No picture No Sound Check whether the TV is switched on Try another channel The problem may be caused by the broadcaster Picture appears...

Страница 28: ...RF coaxial cable away from the other connected cables Lost password Select the SET Password setting in the LOCK menu then enter the following master password 8899 The master password clears your prev...

Страница 29: ...0 x 2160 HDMI Support 3840 x 2160 60Hz Panel Resolution 3840 x 2160 Aspect Ratio 16 9 Dynamic Contrast Ratio Panel 1000 1 Response Time G To G 8 ms Lamp Life Typ Hours 20 000 hours Horizontal Viewing...

Страница 30: ...ative contact information t YouTube You can browse the following website for more help https productforums google com forum categories youtube smart tvs t VUDU You can call the following telephone for...

Страница 31: ...SE UM 6501 1601...

Отзывы: