background image

USER’S MANUAL

MANUEL DE L’UTILISATEUR
MANUAL DEL USUARIO

WB84U1D1

Содержание WB84U1D1

Страница 1: ...USER S MANUAL MANUEL DE L UTILISATEUR MANUAL DEL USUARIO WB84U1D1...

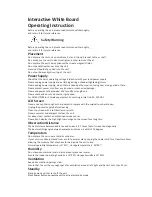
Страница 2: ...pment Fuse rating in inlet is 6 3A 250 VAC LCD Screen Never use any other tough or sharp object to replace with the original touch write pen Unplug the power supply before cleaning Clean the screen wi...

Страница 3: ...3 Battery Properly maintain the batteries and recycle the used batteries Caution This is a Class B product there is not cause radio interference...

Страница 4: ...INPUT 14 5 5 COAXIAL CONNECTION SPDIP AUDIO OUTPUT 14 6 RS232C COMMUNICATION 17 6 1 RS232C 15 6 2 Protocol 15 6 3 Acknowledgement 15 7 INSIDE PC UNIT INSTALLATION REPLACEMENT OPTION 17 7 1 Inside PC...

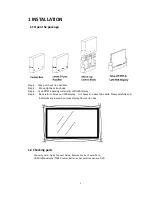
Страница 5: ...acking material Left IWB display Step 4 Be careful to Move out IWB display It is heavy and easy to be slide Please carefully and better Wear gloves when move display from carton box 1 2 Checking parts...

Страница 6: ...6 1 3 Installation The IWB Stand matched takes material object as the standard Please read IWB Stand Installing Instruction while installing 1 3 1 Mounting Bracket tie up to IWB display...

Страница 7: ...bracket to IWB display by 3 screws on each side insert to 2 3 4 screw holes Fix screws to firm condition After finished mounting bracket installation it is easy hang up display to movable stand 1 3 2...

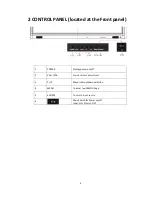
Страница 8: ...t the Front panel 1 POWER Display power on off 2 VOL VOL Sound Volume adjustment 3 P P Menu Item up down selection 4 MENU To enter exit MENU Page 5 SOURCE To switch input source 6 Main Switch for Powe...

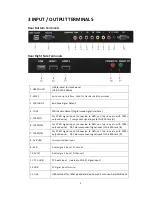
Страница 9: ...ignal input to this RCA Jack G 6 YPBPR PB For YPbPr signal input Connected to DVD set top box etc with YPbPr output device PB Color component signal input to this RCA Jack B 7 YPBPR PR For YPbPr signa...

Страница 10: ...igh Definition Multimedia Interface 2 16 POWER PC Turn ON OFF the internal PC power if installed 17 RESET PC Internal PC reset suspends all programs currently running the PC system re starts NOTE Func...

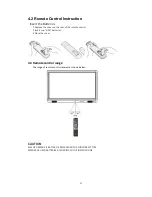
Страница 11: ...the rear of the remote control 2 Insert two AAA batteries 3 Place the cover 4 3 Remote control range The range of remote control receiver as shown below CAUTION RISK OF DAMAGE IF BATTERY IS REPLACED W...

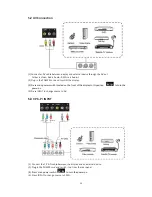
Страница 12: ...the external computer that touch function will be activated in free of driver 5 Press IWB main power switch to ON position to turn the display on 6 Press Source button to select INPUT to VGA 1 or VGA...

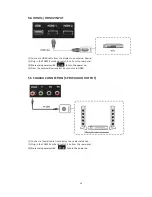
Страница 13: ...he display 3 Press main power switch located on the front of the display to IN position to turn the power on 4 Press INPUT to change source to AV 5 3 Y Pb Pr INPUT 1 Connect the Y Pb Pr cable between...

Страница 14: ...om the rear panel 3 Press main power switch to turn the power on 4 From the external device select input source to HDMI 5 5 COAXIAL CONNECTION SPDIP AUDIO OUTPUT 1 Connect a Coaxial cable from display...

Страница 15: ...otocol 16th Code POWER ON F6 01 01 00 F8 6F 0x01 POWER OFF F6 02 01 00 F9 6F 0x02 VOLUME F6 03 01 00 FA 6F 0x03 VOLUME F6 04 01 00 FB 6F 0x04 HDMI1 F6 05 01 00 FC 6F 0x05 HDMI2 F6 06 01 00 FD 6F 0x06...

Страница 16: ...16 In the Protocol list command list ID 01 0x01 is used 0xF6 command start bit 0x6F command end bit...

Страница 17: ...mooth pushing is highly recommended After insert inside PC be sure to tighten both 2 handheld screws to fasten pc securely 2 There have 2 Wifi Antenna provided inside package When you feel wifi signal...

Страница 18: ...rol and then select off then the PC turns off but keep the Monitor on PC ON When turn on the Monitor the PC is normally off It is possible to turn on the PC by pressing the INPUT button of the monitor...

Страница 19: ...t next Item if current Item is the last one then it will skip to the first one Right Change Sub Menu Adjust Item option or value enter the next menu Left Change Sun Menu Adjust Item option or value OK...

Страница 20: ...st small menu Bright 0 100 50 Same to Contrast Color 0 100 50 This item is unavailable under VGA channel and DVI signal Tint 50 50 0 Only adjustable under NTSC signal un adjustable under other signals...

Страница 21: ...unction introduction Item Variable range Default Explanation Sound Mode Standard Music Movie User Standard Bass 0 100 50 Treble 0 100 50 Balance 0 100 50 Surround On Off Off Surround Sound On Off Cont...

Страница 22: ...5Min 10Min 15Min 30Min 45Min 60Min 90Min 120Min 180Min 240Min Off Pressing Button to select one of Sleep Timer setting Time Zone Pacific UTC 8 Alaska UTC 9 Hawaii UTC 10 Eastern UTC 5 Central UTC 6 M...

Страница 23: ...al VGA channel Wide Normal Wide Only can be adjusted when there is signal Noise Reduction Off Weak Middle Strong Middle DLC Dynamic Light Control for picture brightness contrast Restore Default For th...

Страница 24: ...ress P Mode key Picture Mode display menu opened Key s functions keys Function Picture Mode P Mode Picture Mode works only when there is signal If it is P Mode menu then change options of P Mode order...

Страница 25: ...rtion of screen Key s functions keys Function TIMER If it is Sleep menu then change the options of sleep or it is used to open Sleep menu MEMU Exit from Sleep menu open main menu EXIT Exit from Sleep...

Страница 26: ...ed to change channel Source Menu Appear on screen use to Navigate of each input source Press Enter to make the input selection No operation for 12 seconds then exit from Source menu 8 3 7 Volume menu...

Страница 27: ...u only MUTE key can close MUTE menu 2 When MUTE menu displays if the option of CC Mode is On then close MUTE menu 3 If option of CC Mode is CC On MUTE then press MUTE key to open MUTE menu close MUTE...

Страница 28: ...When USB module inserted Top and left of screen will shown USB 2 0 etc 9 2 2 USB Application Mode USB module if have JPEG M JPEG format file it is possible to display Other else format file can not be...

Страница 29: ...29 10 DISPLAY SIGNAL RESOLUTION FOR REFERENCE 1 Y Pb Pr Y Cb Cr Mode 2 VGA Mode 3 HDMI Mode Standard TMDS 480I 480P 60Hz 576I 576P 50 Hz 720P 50 60 Hz 1080I 1080P 50 60 Hz 4K2K 30 Hz...

Страница 30: ...Program for IWB PC 01 IWB PC 02 Please follow the Quick Instruction Guide to install WScribe program and activate for White Board application Wscribe activate Key procedure 1 Checking parts Accessory...

Страница 31: ...ction if activated 2 Check whether there is a sudden power failure 3 Check for the signal to system and control PC mode No signal 1 Check display setting 2 Check the resolution 3 Adjust the Hs Vs sync...

Страница 32: ...lume 3 Check the audio cable One speaker 1 Adjust sound balance in the menu 2 Check the setting in sound control panel of computer 3 Check the audio cable VGA OUT silence 1 Check for proper earphone c...

Страница 33: ...www westinghousedigital com Westinghouse Digital International Orange CA SE UM 0103 1301 S N...

Отзывы: