background image

10

ETL-ES-Xavier II-WH20.09

EXTENDED DOWNROD OPTION

OPCIÓN CON VARILLA VERTICAL MÁS LARGA

11

12

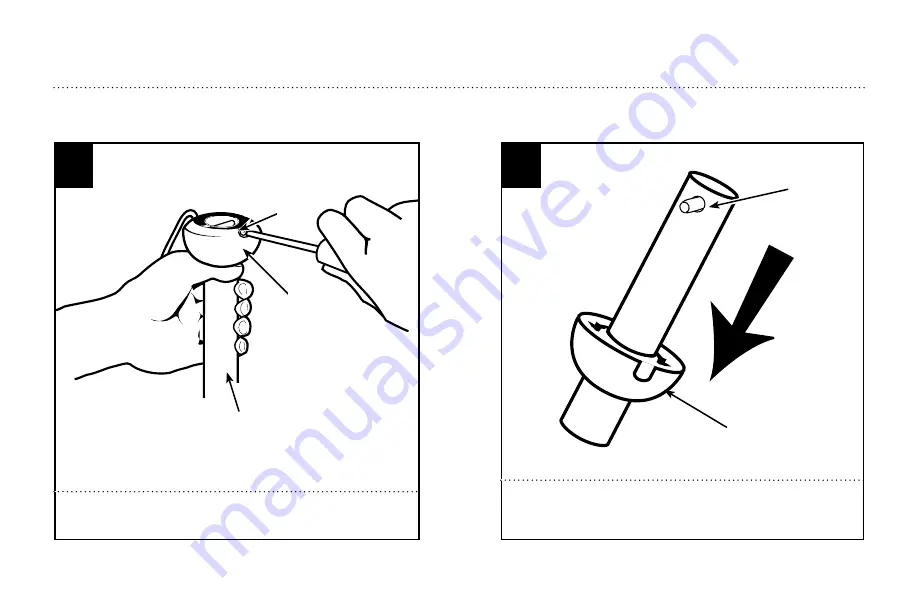
Loosen downrod ball (1) from downrod (2) by removing set screw (3). 
Afloje la bola de la varilla vertical (1) de la varilla vertical (2) quitando 

el tornillo (3).

2

1

2

1

Slide downrod ball (1) off of downrod and remove pin (2).  

Deslice la bola de la varilla vertical (1) hasta separarla de la varilla vertical 

y quite el pasador (2). 

3

Содержание 72231

Страница 1: ... II WH20 09 OWNER S MANUAL MANUAL DEL USUARIO Xavier II Please write model number here for future reference Por favor incluya el número del modelo aquí para futura referencia Net Weight 22 00 LBS Peso Neto 10 00 KGS ...

Страница 2: ...es 10 Attachthemountingbracketusingonlythehardwaresuppliedwiththeoutletbox Fanisonlytobemountedtoanoutletboxmarked AcceptableforFanSupport 11 WARNING Toreducetheriskoffireorelectricshock donotusethisfanwithanysolidstatefanspeedcontroldevice orvariablespeedcontrol 12 Ifthisunitistobeinstalledoveratuborshower itmustbemarkedasappropriatefortheapplication 13 NEVERplaceaswitchwhereitcanbereachedfromatu...

Страница 3: ...uministradaconlacajadeembutir Elventiladorsólosedebemontarenunacajadeembutirmarcada AcceptableforFanSupport Aceptableparasoportarventiladores 11 ADVERTENCIA Parareducirelriesgodeincendiosochoqueseléctricos nouseesteventiladorconundispositivodecontroldevelocidaddeestadosólidoparaventilador ouncontroldevelocidadvariable 12 Siestaunidadseinstalarásobreunabañeraounaducha debeestaridentificadacomoadecu...

Страница 4: ...ttheonethatbest complementsyourdecor orchangethestylewithjustaflipoftheblade NOTE Combo Blade finishes vary depending upon model ALETA DE DOBLE CARA Lasaletadelrotordedoblecarapresentandossuperficiesconunacabadodealta calidad InvirtiendolasaletapuedeUd producirunefectodecorativoadaptadoa suambienteocrearunadecoracióncompletamentenueva NOTA lassuperficiesdelasaletadedoblecarasondistintasenfunciónde...

Страница 5: ...the fan to wobble 2 PREPARING FOR INSTALLATION ANTES DE LA INSTALACIÓN Quite el envoltorio e inspeccione detenidamente el ventilador para verificar que todas las piezas estén incluidas Apague la alimentación en la caja de fusibles para evitar la posibilidad de descarga eléctrica Use una caja de embutir de metal adecuada para soportar un ventilador debe soportar 35 libras Antes de fijar el ventilad...

Страница 6: ...ingslots 2 onthecanopy Rotatethemountingbracketandremovefromthecanopy Quitelostornillosylasdosarandelasenestrelladelosdosagujeroscoincidentes 1 deldosel Afloje noquite lostornillosdelasranurascoincidentes 2 deldosel Gireelsoportedemontajeysepárelodeldosel MOUNTING BRACKET INSTALLATION INSTALACIÓN CON SOPORTE DE MONTAJE 3 1 2 1 2 ...

Страница 7: ...luida con el ventilador proceda a la página 9 paso 9 EXTENDED DOWNROD OPTION Ifinstallingwithlongerdownrodthansuppliedwithfan proceedtopage10 step11 OPCIÓN CON VARILLA VERTICAL MÁS LARGA Si instala una varilla vertical más larga que la que se incluye con el ventilador proceda a la página 10 paso 11 Install mounting bracket to outlet box in ceiling using the screws and washers provided with the out...

Страница 8: ...ca Fije el dosel al alojamiento del motor con los tres tornillos de montaje al techo y las arandelas de presión que extrajo previamente Aprietelostornillosasegurándolos 6 1 Forflushmountoption raisefanassemblyandplaceontohook 1 frommountingbracketintoaclosedholeonthecanopy Thiswill allowforhandsfreewiring PROCEEDDIRECTLYTOPAGE 12 FOR WIRING OPTIONS Para la opción de montaje al techo levante el mon...

Страница 9: ...keeperpin 2 intocrosspinuntilitsnapsintoplace Tightensetscrews 3 incoupling Slidecoupling cover 4 overthedownrodcoupling PROCEED TO PAGE 11 STEP14 Insertelavarillaverticalenelacoplamientodelavarillavertical Asegúresedequeel agujerodelavarillaverticalyeldelacoplamientodelavarillaverticalesténalineados Instaleelpasadortransversal 1 pasándoloporelacoplamientoylavarillavertical Inserteelpasadordereten...

Страница 10: ...12 Loosen downrod ball 1 from downrod 2 by removing set screw 3 Afloje la bola de la varilla vertical 1 de la varilla vertical 2 quitando el tornillo 3 2 1 2 1 Slidedownrodball 1 offofdownrodandremovepin 2 Deslicelaboladelavarillavertical 1 hastasepararladelavarillavertical yquiteelpasador 2 3 ...

Страница 11: ...osecureballtodownrod Note Someextendeddownrodshaveapre drilled set screwhole Ifapre drilledholeispresentintheextendeddownrod tightenthesetscrewinto thepre drilledholeintheextendeddownrod Ifnopre drilledholeexistsintheextended downrod tightenthesetscrewagainstthedownrodtosecurethedownrodball PROCEED TO PAGE 9 STEP9 Vuelvaainstalarelpasadorenlavarillaverticalmáslargaydeslicelaboladelavarillahastae l...

Страница 12: ... del ventilador vivo Interruptor de la luz vivo Verde de tierra DelVentilador De La Casa conectar conectar conectar conectar Conecte el cable azul sólo si conecta un juego de luces al ventilador Control de pared Siga las instrucciones del diagrama anterior para hacer las conexiones de cableado para el ventilador con control de pared Siga las instrucciones del diagrama anterior para hacer las conex...

Страница 13: ... tornillos del soporte de montaje 3 Eleve el dosel permitiendo que los dos tornillos se deslicen dentro de las ranuras Gire el dosel hasta que ambos tornillos del soporte de montaje caigan dentro de las ranuras Apriete los tornillos asegurándolos Instale los dos tornillos y las arandelas en estrella en los agujeros coincidentes del dosel y ajústelos para asegurar el dosel al soporte de montaje For...

Страница 14: ...aycauseadhesivetomarorpeelthepaintedfinishfromthesurfaceofthecanopy Parainstalarelanillodelacubiertadeldosel quitelaparteposteriordelastirasdecintaadhesivaenelinteriordelanillodelacubierta Desliceelanillodelacubiertahaciala partesuperiordelavarillaverticalyasegúreloaldoselpresionandosuavementelacintaadhesivaparaquesepeguealaparteinferiordeldosel ADVERTENCIA Cuandofijeel anillodelacubiertadeldosela...

Страница 15: ...mblytomotorusingmotorscrewsprovided Tightenscrewssecurely Fijeelconjuntodelasaletasalmotorusandolostornillospara elmotorincluidos Aprietelostornillosasegurándolos Checkthemotorforplasticshippingstabilizertabs 1 andremovethemiftheyarepresent Remove the motor screws from the motor and save for later use Verifiquesihaylengüetasplásticasdeembalajepara sosteneralmotor 1 ydescártelas Quite los tornil lo...

Страница 16: ...e 9 pin molex plug Pase los cables del motor a través del agujero del alojamiento del interruptor y use el conector molex de 9 pines para conectar los cables del alojamiento del interruptor a los cables del motor 23 22 Remove one of the screws on the switch housing plate 1 and loosen do not remove the other two 2 Quite uno de los tornillos de la placa del alojamiento del interruptor 1 y afloje los...

Страница 17: ...tch housing Fije el alojamiento del interruptor 1 a la placa correspondiente 2 colocando las ranuras bocallaves del alojamiento 3 sobre las dos cabezas de los tornillos que sobresalen en la placa del alojamiento 4 Gire el alojamiento del interruptor hasta que las cabezas de los tornillos se enganchen en las ranuras bocallaves Inserte el tornillo que extrajo de la placa del alojamiento del interrup...

Страница 18: ...ousing using three small screws provided Conecte el artefacto luminoso al alojamiento del inter ruptor con los tres tornillos pequeños incluidos LIGHT FIXTURE INSTALLATION INSTALACIÓN DEL ARTEFACTO LUMINOSO NOTE For installation of your ceiling fan without the light kit using the optional switch housing cap follow step 25 If you are installing your ceiling fan with the light kit proceed to step 26...

Страница 19: ...s largas de tiro con las piezas finales correspondientes a las cadenas del ventilador introduciendo el extremo de la cadena larga en la pieza de unión Asegúrese de que las cadenas están bien sujetas tirando ligeramente de ambas cadenas en la pieza de unión 19 ETL ES Xavier II WH20 09 28 Install light bulbs included Instale las bombillas de luz incluidas LIGHT FIXTURE INSTALLATION INSTALACIÓN DEL A...

Страница 20: ...ff the ceiling area as shown in illustration B This allows you to set your heating unit on a lower setting without affecting your comfort NOTE Turn off and wait for fan to stop before changing the setting of the forward reverse slide switch Maintenance 1 Because of the fan s natural movement some connections may become loose Check the support connections brackets and blade attachments twice a year...

Страница 21: ...el aire caliente del área del ventilador de techo como lo indica la ilustración B Esto le permite ajustar la calefacción a un nivel más bajo sin que afecte su comodidad NOTA Apague el ventilador y espere a que se detenga antes de cambiar la dirección de adelante atrás con el conmutador de tipo deslizante Mantenimiento 1 El movimiento natural del ventilador podría hacer que se aflojen algunas conex...

Страница 22: ...heck to make sure all screws in motor housing are snug not over tightened 2 Check to make sure the screws which attach the fan blade holder to the motor are tight 3 Some fan motors are sensitive to signals from Solid State variable speed controls DO NOT USE a Solid State variable speed control 4 Allow break in period of 24 hours Most noises associated with a new fan will disappear after this perio...

Страница 23: ... de que todos los tornillos del alojamiento del motor estén ajustados no los apriete demasiado 2 Compruebe para asegurarse de que los tornillos que fijan el soporte de la aleta del ventilador al motor estén apretados 3 NO USE un control de velocidad variable de estado sólido 4 Permita el rodaje del ventilador durante un período de 24 horas La mayoría de los ruidos asociados con el ventilador nuevo...

Страница 24: ...tact us GARANTÍA Este ventilador deWestinghouse Lighting se ofrece con una garantía limitada de por vida para el propietario original frente a defectos de material y de mano de obra Esta garantía sustituye cualquier otra garantía expresa o implícita Westinghouse Lighting reparará o reemplazará las piezas necesarias y o reemplazará el ventilador de techo si el fallo se debe a defectos de material o...

Страница 25: ...25 ETL ES Xavier II WH20 09 ...

Страница 26: ...ade 4 Fan Speed Switch 5 Light Control Switch 6 Capacitor 7 Hardware Pack No Descripción 1 Soporte de montaje 2 Soporte para aleta 3 Aleta 4 Interruptor de control de velocidad para ventilador 5 Interruptor de control de luz 6 Condensador 7 Tornillería 7 6 4 5 26 ETL ES Xavier II WH20 09 ...

Страница 27: ...27 ETL ES Xavier II WH20 09 ...

Страница 28: ...ting Philadelphia PA 19154 1029 U S A www westinghouselighting com WESTINGHOUSE and INNOVATION YOU CAN BE SURE OF are trademarks of Westinghouse Electric Corporation Used under license by Westinghouse Lighting All rights reserved Made in China ...

Отзывы: