background image


13 

Operating 

Before first Use 

Remove the branch cutter and the accessory from the packaging. Keep 
packaging materials out of reach of small children. There is risk of suffocation!  

Charging the Battery 

Charge the battery before first use.  
The electronics protects the battery from over-charging, over-heating and total 
discharge. There is no loss of charge. The battery is characterised by low self-
discharge. A fully charged battery is always ready for use, even if you do not use 
it for months.  

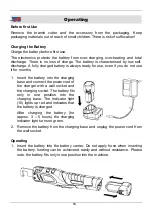
1.  Insert the battery into the charging 

base and connect the power cord of 
the charger with a wall socket and 
the charging socket. The battery fits 
only in one position into the 
charging base. The indicator light 
(10) lights up red and indicates that 
the battery is charged. 
After charging the battery (for 
approx. 3 – 5 hours) the charging 
indicator light turns on green.  

2.  Remove the battery from the charging base and unplug the power cord from 

the wall socket. 

Operating


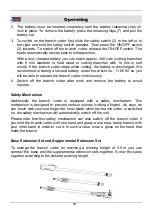
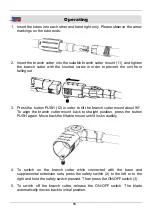
1.  Insert the battery into the battery carrier. Do not apply force when inserting 

the battery. Iserting can be achieveed easily and without resistance. Please 
note, the battery fits only in one position into the machine. 

Содержание M0E-5ET-7.2

Страница 1: ...Westfalia Bedienungsanleitung Nr 108653...

Страница 2: ...Li Ionen Astschere Tosa M0E 5ET 7 2 Artikel Nr 11 06 76 Li Ion Branch Cutter Tosa M0E 5ET 7 2 Article No 11 06 76 Bedienungsanleitung Instruction Manual...

Страница 3: ...it easier for you to handle the unit and help prevent misunderstandings and possible damage or injury Die Astschere zeichnet sich durch lange Laufzeit aus Der Akku kann unabh ngig vom Ladezustand jede...

Страница 4: ...III bersicht Overview 5 6 7 9 3 4 3 2 1 10 8 11 12 2...

Страница 5: ...er Mount optionally available 6 Zusatzverl ngerungsset optional erh ltlich Supplemental Extension Set optionally available 7 Netzteil Power Supply Unit 8 Ersatzakku optional erh ltlich Replacement Bat...

Страница 6: ...ing the Blade Page 16 Maintenance and Cleaning Page 17 Technical Data Page 18 Sicherheitshinweise Seite 2 Vor der ersten Benutzung Seite 4 Laden des Akkus Seite 4 Benutzung Seite 4 Sicherheitsmechanis...

Страница 7: ...n Tragen Sie geeignete Arbeitskleidung Sorgen Sie beim Arbeiten immer f r einen sicheren Stand Bei der Verwendung von Leitern oder Ger sten vergewissern Sie sich dass diese stabil sind und nicht kippe...

Страница 8: ...den auftreten benutzen Sie das Ger t nicht mehr und lassen Sie es durch einen Fachmann instand setzen oder wenden Sie sich an unsere Kundenbetreuung Zerlegen Sie die Astschere nicht und unternehmen Si...

Страница 9: ...Sie den Akku in die Ladestation und verbinden Sie das Netzkabel mit einer Steckdose und der Ladestation Der Akku passt nur in einer Stellung in die Ladestation Die Ladekontrollanzeige 10 beginnt rot z...

Страница 10: ...en 4 Nehmen Sie nach Beendigung der Arbeit den Akku aus der Astschere um Unf lle zu vermeiden Sicherheitsmechanismus Die Astschere ist mit einem zus tzlichen Sicherheitsmechanismus ausgestattet Dieser...

Страница 11: ...hilfe des Drehgelenkes die Astscherenaufnahme um 90 abzuwinkeln Um die Astscherenaufnahme wieder gerade auszurichten dr cken Sie die PUSH Taste erneut Ziehen Sie die Aufnahme wieder zur ck bis diese h...

Страница 12: ...A mit dem beigef gten Inbusschl ssel Entfernen Sie die Abdeckung 2 Entfernen Sie die Schraube B und die Schrauben C Nehmen Sie das Pl ttchen ab Das Messerset 1 besteht aus der Klinge und dem Haken mes...

Страница 13: ...inigen und bei Wartungsarbeiten nehmen Sie immer zuerst den Akku aus dem Ger t Entfernen Sie Schmutz von dem Messer und len Sie nach jeder Reinigung und vor erneuter Benutzung das Messer Ansonsten ben...

Страница 14: ...700 g Abmessungen 340 x 45 x 70 mm Schalldruckpegel 66 dB A Schallleistungspegel 78 dB A Hand Arm Vibration 2 5 m s2 K 1 5 m s2 Steckernetzger t Gewicht 251 g Input 230 V 50 Hz 35 mA Output 12 V 400...

Страница 15: ...10 Technische Daten Ladestation f r 11 06 76 Gewicht 54 g Ladeanzeige Charging Indicator Laden 3 5 Std Charging 3 5 h Voll geladen Fully charged...

Страница 16: ...ng ladder or scaffold make sure the stands are stable and cannot topple over Always keep yourself balanced when units the branch cutter When cleaning maintaining and not in use always remove the batte...

Страница 17: ...ustomer support department Do not disassemble the unit or try repairing it yourself Observe the safety notes and read all chapters of the manual before using the branch cutter Keep hands clear of the...

Страница 18: ...nths 1 Insert the battery into the charging base and connect the power cord of the charger with a wall socket and the charging socket The battery fits only in one position into the charging base The i...

Страница 19: ...ll be able to operate the branch cutter continuously 4 Switch off the branch cutter after work and remove the battery to avoid injuries Safety Mechanism Additionally the branch cutter is equipped with...

Страница 20: ...order to tilt the branch cutter mount about 90 To align the branch cutter mount back to straight position press the button PUSH again Move back the tiltable mount until it locks audibly 4 To switch on...

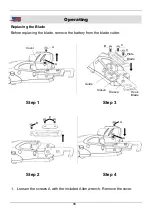
Страница 21: ...Before replacing the blade remove the battery from the blade cutter 1 Loosen the screws A with the included Allen wrench Remove the cover Cover A B C C Plate Blade Hook Blade Sleeve Sleeve Guide A Ste...

Страница 22: ...ther Tighten the screws only hand tight Maintenance and Cleaning When cleaning or maintaining the branch cutter first remove the battery from the unit Oil the blade set after cleaning and before using...

Страница 23: ...ght 700 g Dimensions 340 x 45 x 70 mm Sound Pressure Level 66 dB A Sound Power Level 78 dB A Hand Arm Vibration 2 5 m s2 K 1 5 m s2 Power Supply Unit Weight 251 g Input 230 V 50 Hz 35 mA Output 12 V 4...

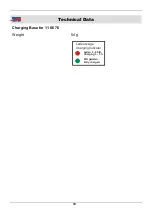
Страница 24: ...19 Technical Data Charging Base for 11 06 76 Weight 54 g Ladeanzeige Charging Indicator Laden 3 5 Std Charging 3 5 h Voll geladen Fully charged...

Страница 25: ...20 Notizen Notes...

Страница 26: ...2004 EN 60745 1 2009 Hagen den 20 Januar 2010 Thomas Klingbeil Qualit tsbeauftragter We the Westfalia Werkzeugcompany Werkzeugstra e 1 D 58093 Hagen declare by our own responsibility that the product...

Страница 27: ...h Internet www westfalia net Kundenbetreuung Customer Services Werter Kunde bitte helfen Sie mit Abfall zu vermeiden Sollten Sie sich einmal von diesem Artikel trennen wollen so bedenken Sie bitte das...

Отзывы: