background image


10 

Operation 

Operation 

1.  First make sure the heat gun is switched off and then connect the power plug 

to a socket. 

2.  Set  the ON/OFF switch (3) from the position 

0

  to step 

I


or 

II

.

  Some smoke 

may be emitted , this does not indicate a problem. 

3.  In setting 

II

  use the buttons (7) and (8) to set the temperature. The 

temperature can be set from 50° to 650° C in steps of 10°  C. The icon  (12) 
flashes until the set temperature is reached.  In Setting I the temperature is 
permanently set to 50° C. 

4.  Use the buttons (9) and (10) to set the airflow. 

5.  Heat up the object to be treated.  If required, switch to a higher or lower 

temperature and direct the nozzle closer to the object. 

6.  Before turning off the heat gun allow it to run for about a minute in setting 

I

 to 

cool it down. 

7.  Always switch off the heat gun after work. Please note that the nozzle is still 

very hot. Do not place the heat gun close to flammable materials. 

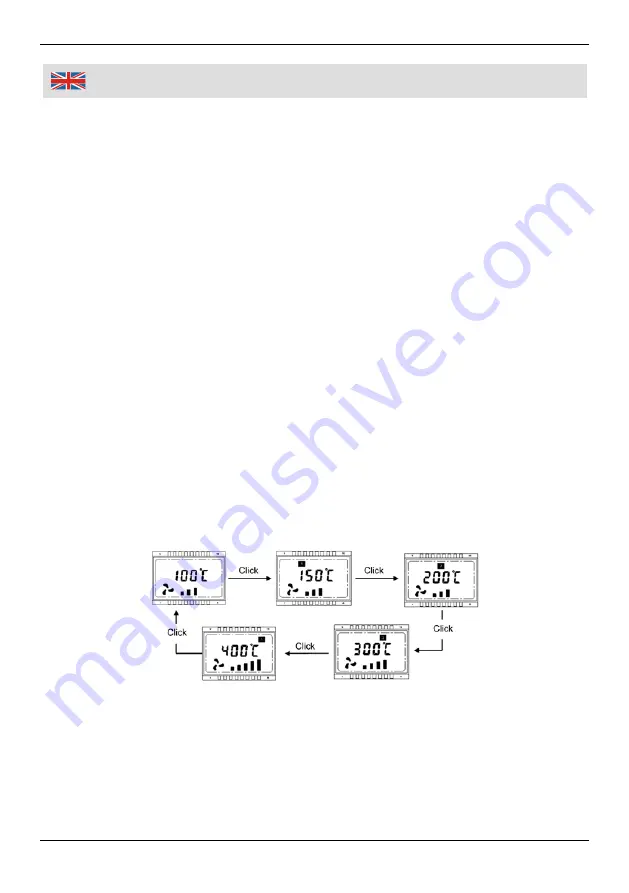
Preset Mode Selection 

For quick selection 4 preset modes are available. Click on the Mode Selection 
Button (6) to cycle through the available modes. The modes preset from the 
factory are shown below. 


Preset Mode Input 

Use the button (6) to select a preset mode and then use the buttons (7), (8), (9), 
and (10) to set temperature and airflow according to your requirements. During 
the process the icon (11) flashes. 


To modify the preset mode with your settings press and hold the Storage  

Содержание 88 34 22

Страница 1: ...Hei luftpistole HPLCD 2000 Artikel Nr 88 34 22 Heat Gun HPLCD 2000 Article No 88 34 22 Originalbedienungsanleitung Original Instruction Manual...

Страница 2: ...nd keep it for future reference Bedienungsanleitungen enthalten wichtige Hinweise f r den Umgang mit Ihrem neuen Produkt Sie erm glichen Ihnen alle Funktionen zu nutzen und sie helfen Ihnen Missverst...

Страница 3: ...III bersicht Overview 1 2 3 4 5 6 7 14 8 4 13 12 11 10 9 15...

Страница 4: ...pf Adjustment Button Temperature 8 Temperatureinstellknopf Adjustment Button Temperature 9 Luftstromeinstellknopf Adjustment Button Airflow 10 Luftstromeinstellknopf Adjustment Button Airflow 11 Symbo...

Страница 5: ...herheitshinweise Seite 2 Einsatzbereich Seite 6 Hinweise Seite 6 Inbetriebnahme Seite 7 Reinigung Seite 8 Technische Daten Seite 8 Safety Notes Page 3 Range of Use Page 9 Hints Page 9 Operation Page 1...

Страница 6: ...e sicher dass sich das Netzkabel nirgendwo verfangen kann Knicken Sie das Netzkabel nicht und wickeln Sie es nicht um das Ger t Seien Sie vorsichtig beim Gebrauch des Ger ts in der N he brennbarer ode...

Страница 7: ...when using the unit near flammable or easy fusible materials such as plastics or glass Do not direct the unit for long time at the same place Never point the running unit to people animals plants flam...

Страница 8: ...tention l utilisation de l appareil en proximit de mat riel inflammables ou facilement fusibles tels que le plastique ou le verre Ne pointez pas l appareil pendant une p riode prolong e au m me endroi...

Страница 9: ...restare attenzione all utilizzo dell apparecchio vicino a materiali infiammabili o facilmente fusibili come plastica o vetro Non puntare l apparecchio per un lungo periodo sulla stesso posto Non punta...

Страница 10: ...ngen Hinweise Beachten Sie dass Lasuren und Grundierfarben auf Holz nicht mit der Hei luftpistole entfernt werden k nnen Testen Sie zuerst eine kleine verdeckte Oberfl che bevor Sie gr ere Fl chen bea...

Страница 11: ...blinkt bis die eingestellte Tempera tur erreicht ist In der Stufe I ist die Temperatur auf 50 C festgesetzt 4 Verwenden Sie die Kn pfe 9 und 10 um den Luftstrom zu regulieren 5 Erw rmen Sie den zu be...

Страница 12: ...Netzstecker und lassen Sie die Hei luftpistole vollst ndig abk hlen Reinigen Sie das Ger t nur mir einen trockenen oder leicht befeuchteten Tuch Verwenden Sie niemals aggressive Chemikalien Halten Si...

Страница 13: ...cannot be removed with the heat gun First test on a small not visible section of the surface before processing a larger area Vapours of paints and plastics are poisonous Always ensure adequate ventil...

Страница 14: ...igher or lower temperature and direct the nozzle closer to the object 6 Before turning off the heat gun allow it to run for about a minute in setting I to cool it down 7 Always switch off the heat gun...

Страница 15: ...tened cloth Never use aggressive chemicals Keep the air slots and the nozzle clean at all time Do not allow liquids to enter the unit and do not immerse the heat gun into liquids of any kind Technical...

Страница 16: ...12 Notizen Notes...

Страница 17: ...ectives and their amendments 2011 65 EU 2011 65 EU Beschr nkung der Verwendung bestimmter gef hrlicher Stoffe in Elektro und Elektronikger ten RoHS Restriction of the Use of certain hazardous Substanc...

Страница 18: ...ch Internet www westfalia net Kundenbetreuung Customer Services Werter Kunde bitte helfen Sie mit Abfall zu vermeiden Sollten Sie sich einmal von diesem Artikel trennen wollen so bedenken Sie bitte d...

Отзывы: