background image


Assembling and Using

Before first Use 

Remove the unit and the accessory out of the packaging. Keep 
packaging materials out of reach of children.  

Assembling and Using 

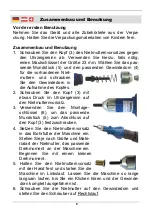
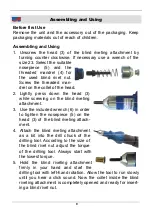
1. Unscrew the head (3) of the blind riveting attachment by 

turning counter clockwise. If necessary use a wrench of the 
size 23. Select the suitable 
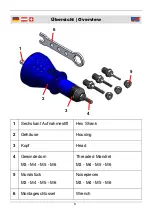
nosepiece (5) and the 
threaded mandrel (4) for 
the used blind rivet nut. 
Screw the threaded man-
drel on the collet of the head. 

2. Lightly press down the head (3) 

while screwing on the blind riveting 
attachment.  

3.  Use the included wrench (6) in order 

to tighten the nosepiece (5) on the 
head  (3) of  the blind riveting attach- 


ment. 

4.  Attach the blind riveting attachment 

as a bit into the drill chuck of the 
drilling tool. According to the size of 
the blind rivet nut adjust the torque 
of the drilling tool. Always start with 
the lowest torque. 

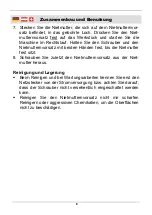
5. Hold the blind riveting attachment 

firmly in your hand and start the 
drilling tool with left-hand rotation. Allow the tool to run slowly 
until you hear a click sound. Now the collet inside the blind 
riveting attachment is completely opened and ready for insert-
ing a blind rivet nut. 

Содержание 81 61 95

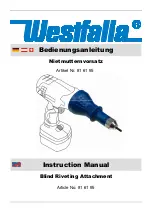
Страница 1: ...Westfalia Bedienungsanleitung Nr 109645 ...

Страница 2: ...Nietmutternvorsatz Artikel Nr 81 61 95 Blind Riveting Attachment Article No 81 61 95 Bedienungsanleitung Instruction Manual ...

Страница 3: ...anual carefully and keep it for future reference Bedienungsanleitungen enthalten wichtige Hinweise für den Umgang mit Ihrem neuen Gerät Sie ermöglichen Ihnen alle Funktionen zu nutzen und sie helfen Ihnen Missverständnisse zu vermeiden und Schäden vorzubeugen Bitte nehmen Sie sich die Zeit diese Bedienungsanleitung in Ruhe durchzulesen und bewahren Sie diese für späteres Nachlesen gut auf Sehr gee...

Страница 4: ...t Aufnahmestift Hex Shank 2 Gehäuse Housing 3 Kopf Head 4 Gewindedorn M3 M4 M5 M6 Threaded Mandrel M3 M4 M5 M6 5 Mundstück M3 M4 M5 M6 Nosepieces M3 M4 M5 M6 6 Montageschlüssel Wrench Übersicht Overview 1 6 5 3 4 2 ...

Страница 5: ...eglichen Teile gelangen Personen mit eingeschränkten physischen sensorischen oder geistigen Fähigkeiten dürfen das Gerät nicht benutzen es sei denn sie werden durch eine Betreuerin einen Betreuer be aufsichtigt und unterwiesen Benutzen Sie den Nietmutternvorsatz nur mit den beiliegen den Mundstücken Falls am Gerät Schäden auftreten benutzen Sie das Gerät nicht mehr und lassen Sie es durch einen Fa...

Страница 6: ...ben Sie den Kopf 3 mit etwas Druck im Uhrzeigersinn auf den Nietmutternvorsatz 3 Verwenden Sie den Montage schlüssel 6 um das passende Mundstück 5 zum Abschluss auf den Kopf 3 festzuschrauben 4 Setzen Sie den Nietmutternvorsatz in das Bohrfutter der Maschine ein Stellen Sie je nach Größe und Mate rialart der Nietmutter das passende Drehmoment an der Maschine ein Beginnen Sie mit einem kleinen Dreh...

Страница 7: ...orsatz mit beiden Händen fest bis die Nietmutter fest sitzt 8 Schrauben Sie zuletzt den Nietmutternvorsatz aus der Niet mutter heraus Reinigung und Lagerung Beim Reinigen und bei Wartungsarbeiten trennen Sie erst den Netzstecker von der Stromversorgung bzw achten Sie darauf dass der Schrauber nicht versehentlich eingeschaltet werden kann Reinigen Sie den Nietmutternvorsatz nicht mir scharfen Reini...

Страница 8: ...mm x 147 mm L Gewicht 257 g Mundstücke M3 M4 M5 M6 mm Sechskant Aufnahme 6 35 mm Empfohlene Antriebsmaschinen Akku Bohrschrauber 12 V 14 4 V 18 V Elektrische und pneumatische Bohr maschinen mit Rechts Linkslauf Minimaler Drehmoment 20 Nm ...

Страница 9: ... clothing or jewellery Tie up hair so hair or clothing cannot get into moving parts Persons with limited physical sensorial or mental abilities are not allowed to use the unit unless they are supervised and briefed for their safety by a qualified person Only use the blind riveting attachment with the included nosepieces Should the unit become damaged do not use it and have it repaired by a profess...

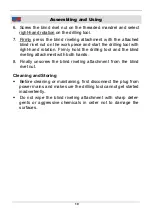
Страница 10: ...head 3 while screwing on the blind riveting attachment 3 Use the included wrench 6 in order to tighten the nosepiece 5 on the head 3 of the blind riveting attach ment 4 Attach the blind riveting attachment as a bit into the drill chuck of the drilling tool According to the size of the blind rivet nut adjust the torque of the drilling tool Always start with the lowest torque 5 Hold the blind riveti...

Страница 11: ... right hand rotation Firmly hold the drilling tool and the blind riveting attachment with both hands 8 Finally unscrew the blind riveting attachment from the blind rivet nut Cleaning and Storing Before cleaning or maintaining first disconnect the plug from power mains and make sure the drilling tool cannot get started inadvertently Do not wipe the blind riveting attachment with sharp deter gents o...

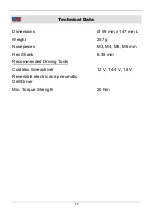
Страница 12: ...mensions Ø 59 mm x 147 mm L Weight 257 g Nosepieces M3 M4 M5 M6 mm Hex Shank 6 35 mm Recommended Driving Tools Cordless Screwdriver 12 V 14 4 V 18 V Reversible electric and pneumatic Drill Driver Min Torque Strength 20 Nm ...

Страница 13: ...and ch Internet www westfalia net Kundenbetreuung Customer Services Werter Kunde bitte helfen Sie mit Abfall zu vermeiden Sollten Sie sich einmal von diesem Artikel trennen wollen so bedenken Sie bitte dass viele seiner Komponenten aus wertvollen Rohstoffen bestehen und wiederverwertet werden können Entsorgen Sie ihn daher nicht in die Mülltonne sondern führen Sie ihn bitte Ihrer Sammelstelle für ...

Отзывы: