Lit. No. 95900/95901, Rev. 00
13
September 1, 2006
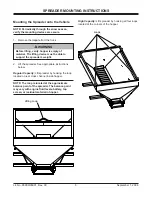
Conveyor
Chain
Rear Edge
of Sill
1" - 3"
20" - 24"
FINAL ADJUSTMENTS
Final Checklist
Drive Chain and Conveyor Chain
Check engine to electric clutch chain tension and
clutch to spinner pulley belt tension. Correct tension
allows 1/4" – 5/16" deflection midway between the
pulleys.
To
increase
spinner belt tension:
Loosen spinner
bearing bolts, and pull shaft assembly away from the
clutch. After correct tension is achieved, retighten the
bearing bolts.
Check the conveyor chain tension. To check the
tension, measure in 20"–24" from the end of the sills.
Push up on the chain with your hand. The conveyor
chain should lift 1"–3" off the conveyor chain guide or
cross angles.
To
increase
chain tension:
Use the two 5/8" x 6"
take-up bolts at the front of the spreader to adjust
conveyor chain tension. Loosen the locknuts before
attempting to adjust the take-up bolts. Turn both bolts
equal amounts to ensure the tension is equally
distributed across both sides of the conveyor chain.
Verify correct engine oil level. (See engine
manufacturers Owner’s Manual.)
Verify the gear case oil level is level with the fill
hole.
Verify correct engine-to-clutch sprocket alignment
and chain tension.
Verify correct gear case output shaft to spinner
shaft alignment.
Verify correct conveyor chain tension.
Verify dielectric grease is applied to all electrical
connections.
Verify wire harnesses are properly secured away
from hot or moving parts.
Verify vehicle harness has sufficient ground
clearance when the spreader is removed from the
truck.
Verify proper choke setting and choke light
operation. See Choke Adjustment Procedure.


