

WD
SATA RAID Controller
Quick Install Guide
Installation Instructions for your
WD SATA RAID Controller
Before Getting Started
This guide is designed to aid in the quick installation of your WD SATA RAID
Controller. If you experience problems following these procedures or need
further information regarding your controller, download the full version WD
SATA RAID Controller User Manual or visit our online knowledge base for
frequently asked questions and other common troubleshooting tips on our
Web site at
support.wdc.com.
Kit Contents
•
WD SATA RAID Controller
•
RAID setup and management software CD
•
SATA RAID Controller drivers diskette
•
Quick Install Guide
•
1-year warranty
Operating Systems
The following operating systems are supported:
•
Windows
®
2003 Server
•
Windows XP
•
Windows 2000
System Requirements
Pentium-class system with an available 32-bit PCI expansion slot (2.2- or
2.3-compliant) or 32-bit portion of a 64-bit PCI slot.
Online Product Registration
Take advantage of various WD offers by registering your SATA RAID
Controller online at:
https://www.wdc.com/en/products/registration
.
WARNING!
Using an operating system not listed below could result
in data loss.
Installing the SATA RAID Controller
If you wish to include your current bootable SATA drive as part of a bootable Mirrored (RAID 1) array on your
WD SATA RAID Controller, you MUST install the Windows 2000, 2003 Server, or XP driver software FIRST onto this drive
while it is still attached to your existing hard drive controller (see step 3 on the reverse side of this poster).
Each WD SATA RAID Controller supports up to two SATA hard drives. For optimal performance, install two identical
SATA drives of the same model and capacity. The drives' matched performance allows the array to function better as a
single drive. If you are striping (RAID 0) for performance, use up to two new SATA drives. If mirroring (RAID 1) for
protection, you can use two new SATA drives OR use an existing SATA drive and a new SATA drive (the new drive must
be the same size or larger than the existing drive).
1.
Power off the computer and unplug the power cord.
2.
Remove the system cover (refer to your system manual for instructions).
3.
Remove the inside slot cover of an available 32-bit PCI slot on the
motherboard.
4.
Install the WD SATA RAID Controller into the open slot. Secure the
bracket to the system's frame (see Figure 1).
5.
Attach your system case's 2- or 4-pin LED cable to the LED connector on
the WD SATA RAID Controller.
6.
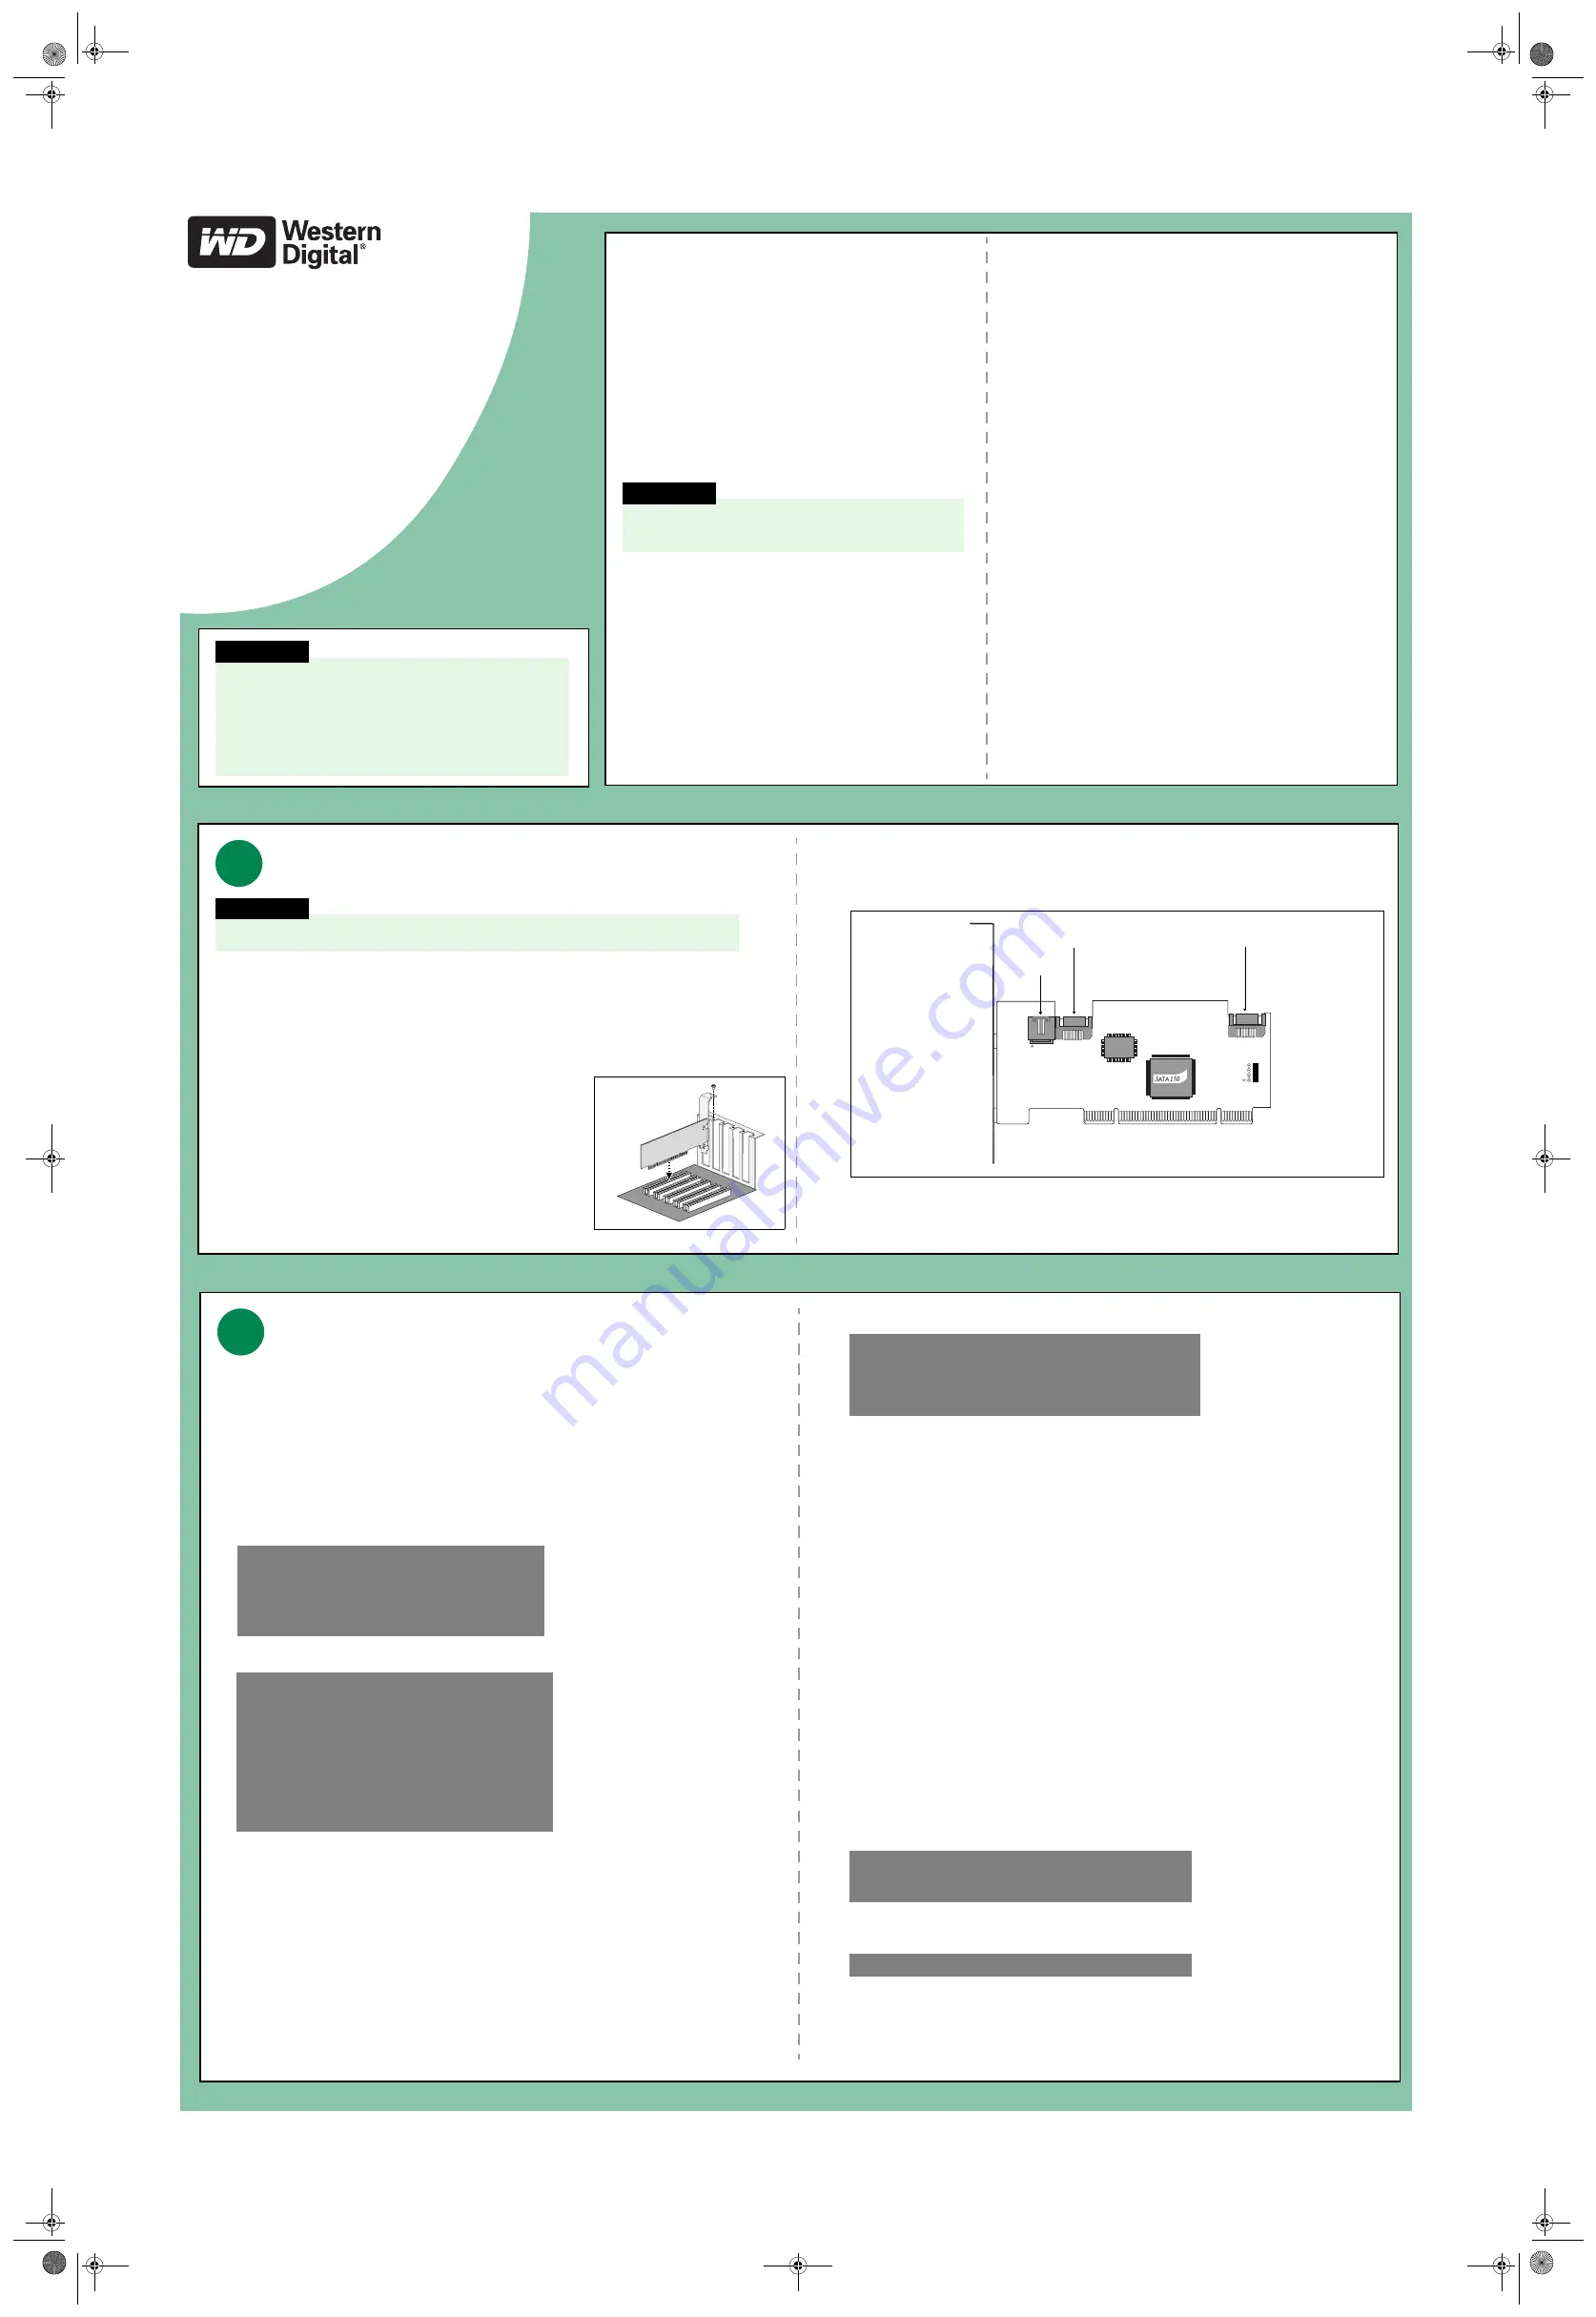
Connect one SATA data cable to each SATA hard drive. Then attach the other end(s) of the cable(s) to the Port 1 or
Port 2 connector(s) on the WD SATA RAID Controller (see Figure 2).
Note:
The WD SATA RAID Controller is a PCI Plug-n-Play (PnP) device. No changes are necessary in the
Motherboard CMOS Setup for resources or drive types in most applications.
Figure 2
1
WARNING!
Before performing any hardware installation, back up your existing data.
Management
connector
Port 2
(Serial)
Port 1
(Serial)
Unpacking and Handling Procedures
WD controller cards are precision instruments and should be handled with care
during unpacking and installation. These devices can be damaged by rough
handling, shock and vibration, or electrostatic discharge (ESD). Be aware of the
following precautions:
•
Do not unpack the controller card until you are ready to install it. Your
controller is packaged in an anti-static bag.
•
Save the original packaging materials and the anti-static bag should you
need to return your controller. Your warranty will be void if your returned
controller is shipped in anything other than the original packaging or WD
approved materials.
•
To avoid ESD problems, ground yourself by touching the metal chassis of the
computer or by wearing a grounding strap before handling the controller.
Articles of clothing generate static electricity. Do not allow clothing to come
in direct contact with the controller.
•
Handle the controller by the sides only. Avoid touching the circuit board
components.
Technical Support
If you need additional information or help during the installation or normal use of
this product, visit our product support Web site at
support.wdc.com
to choose
from the following options:
•
Warranty Services
–Obtain warranty information, warranty status, product
replacement, RMA status, and shipping and packaging information.
•
Downloads Library
–Download diagnostic and installation software and
drivers.
•
Technical Information
–Get product specifications, technical tips, and online
forum.
•
Knowledge Base
–Explore our expert knowledge base and frequently asked
questions (FAQs).
•
Service & Support Options
–Look up available service and support options in
your region.
•
Contact Support
–Contact a support representative by phone or e-mail.
Creating a Disk Array
The WD SATA RAID Controller allows the creation of one or two drives in a striped array, or two drives in a mirrored
array. You can also install a single, non-RAID drive and connect it to the WD SATA RAID Controller.
Use the onboard WD EasyBuild
™
BIOS utility to create a RAID disk array using the attached drives. There are five
different ways to create this array:
•
Single (non-RAID)
•
Performance (RAID 0)
•
Security, using two new SATA hard drives (RAID 1, recommended)
•
Security, using an existing SATA hard drive and a new SATA drive (RAID 1)
•
Security, using Quick Initialization (RAID 1)
Follow the first three steps below prior to executing the steps for each of the different setup options above.
1.
Boot your system. If this is the first time you have booted with the WD SATA RAID Controller and drives installed,
the EasyBuild BIOS will display the following screen.
2.
Press CTRL
+
F
or
CNTL
+
A
(depending on the BIOS screen displayed by your controller)
to enter the EasyBuild
Utility Main Menu.
3.
Begin creating an array as follows:
•
To create a single SATA drive non-RAID array, press 3.
•
To create all other types of RAID arrays, press 1 to display the Auto Setup Options Menu. This is the fastest and
easiest method for creating your first RAID array.
Setting Up a Single SATA Non-RAID Drive
To set up a single SATA non-RAID drive, follow these steps:
1.
Press the ARROW keys to highlight the array number you wish to define, then press ENTER to make your selection.
The
Define Array Definition Menu
appears.
2.
Move to RAID mode and press the SPACEBAR to cycle through array types until it says
Stripe
. Leave
Stripe Block
size and
Gigabyte Boundary
at their default values.
3.
Move to
Drive Assignments
, highlight a drive, and press the SPACEBAR to change one drive to
Y
. Select a drive on
SATA drive channel
1
or
2
.
4.
Press CTRL
+
Y
to save the array information. The
Define Array
menu appears again with the new array defined.
5.
Press the ESC key twice to exit the EasyBuild utility. Your system will reboot automatically. After reboot, the
EasyBuild BIOS will appear showing your newly created array.
Once the drive has been created, format and partition the drive as a new single hard drive. Use a Windows boot disk,
or boot to a Windows 2003 Server, XP, or 2000 operating system CD to partition and format the new drive in
Disk
Management
.
Proceed to section 3 (“Install Software Drivers”) and follow the instructions for WD SATA RAID Controller driver
installation during Windows setup.
Creating an Array for Performance (RAID 0)
To create an array for best performance, follow these steps:
1.
Press the SPACEBAR until
Performance
appears under the
Optimize Array for
section.
2.
Press CTRL
+
Y
to save and create the array.
3.
Follow the directions on-screen to reboot your system.
Once the array has been created, format and partition the array as if it were a new single hard drive. Use a Windows
boot disk, or boot to a Windows 2003 Server, XP, or 2000 operating system CD to partition and format the new array in
Disk Management
.
For bootable drive arrays, go to section 3 (“Install Software Drivers”) and follow the instructions for WD SATA RAID
Controller driver installation during Windows setup.
Creating a Security Array with Two New Drives (RAID 1, recommended)
Under the Security setting, WD SATA RAID Controller permits two drives to be used for a single mirrored array.
NOTE:
When creating a Security array with new drives, a feature called Gigabyte Boundary will automatically be set to
ON.
To create an array for data protection using new hard drives, follow these steps:
1.
Press the SPACEBAR until
Security
appears under the
Optimize Array for
section.
2.
Press CTRL
+
Y
to save your selection.
3.
The window below will appear.
4.
Press N for the
Create Only
option.
5.
A window will appear almost immediately confirming that your Security array has been created. Press any key to
reboot the system.
Once the array has been created, format and partition the array as if it were a new single hard drive. Use a Windows
boot disk, or boot to a Windows 2003 Server, XP, or 2000 operating system CD to partition and format the new array in
Disk Management
.
For bootable drive arrays, go to section 3 (“Install Software Drivers”) and follow the instructions for WD SATA RAID
Controller driver installation during Windows setup.
2
WD SATA RAID Controller
(c)2003 Western Digital Technologies, Inc. All Rights
Reserved
No array defined . . .
Press <Ctrl-F> to enter EasyBuild (tm) Utility
Or press <ESC> key to continue booting the system
EasyBuild(tm) Utility 2.xx (c)2003 Western Digital
Technologies, Inc.
[Main Menu]
Auto Setup . . . . . . . . . . . . [1]
View Drive Assignments . . . . . . [2]
Define Array . . . . . . . . . . . [3]
Delete Array . . . . . . . . . . . [4]
Rebuild Array . . . . . . . . . . [5]
[Keys Available]
Press 1...5 to Select Option [ESC] Exit
WD SATA RAID Controller
(c)2003 Western Digital Technologies, Inc. All Rights Reserved
ID
MODE
SIZE
TRACK-MAPPING
STATUS
1 *
1+0 Stripe
80024M
611/128/32
Functional
Press <Ctrl-F> to enter EasyBuild(tm) Utility...
Do you want the disk image to be duplicated to another or do
quick initialize or create only?
Y - Create and Duplicate
N - Create Only
I - Create and Quick Initialize
Array has been created.
<Press Any Key to Reboot>
IMPORTANT
This WD SATA RAID Controller supports the following
installation configurations: single drive
non-RAID, RAID 1 and RAID 0. When installing a single
SATA hard drive, follow the non-RAID installation
instructions in section 2 below. The single drive install is
not supported in RAID because this setup requires the
simultaneous formatting of two drives.
Figure 1
continued on reverse
SATAcard_Poster2.fm Page 1 Thursday, September 8, 2005 5:17 PM


