Страница 1: ...ns or if parts are damaged or missing DO NOT CONTACT THE STORE please contact Customer Care IMPORTANT Please register this product see the limited warranty on the back cover of this manual before cont...
Страница 2: ...rious injury Read user s m anuall prior to use and foUow all warnings and instructions Do not allow children on or around machine Pedals continue to spin when you stop pedaling Spinning pedals can cau...
Страница 3: ...ical is intended for home use only Do not use the elliptical in a commercial rental or institutional setting Keep the elliptical indoors away from mois ture and dust Do not put the elliptical in a gar...
Страница 4: ...stions after reading this manual please see the front cover of this manual To help us assist you note the product model number and serial number before contacting us The model number and the location...
Страница 5: ...ber is the quantity needed for assembly Note if a part is not in the hardware kit check to see if it has been preassembled M8 Locknut 27 6 M10 Locknut 32 6 M8 Split M8 Washer M10 Washer Washer 8 10 71...
Страница 6: ...arts see page 5 In addition to the included tool s assembly requires the following tools one adjustable wrench one Phillips screwdriver one rubber mallet Assembly may be easier if you have a set of wr...
Страница 7: ...tipping while you complete this step Attach the Front Stabilizer 37 to the Frame 54 with two M8 x 82mm Screws 53 two M8 Split Washers 8 and two M8 Washers 71 Remove the packing material 37 54 53 3 Or...
Страница 8: ...Main Wire 26 Tip Avoid pinching the wires Slide the Upright 9 onto the Frame 54 Attach the Upright 9 with two M8 x 78mm Bolts 38 two M8 Split Washers 8 two M8 Washers 71 and two M8 Locknuts 27 Make su...
Страница 9: ...Pedal Arm 75 with the M10 x 76mm Bolt 30 an M10 Washer 10 and an M10 Locknut 32 Do not overtighten the Bolt the Right Upper Body Leg must pivot freely Repeat this step on the other side of the ellipti...
Страница 10: ...g the wires Attach the Handlebar 4 to the Upright 9 with three M8 x 20mm Screws 7 4 16 7 _ Avoid pinching the wires Slide the Right Upper Body Arm 15 onto the Right Upper Body Leg 80 Attach the Right...
Страница 11: ...alkaline batteries are recommended Do not use old and new batteries together or alkaline standard and rechargeable batter ies together iMPORTANT if the Console has been exposed to cold temperatures al...
Страница 12: ...ss wire into the Console 1 or into the Handlebar 4 Tip Avoid pinching the wires Attach the Console 1 to the Handlebar 4 with four M4 x 16mm Screws 2 12 Avoid pinching the wires 13 Make sure that all p...
Страница 13: ...rear stabilizer until the rocking motion is eliminated HOW TO EXERCISE ON THE ELLiPTiCAL To mount the elliptical hold the handlebars or the upper body arms and step onto the pedal that is in the lower...
Страница 14: ...ay will turn on for a moment the console will then be ready for use 2 Select the manual mode When you turn on the console the manual mode will be selected If you have selected a workout rese lect the...
Страница 15: ...mode again press the Display button repeatedly until an indicator appears below the word SCAN To reset the display press the On Reset button To pause the console stop pedaling When the console is paus...
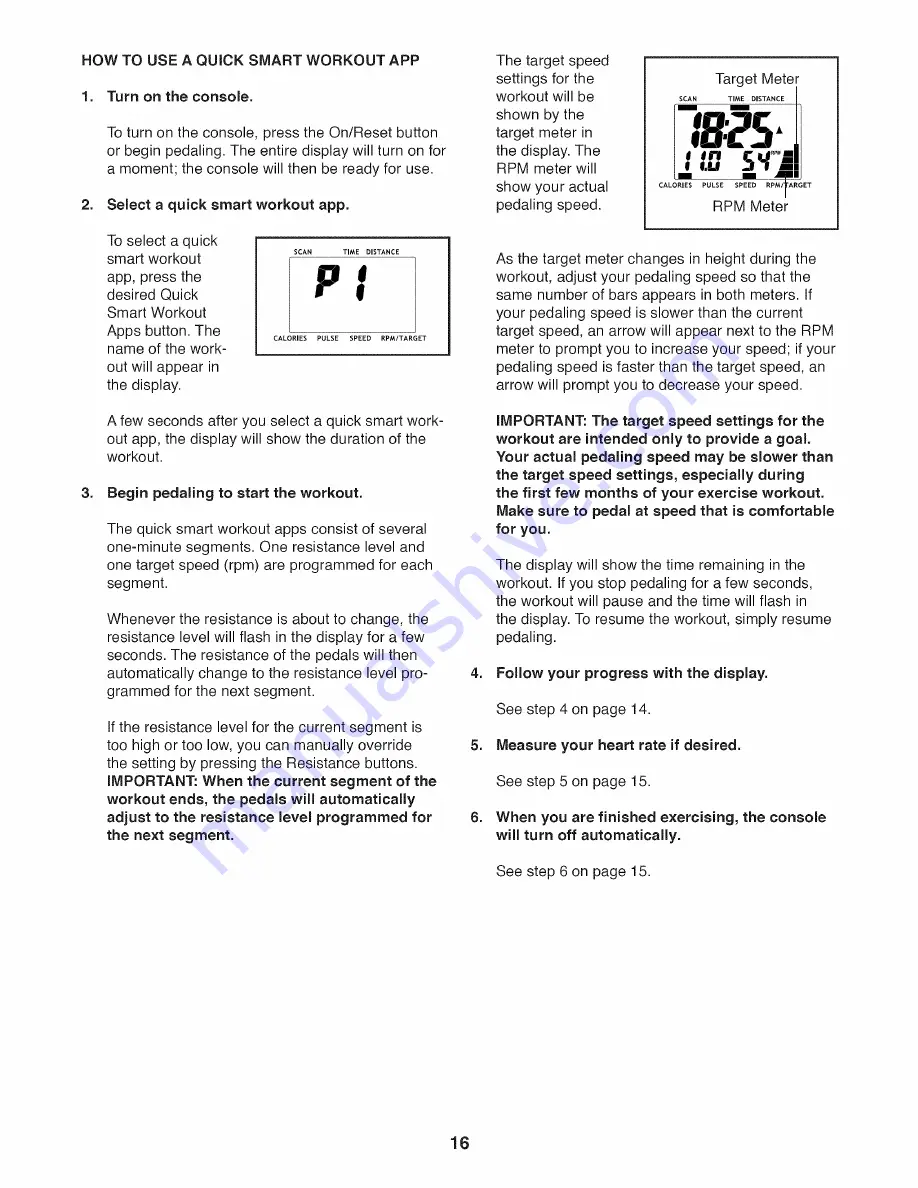
Страница 16: ...nds the pedals will automatically adjust to the resistance level programmed for the next segment The target speed settings for the workout will be shown by the target meter in the display The RPM mete...
Страница 17: ...nt Repeat these actions until the console displays correct feedback When the reed switch is correctly adjusted reattach the shields and the lower upright cover FCC INFORMATION This equipment has been...
Страница 18: ...energy If your goal is to burn fat adjust the intensity of your exercise until your heart rate is near the lowest number in your training zone For maximum fat burning exercise with your heart rate ne...
Страница 19: ...les Stretch With one leg in front of the other reach forward and place your hands against a wall Keep your back leg straight and your back foot flat on the floor Bend your front leg lean forward and m...
Страница 20: ...er M8 x 78mm Bolt M10 x 45mm Bolt Left Pedal Left Pedal Arm M8 x 20mm Left threaded Screw Crank Cover Crank Disc Key No 45 46 47 48 49 5O 51 52 53 54 55 56 57 58 59 6O 61 62 63 64 65 66 67 68 69 70 71...
Страница 21: ...Leg Cover 96 1 M10 x 14mm Washer 92 1 Flywheel Axle Grease Packet 93 6 M4 x 20mm Screw Assembly Tool 94 1 Tension Spring User s Manual Note Specifications are subject to change without notice For info...
Страница 22: ...22 7 L 3 42 2O 93 L 84 18 89 9O 41 3O 45 9O 93 35 77 10 91 93 71 8 45 17 7 87 45 45 16 14_ 79_ 89 88 18 m X U r 0 m m Z 7 o Q D Z o F m r co r o r o r o o oo r o...
Страница 23: ...t_ 43 46 53 I I 71 45 52 71 45 48 54 26 56 73 70 74 45 68 45 45 50 11 63 53 45 57 58 36 96 32 44 m X U F 0 m m Z W o Z o ITI r r o o o0...
Страница 24: ...me service the customer will be responsible for a minimal trip charge This warranty does not extend to freight damage to the product This warranty will automatically be voided if the product is used a...