background image

8

Inspect and properly tighten all parts of the exercise
cycle regularly. Replace any worn parts immediately. 

To clean the exercise cycle, use a soft, damp cloth.

Never use abrasives or solvents.

To avoid damage

to the console, keep liquid away from the console and
keep the console out of direct sunlight. 

When storing the exercise cycle, remove the batteries
from the console and keep the exercise cycle away
from moisture and dust.

TIGHTENING THE PEDALS

For best performance, regularly tighten the pedals.

CONSOLE TROUBLESHOOTING

If the console does not function properly, the batteries
should be replaced. See assembly step 5 on page 6
for battery installation instructions. Make sure that the
extension wire is plugged fully into the console. 

MAINTENANCE 

HOW TO OPERATE THE CONSOLE

1. Turn on the console.

To turn on the console, press the console button or
simply begin pedalling.   

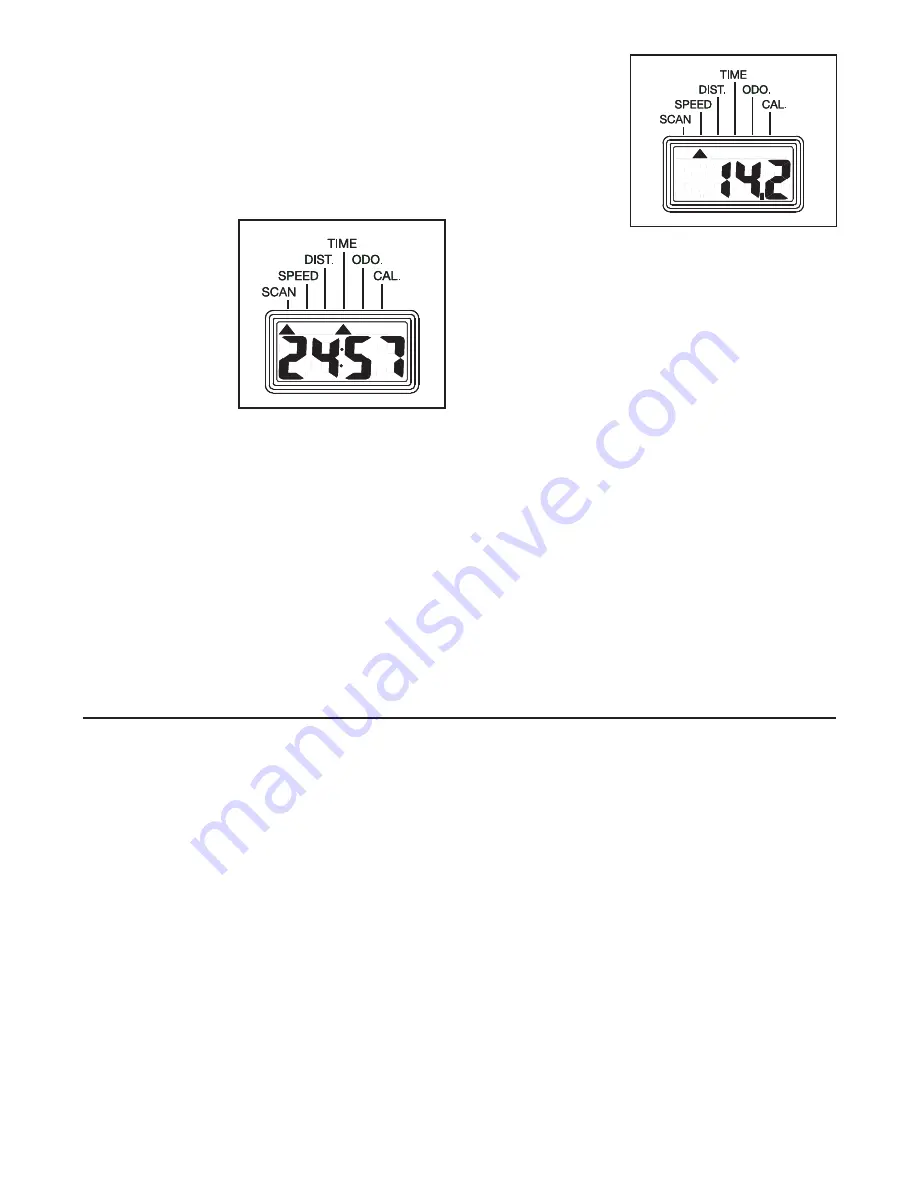
2. Select one of the five modes:

Scan mode—

When the con-
sole is turned on,
the scan mode
will be selected.
The SCAN indi-
cator will show
that the scan
mode is select-
ed, and a sec-
ond mode indica-
tor will show
which mode is currently displayed. Note: If you
have selected a different mode, you can reselect
the scan mode by repeatedly pressing the console
button until the SCAN indicator reappears.

Time, speed,
distance, or
calorie mode—

To select one of
these modes for
continuous dis-
play, press the
console button
repeatedly until
the desired mode
indicator appears.
Make sure that the SCAN indicator does not
appear.   

Note: To reset the display, press the console button
for a few seconds. After the display is reset, the
scan mode will be selected.

3. Turn off the console.

To turn off the console, simply wait for a few min-
utes. The console has an auto-off feature. If the
pedals are not moved and the console button is not
pressed for a few minutes, the power will turn off
automatically to conserve the batteries.

Содержание sport 25

Страница 1: ..._ Serial Number Decal QUESTIONS As a manufacturer we are com mitted to providing complete customer satisfaction If you have questions or if there are missing parts please call Or write ICON Health Fitness Ltd Customer Service Department Unit 4 Revie Road Industrial Estate Revie Road Beeston Leeds LS118JG UK email csuk iconeurope com 08457 089 009 USER S MANUAL Vinyl fully weeded Granite ABS or HIP...

Страница 2: ...T PARTS Back Cover WESLO is a registered trademark of ICON IP Inc nyl fully weeded ranite BS or HIPS Plastic mil vinyl backed with adhesive and fully weeded MS 485 Red Sport 25 MS 429 Grey Weslo 5 x 3 28 lk screen upon approval Vinyl fully weeded Granite ABS or HIPS Plastic 4mil vinyl backed with adhesive and fully weeded PMS 485 Red Sport 25 PMS 429 Grey Weslo 6 5 x 3 28 Silk screen upon approval...

Страница 3: ...et away from moving parts 10 When adjusting the seat make sure that the shaft of the seat knob is inserted into one of the holes in the seat post see HOW TO ADJUST THE SEAT on page 7 Do not insert the seat knob under the seat post 11 If you feel faint dizzy or short of breath whilst exercising stop immediately and begin cooling down 12 The warning decal shown below is found on the exercise cycle i...

Страница 4: ...after reading this manual please call our Customer Service Department at 08457 089 009 To help us assist you please note the product model number and serial number before calling The model number is WLEVEX09940 The serial number can be found on a decal attached to the exercise cycle see the front cover of this manual for the location Before reading further please familiarise yourself with the part...

Страница 5: ... the tip of the console cable B into the wire clip inside of the metal bracket See inset drawing B Firmly pull the console cable B and slide it into the metal bracket A on the Lower Cable 14 as shown See inset drawing C Using pliers squeeze the prongs on the upper end of the metal bracket A together Carefully push the excess wire and cable down into the Frame 1 and insert the Upright 19 into the F...

Страница 6: ... Handlebar 24 to the bracket on the Upright 19 with two 5 16 x 35mm Carriage Bolts 23 and two 5 16 Nylon Locknuts 9 5 The Console 26 requires two 1 5V AA batteries Alkaline batteries are recommended Locate the bat tery door on the back of the Console Press the tab on the battery door and remove the battery door Insert the batteries into the battery holder inside of the Console Reattach the battery...

Страница 7: ...r battery installation instruc tions DESCRIPTION OF THE CONSOLE Note If there is a sheet of clear plastic on the console display remove the plastic The console features six modes that provide instant exercise feedback whilst you exercise Scan This mode displays the speed distance time odometer and calories modes for a few seconds each in a repeating cycle Speed This mode displays your pedalling sp...

Страница 8: ...ole button or simply begin pedalling 2 Select one of the five modes Scan mode When the con sole is turned on the scan mode will be selected The SCAN indi cator will show that the scan mode is select ed and a sec ond mode indica tor will show which mode is currently displayed Note If you have selected a different mode you can reselect the scan mode by repeatedly pressing the console button until th...

Страница 9: ... time This increases the demand on the heart to pump blood to the muscles and on the lungs to oxygenate the blood For aerobic exercise adjust the intensity of your exercise until your heart rate is near the highest number in your training zone as you exercise HOW TO MEASURE YOUR HEART RATE To measure your heart rate stop exercising and place two fingers on your wrist as shown Take a six second hea...

Страница 10: ...on Locknut 16 1 Extension Wire 17 1 Reed Switch Wire 18 1 M10 x 40mm Bolt 19 1 Upright 20 3 M5 x 15mm Screw 21 2 Handlebar Foam 22 2 Handlebar Endcap 23 2 5 16 x 35mm Carriage Bolt 24 1 Handlebar 25 1 16 5mm Spacer 26 1 Console 27 1 M5 x 12mm Screw 28 4 M8 x 20mm Button Screw 29 1 M8 Nylon Locknut 30 1 Console Mount 31 1 Idler Bracket 32 1 Seat 33 1 Seat Post 34 2 Side Shield Cover 35 1 Frame Bush...

Страница 11: ...22 22 21 23 45 45 45 20 40 43 15 43 15 32 33 34 34 35 11 36 17 20 6 37 28 6 37 28 28 6 37 37 6 7 3 17 16 13 14 5 3 38 8 12 39 41 2 7 44 49 51 50 49 51 48 7 7 3 2 3 5 1 42 18 47 25 52 46 29 31 38 EXPLODED DRAWING Model No WLEVEX09940 R0904A ...

Страница 12: ...evie Road Industrial Estate Revie Road Beeston Leeds LS118JG UK Tel Outside the UK 0 444 113 387 7133 Fax 0 444 113 387 7125 When ordering parts please be prepared to give the following information the MODEL NUMBER of the product WLEVEX09940 the NAME of the product WESLO SPORT 25 exercise cycle the SERIAL NUMBER of the product see the front cover of this manual the KEY NUMBER and DESCRIPTION of th...

Отзывы: