12
OPERATION
CONNECTING TO POWER SUPPLY
NOTE:
For safety reasons, this product is equipped with a short power cord. Do not connect the electric tiller directly
to a power supply using this power cord. A proper extension cord is required for operation. Observe the technical
requirements for this product when purchasing an extension cord.
WARNING!
For your safety, it is required that the extension cord be rated for outdoor use, with all sockets
protected against water slash. Always use a residual-current device (RCD) or residual-current circuit breaker
(RCCB) protected power supply.
WARNING!
Check the voltage to ensure it complies with the information on the rating label.
CONNECTING THE EXTENSION CORD
1. Make sure that the power is OFF.
2. Select the correct extension cord using the chart on p. 6.
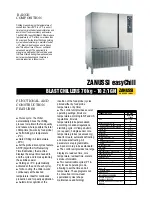
3. Make a knot with the power and extension cords (Fig. 6).
Secure the connection.
POWERING ON & OFF
WARNING!
Rotating tines may cause serious injury.
The tines will continue to turn for a few seconds after the
tool has been switched OFF. Do not touch the rotating
tines. Contact with hot components (i.e. motor housing,
gear box, etc.) on the machine may cause burns. Allow
the machine to cool before handling.
1. Connect the tiller to a working 120V outlet using a heavy-
duty, outdoor rated extension cord.
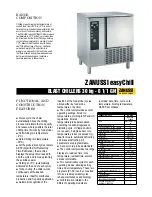
2. To turn the tool ON, push and hold the safety lock button
(Fig. 7 - 1) with your thumb and then squeeze the trigger
switch (Fig. 7 - 2) with your fingers. Once the tool is run-
ning, release the safety lock button.
3. To switch OFF, release the trigger switch (Fig. 7 - 2).
TILLING
1. Move tiller to desired work area prior to starting motor.
2. Pull the wheel support bracket release pin (Fig. 8 - 1),
then swing the wheel bracket up and out of the way. Release
the pin, and make sure it clicks into place in the upper hole
in the wheel support bracket. Wiggle the bracket to be sure
it is securely locked in place before beginning to till.
Tilling instructions continue on the next page.
Fig. 8
Fig. 7
2
1
Fig. 6
Extension
Cord
Appliance
Cord
1
Содержание TC1014
Страница 17: ...17 EXPLODED VIEW PARTS LIST ...