Weltevree Rabat Shelving low Скачать руководство пользователя страница 10

Stap 7

Plaats nu de losse plank in de 

gewenste positie. 

Step 7

Now place the loose plank in the 

desired position.

Schritt 7

Legen Sie nun die losen 

Regalböden in die gewünschte 

Position.

Stap 6

Plaats het achterpaneel aan 

de achterzijde van de kast en 

zet dit vast met de M6 x 12 mm 

bouten en de borgmoeren.

Als de gaten niet uitlijnen draai 

dan de andere boutjes weer 

iets los zodat er meer speling 

ontstaat. 

Step 6

Place the back panel on the 

back of the cabinet and secure 

it with the M6 x 12mm bolts and 

locknuts.

If the holes do not align, loosen 

the other bolts slightly so that 

there is more leeway. 

Schritt 6

Setzen Sie die Rückwand auf 

die Rückseite des Regals und 

befestigen Sie sie mit den 

Schrauben M6 x 12 mm und 

den Kontermuttern.

Wenn die Löcher nicht 

ausgerichtet sind, lösen 

Sie die anderen Schrauben 

leicht, damit mehr Spielraum 

entsteht.

4x

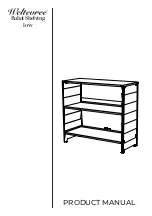
Содержание Rabat Shelving low

Страница 1: ...PRODUCT MANUAL RabatShelving low...

Страница 2: ...s warranty and mainte nance The inspiration for the Rabat Shelving comes from the iconic over lapping wood of sheds and houses in Sweden This architectural technique is turned around creating a functi...

Страница 3: ...of een borstel die niet schuurt Gebruik lauw water of een milde zeep oplossing Spoel de Rabat Shelving af met schoon water To prolong the life of the Rabat Shelving a treatment with wood oil is recomm...

Страница 4: ...ANUAL PRODUCT MANUAL RabatShelving low 10 Benodigdheden 2 Personen steeksleutel 10 Handleiding Necessities 2 Persons open ended spanner 10 Manual Voraussetzungen 2 Personen 10er Maulschl ssel Anleitun...

Страница 5: ...gbolkopflensschroef Hexagon socket button head screw with flange Innensechskantschrauben 4x M6 x 20 mm Laagbolkopflensschroef Hexagon socket button head screw with flange Innensechskantschrauben Onder...

Страница 6: ...Linke Seitenwand 1x Achterplaat Back panel R ckwand 1x Rechter zijpaneel right side panel Rechte Seitenwand 1x Bovenkant Top Oberseite des Schranks 1x Onderste plank Bottom shelf Unterer Regalboden 1...

Страница 7: ...ten aan voor en achterzijde Shelf with holes on the front and back Regalboden mit L chern vorne und hinten Stap 1 Om de levensduur van de Rabat Shelving te verlengen is een behandeling met houtolie vo...

Страница 8: ...fasten it together with the sleeve nuts and the M6 x 20 mm bolts Schritt 4 Legen Sie die Oberseite des Schranks ber die Seitenw nde Legen Sie den Montagestreifen auf die Innenseite der Seitenw ndeund...

Страница 9: ...t behulp van de M6 x 12 mm bouten en de borgmoeren Step 5 Further secure the top and bottom shelf at the front using the M6 x 12mm bolts and the lock nuts Schritt 5 Befestigen Sie den obere und un ter...

Страница 10: ...tlijnen draai dan de andere boutjes weer iets los zodat er meer speling ontstaat Step 6 Place the back panel on the back of the cabinet and secure it with the M6 x 12mm bolts and locknuts If the holes...

Страница 11: ...e poten Step 8 Fix the cabinet to the wall using the holes in the back of the cabinet or fix it to the floor through the holes at the bottom of the legs Schritt 8 Befestigen Sie den Schrank mit den L...

Страница 12: ...aan het product wanneer a de schade een gevolg is van normale slijtage b de schade een gevolg is van onjuist gebruik c er geen of onjuist onderhoud is uitgevoerd d er wijzigingen of reparaties door d...

Отзывы: