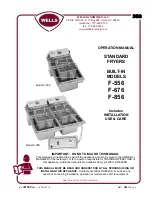
Wells F-556 Скачать руководство пользователя страница 8

OPERATION 

NORMAL OPERATION  

 
1.  a.  Be sure the TEMPERATURE CONTROL KNOB is turned to 


OFF.


b.  Lower the ELEMENT HEAD into the frypot by pushing back on 

  the 

BASKET 

SUPPORT 

ROD, 

raising the ELEMENT HEAD  


SUPPORT ROD, then carefully lowering the elements.  

 
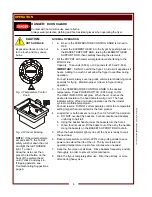
2.  Fill the FRYPOT with commercial-grade liquid shortening to the  
 

MIN OIL line. 


Capacity:  15 pounds (F-556), or 30 pounds (F-676 and F-856). 


IMPORTANT:

  DO NOT overfill the frypot.  Cold oil will expand as it 


heats.  Adding too much oil will allow the frypot to overflow during 

 operation. 


For best results, always use top grade commercial shortening made 


specially for frying.  Maintain proper oil level in frypot during           

 operation. 

  
3.  Turn the TEMPERATURE CONTROL KNOB to the desired 
 

temperature.  Press POWER SWITCH (F-856 only) to ON.          


The HEAT INDICATOR will glow.  When the oil   reaches the       


desired temperature, the heat indicator will go out.  The heat  


indicator will go off and on during operation as the thermostat 


cycles to maintain temperature. 


For best results:  DO NOT set temperature control to a temperature 


setting higher than is required for the food product. 

 
4.  Load either or both baskets no more than 1/2 full with food product. 
 

a.  DO NOT overload fry baskets.  For best results, load baskets 


uniformly to half full. 


b.  Using the basket handle, lower the baskets into the hot oil. 


c.  When food is cooked, lift the basket out of the oil by the handle.  


Hang the baskets on the BASKET SUPPORT ROD to drain. 

 
5.  When the heat indicator light cycles off, the fryer is ready to cook 
 

the next load. 

 
6.  Reduce temperature control to 225ºF during idle periods to save 
 

power and extend the life of the oil.  The fryer will return to            


operating temperature in just a few minutes when needed. 

 
7.  Keep the fryer clean at all times.  Rinse baskets frequently, and dry 
 

thoroughly, in order to prevent oil contamination.  

 
8.  Drain the frypot completely after use.  Filter the oil daily, or more  
 

often during heavy use. 
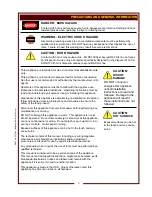
DANGER:  

BURN HAZARD


Contact with hot oil will cause severe burns. 
Always wear protective clothing and heat resistant gloves when operating the fryer. 

CAUTION: 

HOT SURFACE 
 

Exposed surfaces can be hot 
to the touch and may cause 
burns. 


Fig. 3  Temperature Control     
           Knob 

Fig. 4  Oil Level Marking 
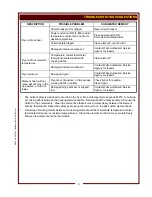
 
NOTE:  

If the oil temperature 

exceeds 440ºF, the hi-limit 
safety will shut down the unit, 
and light the red T

ROUBLE 

light.  To reset: 
Allow the oil to cool, then 
press the red button on the 
back of the element head  
until it “clicks” and stays in. 
If tripping persists, see    
Troubleshooting Suggestions, 
page 9. 

M

303 p/n 30

7590 

 OpM

anual Built-In

 Std Fr

yer 

Содержание F-556

Страница 1: ...urant or to the person responsible for TRAINING OPERATORS of this appliance Additional manuals are available from your WELLS DEALER THIS MANUAL MUST BE READ AND UNDERSTOOD BY ALL PERSONS USING OR INST...

Страница 2: ...elivery person 2 FILE CLAIM FOR DAMAGE IMMEDIATELY Regardless of the extent of the damage 3 CONCEALED LOSS OR DAMAGE if damage is unnoticed until the merchandise is unpacked notify the transportation...

Страница 3: ...ong economical service life This manual contains the information needed to properly install this appliance and to use and care for the appliance in a manner which will ensure its optimum performance T...

Страница 4: ...Controls F 856 Shown Others are Similar Except as Noted M303 p n 307590 OpManual Built In Std Fryer FRYPOT FRYPOT HANDLES FRY BASKET CONTROL PANEL F856 ONLY POWER SWITCH F 856 ONLY ELEMENT HEAD SUPPO...

Страница 5: ...must be performed by a qualified technician This manual is considered to be a permanent part of the appliance This manual and all supplied instructions diagrams schematics parts breakdown illustratio...

Страница 6: ...ryer c Refer to the Installation Instructions for Underwriters Laboratories Conditions of Acceptability Mounting the fryer a Verify that provided sealants are applied to the under side of the fryer to...

Страница 7: ...ed to the wrong voltage or phase is NOT covered by warranty FRYER ELECTRICAL INSTALLATION Fryers must be connected directly to an appropriately sized electric circuit Conduit and strain relief must be...

Страница 8: ...OT overload fry baskets For best results load baskets uniformly to half full b Using the basket handle lower the baskets into the hot oil c When food is cooked lift the basket out of the oil by the ha...

Страница 9: ...all exterior surfaces free from splashed grease by wiping with a clean cloth dampened with warm water and mild detergent A non abrasive detergent and plastic scouring pad may be used for stubborn depo...

Страница 10: ...low the oil to cool to a safe temperature 120 F or 50 C 3 Raise the element head and lift the frypot out of the fryer by the frypot handles 4 Dispose of the used oil in an approved oil disposal recept...

Страница 11: ...s Element head will not raise will not stay in the up position or will not lower Frypot out of position or has excess cooking debris in bottom Check frypot for position Clean frypot Damaged hinge brac...

Страница 12: ...FF Allow the mixture to set in the frypot overnight After the soak period raise the elements and remove any remaining carbonization with a stiff bristle brush Be careful that the capillary tubes of th...

Страница 13: ...IAL NO _______________ VOLTAGE 208 240 1 3 11 M303 p n 307590 OpManual Built In Std Fryer DESCRIPTION PART NO FRY BASKET HALF SIZE 20161 FRY BASKET FULL SIZE 20162 FRYPOT 20169 CRUMB CRADLE 20690 COVE...

Страница 14: ...ION CUSTOMER SATISFACTION Commercial Food Equipment Service Association Wells Bloomfield proudly supports CFESA Commercial Food Equipment Service Association PRINTED IN UNITED STATES OF AMERICA WELLS...

Отзывы: