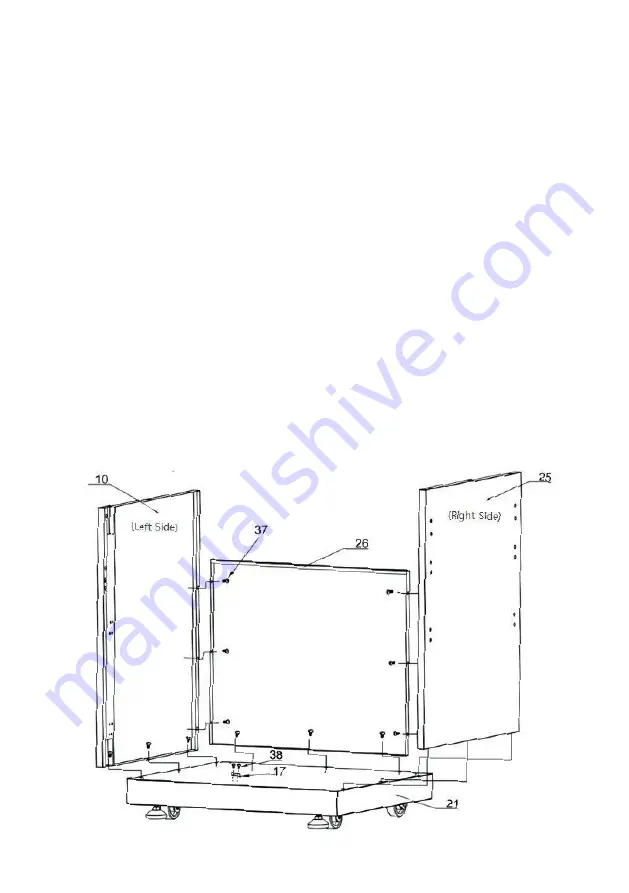
Schritt 2
1. Befestigen Sie die Anschlagplatte (Teilenr. 17) mithilfe von 2 Kreuzschlitz-
Rändelschrauben (Teilenr. 38) an Teil Nr. 21;
2. Schrauben Sie die linke Seitenwand (Teilenr. 10) mithilfe von 3 flachen
¼“-Kreuzschlitzschrauben (Teilenr. 37) an das Teil 21;
3. Schrauben Sie die rechte Seitenwand (Teilenr. 25) mithilfe von 3 Schrau-
ben (Teilenr. 37) an das Teil 21;
4. Schrauben Sie die Rückwand (Teilenr. 26) mithilfe von 8 Schrauben (Teil-
enr. 37) an die Teile 21, 10 und 25;
5. Stellen Sie sicher, dass die Teile glatt verschraubt sind. Ziehen Sie die
Schrauben erst stark an, wenn alle Teile ausgerichtet sind
Содержание WB00377
Страница 4: ...EN Parts Explosive Pictures...
Страница 7: ...Product Dimension...
Страница 11: ...Step 4 1 Make sure all the connections are smooth and the design is looking like below picture...
Страница 18: ...EN Detailed Installation Pictures for Door hinge is shown below...
Страница 24: ...DE Teile Explosionszeichnung...
Страница 27: ...Produktma e...
Страница 38: ...DE Detaillierte Bilder f r die Installation des T rscharniers finden Sie weiter unten...
Страница 44: ...FR Images sur l explosibilit des pi ces...
Страница 47: ...Dimension du produit...
Страница 51: ...tape 4 1 1 S assurer que toutes les connexions sont souples et que le design res semble l image ci dessous...
Страница 58: ...FR Les images d taill es de l installation pour la charni re de porte sont pr sent es ci dessous...
Страница 64: ...HU Alkatr szek robbantott br i...
Страница 67: ...Term km retek...
Страница 78: ...HU Az ajt p nt r szletes szerel si k pei az al bbiakban l that k...
Страница 84: ...RO Imagini detaliate cu piesele...
Страница 87: ...Dimensiunea produsului...
Страница 98: ...RO Ilustra iile detaliate privind montarea balamalei u ii sunt prezentate mai jos...
Страница 102: ......
Страница 103: ......
Страница 104: ......


