background image

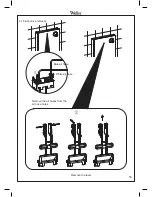
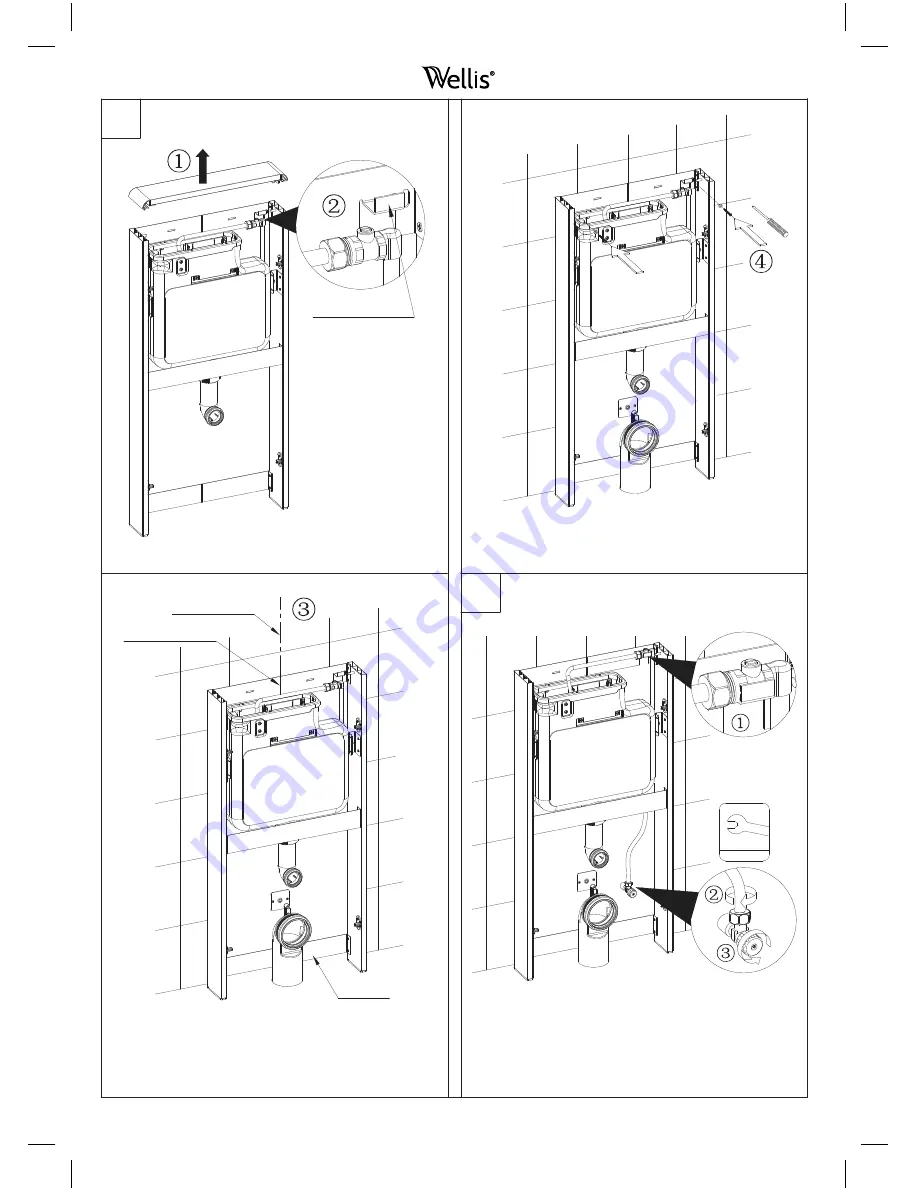
Open the cistern top 

cover, pull and 

separate the hose 

from the hook. 

hook on the 

back plate

4

23mm

8

Bottom frame

3

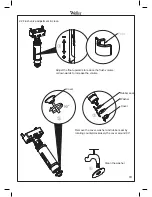
Fix the screws(big)into the 

expansion nuts tightenly.

Center line on the top frame

Wall center line

Snap the hose into the hook, then connect the 

hose into the valve.

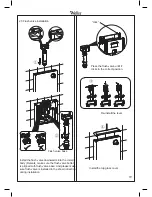
Cistern frame tightly lean to the 

wall, make sure that the cistern 

frame center line and wall center 

line should be coincide/align. 

Содержание Corsica

Страница 1: ...RUCTION Guide Corsica bodenst ndiger sp lkasten f r bodenst ndige Toiletten BEDIENUNGSANLEITUNG R servoir de toilette pos e au sol de Corsica Pour les toilettes pos es au sol MODE D EMPLOI Corsica ll...

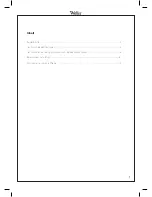
Страница 2: ...1 2 4 5 6 14 Content Accessories List Technical Specifications Technical drawing inlet valve flush valve connection Cistern installation Maintenance daily care...

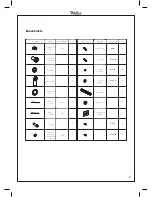
Страница 3: ...air hose blue air hose flush pipe rubber seal on above pipe flush pipe straight flush pipe rubber seal 1 1 1 1 1 1 1 1 110 60 white blue 2 Accessories List 1 drainage pipe expansion nut washer small 2...

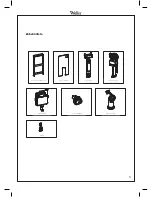
Страница 4: ...3 Aluminum frame Gass panel e v l a v t e l n I e v l a v h s u l F Push button lever Accessories list Drainage pipe Cistern...

Страница 5: ...Name Model Ambient temperature water supply pressure water supply temperature Dimension Technical Specitication 3 40 C 4 35 C 1003 5mm X 483mm X 108mm 0 07 0 75MPa CJ805F J518 Pneumatic cabinet ciste...

Страница 6: ...5 Technical drawing inlet valve flush valve connection 483 1003 5 98 5 98 8 108 180 355 160 130 30 0 5 0 0 2 52 90 180 355...

Страница 7: ...ed holes wall center line floor center line 24 As picture shows based on the center point of the floor drainage hole draw the floor center line and wall center line Then mark four install points on th...

Страница 8: ...the lenghth H1 between floor and drainage pipe center points Cut the extra A length of the pipe as above shows Apply glass glue on the drainage pipe bottom outside ring as shows Insert back the draina...

Страница 9: ...om frame 3 Fix the screws big into the expansion nuts tightenly Center line on the top frame Wall center line Snap the hose into the hook then connect the hose into the valve Cistern frame tightly lea...

Страница 10: ...ee whether it works and water runs into cistern tank 9 Screw the nut and washer onto the botls until they are around in the middle of bolt Screw the bolts onto the square plate Fix the drainage pipe o...

Страница 11: ...e Install the push button frame and button onto the glass Insert the two plugs into the positions as shown Install the panel make sure the glass panel close to the alumunium frame then push down the p...

Страница 12: ...t air hoses to the correct positions Blue air hose White air hose Half flush mark Full flush mark Install the cistern top cover Hook on the cover Fastener Top cover Align Hook and fastener should be t...

Страница 13: ...10 12 1 2 3 4 1 2 3 4 Cut the flush pipe and drainage pipe Mark on the flush pipe and drainage pipe Make the chamfer on the flush pipe and drainage pipe Apply silicone oil...

Страница 14: ...13 Install the flush pipe into the cistern Install the flush pipe into the toilet Apply glass glue Test half full flush functions Install toilet...

Страница 15: ...14 23mm Remove the top cover Turn off the stop valve on the flexible hose Separate the hose from the stop valve Take out the inlet valve upwards Maintenance daily care 1 1 Inlet valve removal...

Страница 16: ...m Adjust the float upwards to increase the inlet volume or downwards to reduce the volume Remove the water stopping part Wash this removed part 1 2 Inlet valve adjustment clean 1 3 Inlet valve install...

Страница 17: ...16 Remove the air hoses from the air hose holes Remove the lever 2 1 Flush valve removal Blue air hose White air hose...

Страница 18: ...17 Buckles on the cistern hunging plate Open the buckles on the cistern hunging plate and lift the flush valve...

Страница 19: ...er Clean the washer 2 2 Flush valve adjustment clean Adjust the float upwards to reduce the flush volume or downwards to increase the volume Remove the cover washer and rubber seal by rotating counter...

Страница 20: ...e sure the flush valve bottom is aligned with flush valve base And please make sure flush valve is installed in the shown direction during installation Re install the lever Install the top glass cover...

Страница 21: ...Corsica bodenst ndiger sp lkasten f r wandmontierte Toiletten BEDIENUNGSANLEITUNG Corsica DE...

Страница 22: ...s Technical drawing inlet valve flush valve connection Cistern installation Maintenance daily care Inhalt Zubeh liste 2 Technische Spezifikationen 4 Technische Zeichnung Einlassventil Sp lventilanschl...

Страница 23: ...pe expansion nut washer small 2 2 screw 2 ST4 8 45 8 40 11 1 2 square plate M8 bolt M8 nut washer big 2 2 1 1 6 30 ST4 2 34 2 2 16 1 5 Zubeh rliste Produkt Liste Namen Namen Dehnmutter Schraube Kleine...

Страница 24: ...e Gass panel e v l a v t e l n I e v l a v h s u l F Push button lever Accessories list Drainage pipe Cistern Zubeh rliste Aluminiumrahmen Sp lkasten Hebel Druckknopf Abflussrohr Glasscheibe Sp lventi...

Страница 25: ...5 C 1003 5mm X 483mm X 108mm 0 07 0 75MPa CJ805F J518 Pneumatic cabinet cistern for floor standing WC Name Model Technische Spezifikation CJ805F J518 Umgebungstemperatur 3 40 C Wasserversorgungsdruck...

Страница 26: ...5 Technical drawing inlet valve flush valve connection 483 1003 5 98 5 98 8 108 180 355 160 130 30 0 5 0 0 2 52 90 180 355 Technische Zeichnung Einlassventil Sp lventilanschluss...

Страница 27: ...he mark points Holes depth should be more than length of expansion nuts and diameters are as picture shown Sp lkasten Installation Wandmitte Linie Bodenmitte Linie Dehnmutter gro Dehnmutter klein Setz...

Страница 28: ...hole on the floor make sure it is totally inserted Fix the plate on the wall by small screws 2 5 6 Setzen Sie das Abflussrohr in das Loch im Boden stellen Sie sicher dass es ganz eingesetzt ist Tragen...

Страница 29: ...l make sure that the cistern frame center line and wall center line should be coincide align ffnen Sie das Sp lkastenverdeck ziehen und entfernen Sie das Rohr vom Haken Drehen Sie fest die Schrauben g...

Страница 30: ...square plate Fix the drainage pipe onto the wall by using square plate 5 ffnen Sie das Absperrventil am Schlauch um zu sehen ob es funktioniert und Wasser in den Beh lter l uft Schrauben Sie die Mutt...

Страница 31: ...h down the panel until the hung hook totaly into the fasteners on the frame Installieren Sie die Platte stellen Sie sicher dass die Glasplatte in der N he des Aluminiumrahmens ist und dr cken Sie dann...

Страница 32: ...cistern top cover Hook on the cover Fastener Top cover Align Hook and fastener should be totaly locked Verbinden Sie Luftrohre an die richtige Position Haken und Schlo ganz verschlie en Installieren S...

Страница 33: ...flush pipe and drainage pipe Make the chamfer on the flush pipe and drainage pipe Apply silicone oil Markieren Sie auf dem geraden Sp lrohr und dem Abflussrohr Schneiden Sie das Sp lrohr und Abflussr...

Страница 34: ...lush pipe into the toilet Apply glass glue Test half full flush functions Install toilet Installieren Sie das Abflussrohr an den Sp lkasten Installieren Sie das Sp lrohr in die Toilette Glaskleber auf...

Страница 35: ...top valve Take out the inlet valve upwards Maintenance daily care 1 1 Inlet valve removal Schlie en Sie das Absperrventil am flexiblen Rohr Wartung und t gliche Pflege 1 1 Einlassventil enrfernen Tren...

Страница 36: ...Wash this removed part 1 2 Inlet valve adjustment clean 1 3 Inlet valve installation 1 2 Einlassventil anpassen und reinigen Stellen Sie den Schwimmer nach oben ein um das Einlassvolumen zu erh hen o...

Страница 37: ...es from the air hose holes Remove the lever 2 1 Flush valve removal Blue air hose White air hose 2 1 Sp lventil entfernen Entfernen Sie die Luftrohre aus den L chern Entfernen Sie den Hebel Blaues Luf...

Страница 38: ...ern hunging plate Open the buckles on the cistern hunging plate and lift the flush valve Schnallen an der Sp lkasten H ngeplatte ffnen Sie die Schnallen an der Sp lkasten H ngeplatte und heben Sie das...

Страница 39: ...r seal by rotating counterclockwisely the cover around 90 2 2 Sp lventil einstellen und reinigen Stellen Sie den Schwimmer nach oben um die Sp lmenge zu reduzieren oder nach unten um sie zu erh hen En...

Страница 40: ...ss the flush valve until it clicks in the correct position 2 3 Flush valve installation 2 3 Sp lventil Installation Installieren Sie das Sp lventil nach unten in den Sp lkasten Bemerkung Stellen Sie s...

Страница 41: ...R servoir de toilette pos e au sol de Corsica Pour les toilettes pos es au sol MODE D EMPLOI Corsica FR...

Страница 42: ...drawing inlet valve flush valve connection Cistern installation Maintenance daily care Contenu Liste des accessoires 2 Sp cifications Techniques 4 Dessin technique vanne d entr e branchement du robin...

Страница 43: ...screw 2 ST4 8 45 8 40 11 1 2 square plate M8 bolt M8 nut washer big 2 2 1 1 6 30 ST4 2 34 2 2 16 1 5 Liste des accessoires Liste des l ments Noms Noms crou d expansion vis rondelle petite rondelle gro...

Страница 44: ...a v t e l n I e v l a v h s u l F Push button lever Accessories list Drainage pipe Cistern Liste des accessoires Armature en aluminium Citerne Levier Bouton poussoir Tuyau de drainage Panneau en verr...

Страница 45: ...483mm X 108mm 0 07 0 75MPa CJ805F J518 Pneumatic cabinet cistern for floor standing WC Nom Mod le Specifications Techniques CJ805F J518 Temp rature ambiante 3 40 C Pression d alimentation en eau 0 07...

Страница 46: ...5 Technical drawing inlet valve flush valve connection 483 1003 5 98 5 98 8 108 180 355 160 130 30 0 5 0 0 2 52 90 180 355 Dessin technique vanne d entr e branchement de la vanne de chasse...

Страница 47: ...than length of expansion nuts and diameters are as picture shown Installation de citerne Ligne centrale du mur Ligne centrale du sol crou d expansion gros crou d expansion petit Ins rez les crous d ex...

Страница 48: ...re it is totally inserted Fix the plate on the wall by small screws 2 5 6 Ins rez le tuyau de drainage dans le trou sur le sol assurez vous qu il est totalement ins r Appliquez la colle de verre sur l...

Страница 49: ...ke sure that the cistern frame center line and wall center line should be coincide align Ouvrez le capot sup rieur de la citerne tirez et s parez le tuyau du crochet Serrez les vis grosses dans les cr...

Страница 50: ...s onto the square plate Fix the drainage pipe onto the wall by using square plate 5 Ouvrez la vanne d arr t sur le tuyau pour voir si cela fonctionne et l eau coule dans le r servoir de la citerne Vis...

Страница 51: ...own the panel until the hung hook totaly into the fasteners on the frame Installez le panneau assurez vous que le panneau de verre est pr s de l armature en aluminium puis appuyez sur le panneau jusqu...

Страница 52: ...er Align Hook and fastener should be totaly locked Branchez les tuyaux d air dans les positions correctes Le crochet et l l ment de fixation doivent tre compl tement verrouill s Installez le capot sup...

Страница 53: ...rainage pipe Make the chamfer on the flush pipe and drainage pipe Apply silicone oil Marquez sur le tuyau de chasse et le tuyau de drainage Coupez le tuyau de chasse et le tuyau de drainage Fa tes le...

Страница 54: ...into the toilet Apply glass glue Test half full flush functions Install toilet Installez le tuyau de chasse dans la citerne Installez le tuyau de chasse dans la toilette Appliquez la colle de verre T...

Страница 55: ...lve Take out the inlet valve upwards Maintenance daily care 1 1 Inlet valve removal D sactivez la vanne d arr t sur le tuyau flexible Entretien Soins quotidiens 1 1 L enl vement de la vanne d entr e S...

Страница 56: ...this removed part 1 2 Inlet valve adjustment clean 1 3 Inlet valve installation 1 2 Nettoyage et r glage de la vanne d entr e R glez le flotteur vers le haut pour augmenter le volume d entr e ou vers...

Страница 57: ...he air hose holes Remove the lever 2 1 Flush valve removal Blue air hose White air hose 2 1 L enl vement du robinet de chasse Retirez les tuyaux d air des trous des tuyaux d air Retirez le levier Tuya...

Страница 58: ...cistern hunging plate Open the buckles on the cistern hunging plate and lift the flush valve Boucles sur la plaque fix e de la citerne Ouvrez les boucles sur la plaque fix e de la citerne et levez la...

Страница 59: ...seal by rotating counterclockwisely the cover around 90 2 2 R glage nettoyage de la vanne de chasse R glez le flotteur vers le haut pour r duire le volume de chasse ou vers le bas pour augmenter le v...

Страница 60: ...orrect position 2 3 Flush valve installation 2 3 Installation de la vanne de chasse Installez la vanne de chasse vers le bas dans le corps de la citerne Remarque Assurez vous que le bas de la vanne de...

Страница 61: ...Corsica ll wc tart ly ll WC hez SZEREL SI TMUTAT Corsica HU...

Страница 62: ...chnical drawing inlet valve flush valve connection Cistern installation Maintenance daily care Tartalomjegyz k Alkatr szlista 2 M szaki specifik ci 4 M szaki rajzok bemeneti szelep s bl t szelep csatl...

Страница 63: ...nage pipe expansion nut washer small 2 2 screw 2 ST4 8 45 8 40 11 1 2 square plate M8 bolt M8 nut washer big 2 2 1 1 6 30 ST4 2 34 2 2 16 1 5 Alkatr szlista Term klista N v N v Hosszabb t csavar csava...

Страница 64: ...ame Gass panel e v l a v t e l n I e v l a v h s u l F Push button lever Accessories list Drainage pipe Cistern Alkatr szlista Alum nium v z WC tart ly kar Nyom gomb Lefoly cs vegpanel bl t szelep Bem...

Страница 65: ...ion 3 40 C 4 35 C 1003 5mm X 483mm X 108mm 0 07 0 75MPa CJ805F J518 Pneumatic cabinet cistern for floor standing WC N v Modell M szaki specifik ci CJ805F J518 K rnyez h m rs klet 3 40 C V zvezet knyom...

Страница 66: ...5 Technical drawing inlet valve flush valve connection 483 1003 5 98 5 98 8 108 180 355 160 130 30 0 5 0 0 2 52 90 180 355 M szaki rajz bemeneti s bl t szelep csatlakoz s...

Страница 67: ...ts Holes depth should be more than length of expansion nuts and diameters are as picture shown WC tart ly szerel se fali k z pvonal padl k z pvonal Hosszabb t csavar nagy Hosszabb t csavar kicsi Illes...

Страница 68: ...on the floor make sure it is totally inserted Fix the plate on the wall by small screws 2 5 6 Illessze be a lefoly cs vet a padl n a lefoly lyukba Gy z dj n meg arr l hogy teljesen bele illeszkedik e...

Страница 69: ...make sure that the cistern frame center line and wall center line should be coincide align Vegye le a WC tart ly fed lapot s h zza fel s akassza ki a cs vet a lemezr l R gz tse szorosan a nagy csavar...

Страница 70: ...bolt Screw the bolts onto the square plate Fix the drainage pipe onto the wall by using square plate 5 Ellen rizze az elz r szelepet Nyissa meg s n zze meg hogy a v z a WC tart lyba folyik e Csavarja...

Страница 71: ...down the panel until the hung hook totaly into the fasteners on the frame Szerelje fel a panelt s gy z dj n meg arr l hogy az vegpanel k zel legyen az alum nium kerethez majd nyomja le a panelt teljes...

Страница 72: ...cover Fastener Top cover Align Hook and fastener should be totaly locked Csatlakoztassa a leveg cs veket a megfelel poz ci ba Horognak s a r gz t elemnek megfelel en r gz tettnek z rtnak kell lennie...

Страница 73: ...pipe Mark on the flush pipe and drainage pipe Make the chamfer on the flush pipe and drainage pipe Apply silicone oil Jel lje meg az bl t s a lefoly cs vet V gja m retre az bl t s lefoly cs vet Sark t...

Страница 74: ...flush pipe into the toilet Apply glass glue Test half full flush functions Install toilet Szerelje be az bl t cs vet a WC tart lyba Szerelje be az bl t cs vet a WC be Haszn ljon vegragaszt t Tesztelj...

Страница 75: ...stop valve Take out the inlet valve upwards Maintenance daily care 1 1 Inlet valve removal Z rja el az elz r szelepet a rugalmas cs v n Karbantart s s napi gondoz s 1 1 Bemeneti szelep elt vol t sa V...

Страница 76: ...part Wash this removed part 1 2 Inlet valve adjustment clean 1 3 Inlet valve installation 1 2 Bemeneti szelep ll t s s tiszt t s ll tsa az sz t felfel a bemeneti t rfogat n vel s hez s ll tsa lefel a...

Страница 77: ...the air hose holes Remove the lever 2 1 Flush valve removal Blue air hose White air hose 2 1 bl t szelep elt vol t sa T vol tsa el leveg cs vet a leveg cs lyukb l T vol tsa el a WC tart ly leh z kart...

Страница 78: ...on the cistern hunging plate Open the buckles on the cistern hunging plate and lift the flush valve Csatok a WC tart ly f gg lemezen Nyissa ki a csatokat a WC tart ly f gg lemezen s emelje ki az bl t...

Страница 79: ...r washer and rubber seal by rotating counterclockwisely the cover around 90 2 2 Az bl t szelep be ll t sa s tiszt t sa ll tsa az sz t felfel hogy cs kkentse az bl t t rfogatot vagy lefel hogy n velje...

Страница 80: ...e flush valve until it clicks in the correct position 2 3 Flush valve installation 2 3 bl t szelep beszerel se Szerelje be az bl t szelepet lefel a WC tart lyba Megjegyz s Gy z dj n meg arr l hogy az...

Страница 81: ......

Страница 82: ......

Страница 83: ......

Страница 84: ......

Отзывы: