1
MODEL EC2002M ELECTRONIC SOLDERING STATION
WARNING:
This product, when used for soldering and similar applications, produces chemicals known to the State of
California to cause cancer and birth defects or other reproductive harm.
OPERATING INSTRUCTIONS
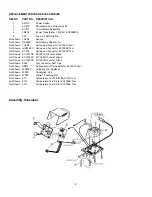
Unpack unit carefully. Place spring and funnel in slot in top of tool stand. Attach tool stand to either side of power unit, if desired.
Fill reservoir with water and wet sponge, distilled water is preferred. Insert tool in holder and connect tool plug to receptacle on
power unit; rotate plug housing to lock plug into receptacle. Insert line cord plug into properly grounded AC receptacle and turn
station on. When the tip temperature reaches 400°F (204°C), remove tool from holder and tin tip with solder. Unit will be ready for
use when it reaches the set point temperature.
The unit display shows a Read mode by default which displays the current temperature of the tip. To switch into the Set mode,
turn the knob slightly and the display will show the current set temperature. Release the knob when you have reached the desired
temperature setting, and after a three second delay the display will switch back into Read mode. When you first turn the unit on,
the display should show 888 for two seconds as a test and then will display the Set temperature for three seconds before
switching into Read mode.
Always use the lowest temperature that will handle the load you are soldering. The Weller
®
electronic control provides maximum
power to the heated load even when set to the lowest temperature; therefore, there is no need to use high temperature to handle
heavy soldering loads. By using lower temperatures and properly selecting tip styles, sensitive components will be protected from
heat damage.
While the unit is in the Read mode, the displayed tip temperature may fluctuate. This fluctuation is normal and represents the
control system response to the changing load. Tip selection for a particular job may be optimized by observing the tip temperature
fluctuations during the soldering operation. Normally, the tip should be selected for minimum fluctuation. This will provide the
shortest soldering dwell time; however, some applications may require a fast response with total fluctuation not critical.
A WCM1 Calibration Unit is available that interfaces directly with the EC2002Ms microprocessor through the iron receptacle and
provides the ability to enable a timed setback mode, a temperature lock out feature, a switch to change the display measurement
between °F and °C, digital calibration of the unit to an outside temperature reference, and reset the unit to its original factory
calibration. When the unit enters Setback mode, the unit display will highlight the bottom segment of all three digits. Turn the unit
off and back on to return to normal operation. If the unit is locked to a specific temperature, this temperature may be checked, but
not altered, by turning the knob.
WARNING: Do not remove ground prong from line cord plug. Removal may cause tip temperature to be erratic
.
CALIBRATION
The EC1201A, EC1302B and EC1503B soldering tools use high precision platinum RTD temperature sensors; therefore, they are
interchangeable without any re-calibration. Should you wish to custom calibrate your EC2002M unit, this can be easily accomplished
with the use of a WCM1 Calibration Unit and a temperature measurement device like the WA2000.
AVAILABLE MODELS AND HAND PIECES
Product
Description
EC2002M-0
Power unit only, 120V 60Hz, °F display
EC2002M-0D
Power unit only, 240V 50/60Hz, °C display
EC2002M-1
Power unit, 120V 60Hz, °F display, EC1201A tool with ETA tip
EC2002M-1D
Power unit, 240V 50/60Hz, °C display, EC1201A tool with ETA tip
EC2002M-2
Power unit, 120V 60Hz, °F display, EC1302B tool with EPH101 tip
EC2002M-2D
Power unit, 240V 50/60Hz, °C display, EC1302B tool with EPH101 tip
EC2002M-3
Power unit, 120V 60Hz, °F display, EC1503B tool with EMA tip
EC2002M-3D
Power unit, 240V 50/60Hz, °C display, EC1503B tool with EMA tip
EC1201A
40 Watt soldering tool w/ETA tip
EC1302B
20 Watt soldering tool w/EPH101 tip
EC1503B
42 Watt high capacity soldering tool w/EMA tip


