background image

      5

4


5


E

I

K

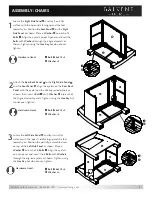
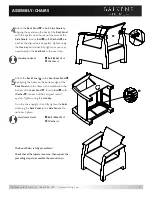
Attach the 

Back

 Panel


E

 to both 

Side Panels

 by 

aligning the eyelets on the back of the 

Back 

P

a

nel


with the eyelets near the rear of the arms of the 

Side Panels

. Insert a 

B

olt


I

 with 

W

a

sher

s

K

 into 

each of the aligned sets of eyelets. Tighten using 
the 

Hex Key

 but do not fully tighten as you may 

need to adjust the 

Seat

 Back

 in the next step.

Attach the 

Back

 Panel


E

 to the 

Re

a

r


B

a

se Panel


C


by aligning the holes on the bottom edge of the 

Back 

P

a

nel 

with the holes in the crossbar on the 

bottom of the 

Se

a

t P

a

nel 

B

. Insert a 

B

olt


J

 with 

Washer


K

 into each of the 2 aligned sets of 

eyelets. Tighten using the 

Hex Key

.

Turn the chair upright, then fully tighten the 

Bolts


attaching the 

Back Panel

 to the 

Side Panels

. Do 

not over-tighten.

hardware used:


J


Bolt (M6x

35

)

 x2 

K


Washer

 x2

J

K

hardware used:


I


Bolt (M6x20)

 x2 

K


Washer

 x2

The 

Bondi C

hair is fully assembled!

Check that all hardware is secure, then repeat the 
preceding steps to assemble the second chair.

Contact us for assistance:  (866) 985-7877  |  www.wtliving.com 

ASSEMBLY: CHAIRS

Содержание Balkene Home Bondi 62963

Страница 1: ...er c which will be needed if you need to contact us about warranty coverage Purchase Date Questions problems missing parts Before returning to your retailer our exceptional customer service is availab...

Страница 2: ...you use furniture covers always make sure the conversation set is clean and completely dry before covering as mold may form in dark wet places Remove cushions prior to covering and store them in a dry...

Страница 3: ...16 per chair Hex Key K Washer Qty 18 per chair HARDWARE CONTENTS D E F G H B A C M6x35 Bolt Qty 2 per chair L M6x25 Bolt Qty 8 M Washer Qty 8 CHAIRS TABLE Assemble in a clear area on a spacious nonab...

Страница 4: ...elets on the already joined panels as shown then insert a Bolt I with Washer K into each of the aligned sets of eyelets Tighten using the Hex Key but do not over tighten B C A I K I K hardware used A...

Страница 5: ...e holes on the bottom edge of the Back Panel with the holes in the crossbar on the bottom of the Seat Panel B Insert a Bolt J with Washer K into each of the 2 aligned sets of eyelets Tighten using the...

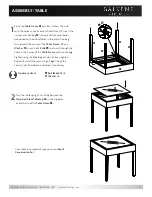
Страница 6: ...e holes in the corner of the Table Frame and into the Leg Tighten using the Hex Key but do not over tighten Repeat to install the remaining 3 Legs Check the security of all hardware and adjust if nece...

Страница 7: ...ARE NO EXPRESS WARRANTIES EXCEPT AS LISTED PURCHASER ASSUMES ALL RISKS IN THE ASSEMBLY AND OPERATION OF THIS UNIT FAILURE TO FOLLOW WARNINGS AND OPERATIONAL INSTRUCTIONS CONTAINED IN THIS MANUAL CAN R...

Отзывы: