background image

 - 

44 

-


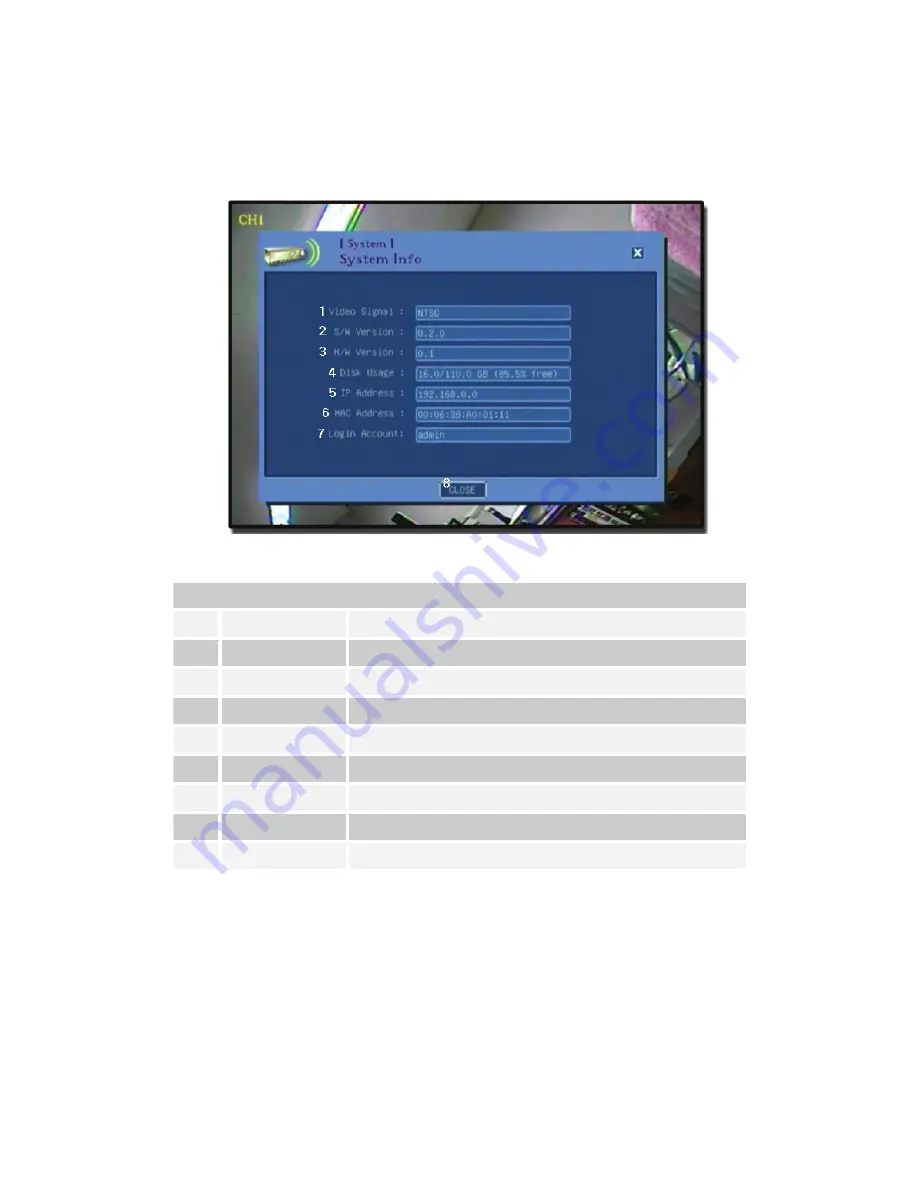
4.1.3 SYSTEM / System Info 


SETUP   SYSTEM   System Info 

No 

Item 

Function 

Video signal 

Switch from NTSC/PAL. 

Software Version 

Indicates software version. 

Hardware Version 

Indicates hardware version. 

Disk Usage 

Used and hdd much is free. 

IP Address 

Indicates current IP address. 

MAC Address 

Indicates unique MAC address for Ethernet. 

Login Account 

Indicates user id. 

CLOSE 

Close out of system info menu. 

Содержание WDR-1612

Страница 1: ......

Страница 2: ...System Startup and Shutdown 21 3 How to use Device 23 3 1 DISPLAY MODE 24 3 1 1 Display Mode Popup 26 3 2 PLAYBACK MODE 27 3 2 1 Calendar Search 29 3 2 2 Event Search 30 3 2 3 Time Search 31 3 3 PTZ...

Страница 3: ...4 2 4 DEVICE Sensor In Relay Out 62 4 2 4 1 DEVICE Sensor In Relay Out Notify 63 4 2 5 DEVICE Motion Alarm 64 4 2 6 DEVICE Extra Alarm 65 4 3 RECORD MENU 66 4 3 1 RECORD Camera 67 4 3 1 1 RECORD Came...

Страница 4: ...ein at any time without prior notice No part of this guide may be reproduced transmitted transcribed stored in a retrieval system or translated into any language in any form by any means without prior...

Страница 5: ...ver there is no guarantee that interference to radio or television reception which can be determined by turning the equipment off and on the user is encouraged to try to correct the interference by on...

Страница 6: ...5 1 Product Contents and Specifications...

Страница 7: ...vacy act of 1974 5 U S C 552a Please note that WELDEX Digital Video Recorders are intended for recording of surveillance use and should never be used in a manner that invades other people s privacy or...

Страница 8: ...r electrical shock Immediately turn the DVR s power off remove the power cable from outlet Confirm that smoke and fume emissions have ceased Please consult the DVR distributor or WELDEX customer help...

Страница 9: ...to overheating distortion of the equipment fire electrical shock or other hazards Do not place the battery near a heat source or expose it to direct flame or heat Neither should you immerse them in wa...

Страница 10: ...s replaced by an incorrect type Dispose of used batteries according to the instructions PREVENTING MALFUNCTION Avoid Strong Magnetic Fields Never place the DVR in close proximity to electric motors or...

Страница 11: ...following items are included in the box Plug In Connection Block Software 1 2 3 4 1 2 3 4 5 6 7 8 9 0 POWER 10 MENU ESC SCREEN PREV FB FF NEXT SB PLAY PAUSE SF REC SEARCH BACKUP EVENT PRESET HOME FOC...

Страница 12: ...11 1 2 IR REMOTE CONTROLLER How to change Remote ID 1 Push IDSEL button for 3 5 seconds 2 Push the Number button of 2 digits to change remote identification ID input range 00 99 3 It finished setting...

Страница 13: ...on Overwrite Recording Schedule Supports Recording Schedule per camera Recording Adjustment 3 level of resolution Recording frame rate adjustment per channel Pre Post Alarm Pre Alarm 5 300 sec Post Al...

Страница 14: ...a Recording Adjustment 3 level of resolution Recording frame rate adjustment per channel Pre Post Alarm Pre Alarm 5 300 sec Post Alarm Max 300sec Motion Detection 11x9 Selectable Grids 10 sensitivity...

Страница 15: ...14 1 4 QUICK START PAGE The Factory Default password for the unit is 0000...

Страница 16: ...15 1 5 MAIN FEATURES DISPLAY MODE Realtime Display Multi Split Screen Mode PLAYBACK MODE Playback Recorded Images SETUP MODE 5 Options for System Control SYSTEM DEVICE RECORD NETWORK BACKUP...

Страница 17: ...16 1 6 PRODUCT DIMENSION 430 mm 450 mm 430 mm 90 mm 450 mm 89 mm...

Страница 18: ...creen button to select modes of arrow button 6 Menu Displays menu on the screen 7 Enter For entering selection 8 Left Right Up Down Arrow buttons control the Menu 9 SEQ Changes sequence mode 10 ESC To...

Страница 19: ...utputs for external device control 6 RS 232C POS Point Of Sale RS 232 connection 7 VIDEO OUT Composite Video output 8 S VHS OUT S VHS S Video output 9 ALARM OUTPUT Alarm Output 10 VGA VGA connection 1...

Страница 20: ...19 2 Product Operation...

Страница 21: ...at surface If required attach the rubber mount for installation Note Install system in location with good ventilation to prevent overheating Internet Caution Depending on the grounding the coaxial cab...

Страница 22: ...a problem The operation of the system can be locked up however when major parts such as hard disk function abnormally due to external electric shock physical damage or other various reasons The system...

Страница 23: ...22...

Страница 24: ...23 3 How to use Device...

Страница 25: ...ed 16 camera option on 120 Frames per second 2 Number of Channels 1 16 Choose camera option with mouse 3 Event Click to capture current event 4 REC Click to record current event 5 Sequence Mode Indica...

Страница 26: ...annels or images on Channels 9 Next Screen Click to go to next screen 10 Setup Click to go to DVR menu 11 Search Click to go to Search mode 12 PTZ MODE Click to go to PTZ operation mode 13 Data Backup...

Страница 27: ...ZE Freeze image 4 ZOOM Get close up of image or adjust zoom 5 PTZ PTZ bar enables 6 SEARCH Search bar enables 7 MENU Go to menu screen Display Mode menu option Search Mode menu option PREV SCREEN NEXT...

Страница 28: ...e of playback data During the playback the DVR may be played back in reverse paused speed search Taskbar Playback Mode No Picture Item Function 1 Prev day Click to go to previous screen 2 Camera Click...

Страница 29: ...Screen Mode Change from 4 9 16 screens 8 Next Screen Go to next screen 9 Search for Playback Click to find image 10 Playback Keys Playback buttons 11 Return to live mode Click to go back to current i...

Страница 30: ...em Function 1 Month To set month 2 Year To set year 3 Camera To set camera options 4 Time Table Bar Shows amount of time 5 Arrow Key Shows amount of current image captured 6 Search Time Indicates mm d...

Страница 31: ...Date Displays date of recording 2 Click on image button to search image on a given date 3 All To show all recorded events 4 Sensor Displays sensor event captured 5 Motion Alarm Displays motion capture...

Страница 32: ...31 3 2 3 Time Search Taskbar Display Mode Search Time Search No Item Function 1 Search Time Search Time Setting 2 PLAY Play of Search Time...

Страница 33: ...ZOOM Z Z to Zoom In or Zoom Out 3 FOCUS F F to Focus Near or Focus Far 4 IRIS I I to adjust 5 PRESET Device PTZ to PRESET camera 6 Guard Tour Device PTZ to set Guard Tour 7 TOUR Camera to set Tour 8...

Страница 34: ...33 4 System Setup...

Страница 35: ...34 4 SYETEM SETUP INITIAL SETUP Menu Tree...

Страница 36: ...35 Main Menu Click a menu button to go to main menu...

Страница 37: ...36 4 1 SYSTEM MENU Main menu will dlirect you to system menu for general information...

Страница 38: ...allows to be typed 3 DVR ID I identifies DVR used 4 Remote Controller ID Remote Controller ID can set up 0 99 Up to 2 DVR can not have same ID 5 Language Language used 6 Sequence Dwell Time Indicates...

Страница 39: ...dit Box Top of keyboard to input information 2 EXIT Top right side to exit out of keyboard menu 3 Number Alphabet For Title Name 4 Backspace For backspace key 5 Enter For enter key 6 Shift For shift k...

Страница 40: ...39 4 1 1 2 SYSTEM General Spot Out SETUP SYSTEM General Spot Out No Item Function 1 Set Camera Ability to set each camera 2 OK Ok set cameras...

Страница 41: ...eral Spot Out Spot Out Camera SETUP SYSTEM General Spot Out No Item Function 1 Camera Number Click All to enable all cameras or click on each individual camera 2 OK Ok selection s made 3 CANCEL Cancel...

Страница 42: ...l OSD No Item Funchion 1 All Enable all options 2 Date Enable dute to appear 3 Time Shows time 4 Title Shows camera identity 5 PTZ To enable PTZ 6 Recording Enable record mode 7 Audio Allow audio 8 OK...

Страница 43: ...e 3 Date Format Select date format 4 Time Format Select time format 5 Time Zone Select time zone 6 DST automatic Daylight Saving Time option 7 Time Sync Mode To display when inputs were made duel save...

Страница 44: ...No Item Function 1 Month Set this month with arrow icon 2 Year Set this year with arrow icon 3 Hour Set Hour information 4 Minute Set minute information 5 Sec Set second information 6 AM PM Set AM PM...

Страница 45: ...AL 2 Software Version Indicates software version 3 Hardware Version Indicates hardware version 4 Disk Usage Used and hdd much is free 5 IP Address Indicates current IP address 6 MAC Address Indicates...

Страница 46: ...on 1 Date Date log to retrieve 2 Virtual Calendar Enter date time 3 All Display all date time activities 4 System Displays all system information 5 Setup Displays setup information 6 Event Displays lo...

Страница 47: ...Function 1 Method To uprade use USB CD RW or FTP 2 Device To see current device used 3 Scan To see current scan 4 Host Address Show host address 5 Current Version Current software version 6 New Versio...

Страница 48: ...d date overwrite and begin recording again SETUP SYSTEM HDD Info No Item Function 1 ID HDD Id displayed 2 Model HDD model displayed 3 Capacity HDD capacity displayed 4 Free Amount of unused space 5 Te...

Страница 49: ...y Default Factory Default screen allows resetting of system SETUP SYSTEM Factory Default No Item Function 1 Edit Factory Default edit option 2 Confirm Confirm option 3 OK Factory Default changes 4 CLO...

Страница 50: ...nction 1 Group Show current group name 2 User Show individual user access 3 Add Group Assign new group 4 Add User Assign new user 5 Edit Edit Group User 6 Delete Remove Group User 7 Auto Log in Automa...

Страница 51: ...t groups 2 Virtual Keyboard Enter Group Name 3 Shutdown A right for power shutdown 4 Search A right for search 5 PTZ Click to allocqte each PTZ 6 Backup Allow backup of group 7 System System menu allo...

Страница 52: ...ser SETUP SYSTEM User Management Add User No Item Function 1 User Add new user 2 Group Add new group 3 Password 1 9 characters for password 4 Confirm Confirm password again here 5 OK Confirm informati...

Страница 53: ...M User Management Edit In user Management screen group choose to edit group information SETUP SYSTEM User Management Add User No Item Function 1 Group Change group user 2 OK Allow changes 3 CANCEL Can...

Страница 54: ...port Setup No Item Function 1 Export To Choose where to export to 2 Scan Indicates where to scan to 3 Import From Choose where to import to 4 Scan Indicates where to scan to 5 Progress Progress of Exp...

Страница 55: ...Log Off How to log off DVR Warning Do not forget admin password SETUP SYSTEM Export Import Setup No Item Function 1 User Choose user ID 2 Password User password can be typed with virtual keyboard 3 LO...

Страница 56: ...55 4 2 DEVICE MENU Click on second icon for device setup on main menu There are 6 sub menues...

Страница 57: ...Show areas where motion will be triggered 4 Title Name each camera 5 Brightness Change brightness from 0 100 6 Contrast Change contrast from 0 100 7 Color Change color from 0 100 8 Sharpness Change sh...

Страница 58: ...r zoom out option 8 F F PTZ camera focus in or focus out option 9 Speed Set speed of PTZ 10 Preset Preset camera setup 11 Camera Select PRESET1 PRESET8 position for camera 12 Set Set up to 8 motions 1...

Страница 59: ...ur How to setup Guard Tour DEVICE PTZ GUARD TOUR No Item Function 1 List List of Guard Tours 2 ADD Add Preset time 3 Modify Modify Guard Tour 4 Delete Delete Guard Tour 5 START Begin Guard Tour 6 CANC...

Страница 60: ...TTING No Item Function 1 Tour Point Choose from Preset1 Preset8 2 Tour Sec Set Guard Tour time 3 Choose from Preset time to place in Guard Tour 4 Items to remove from the Guard Tour 5 Guard Tour Alow...

Страница 61: ...OUR GUARD TOUR SETTING No Item Function 1 Indicates camera ON OFF mode 2 Indicates camera light ON OFF mode 3 Indicates camera front wiper ON OFF mode 4 Indicates camera front windshield wiper ON OFF...

Страница 62: ...ameras can have audio preset SETUP DEVICE Audio NO Item Function 1 Audio Up to 4 capability 2 ON OFF ON OFF mode for audio on cameras 3 Two Way Audio Select two way audio 4 SAVE Save new information 5...

Страница 63: ...r 4 OUT Set cameras to output 5 IPS Set IPS IPS FPS frame per second 6 Preset Presert alarm for PTZ 7 Dwell Setup dwell time 8 Pre Alarm Pre alarm event 9 Type Set sensor alarm from N O or N C 10 1 8...

Страница 64: ...or In Relay Out Notify SETUP DEVICE Sensor In Relay Out Notify No Item Function 1 All On Off All 2 Buzzer On Off buzzer 3 Message On Off message 4 Camera Pop up On Off camera pop up 5 OK Save changes...

Страница 65: ...OFF On Off option 3 OUT To indicate camera notin motion 4 IPS Indicates frame rate image per second 5 Dwell Motion up to 3 seconds 6 Pre Alarm Motion up to 5 seconds 7 1 8 1 8 camera options 8 9 16 9...

Страница 66: ...ger 5 Notify Type How to notify alarm trigger 6 S M A R T HDD set off indicator 7 Video Loss Alarm triggered for video loss 8 Recording Failure Alarm trigger for recording failure 9 Alarm Alarm trigge...

Страница 67: ...66 4 3 RECORD MENU Third icon on main menu directs you to recording features of camera...

Страница 68: ...OFF On off per camera 4 IPS Set IPS 5 Quality 5 Quality of recording image 6 Audio Indicate audio on cameras 4 maximum 7 1 8 Shows 1 8 cameras 8 9 16 Shows 9 16 cameras 9 Data Keeping Day Choose term...

Страница 69: ...4 3 1 1 RECORD Camera Data Keeping Day SETUP RECORD CAMERA Data Keeping Day No Item Function 1 USE View Data Keeping Day 2 ALL SAME DAY S Click to save same data on all cameras 3 CLOSE Close out of wi...

Страница 70: ...camera recording 4 0 23 Set hours to record 5 SUN H DAY Check days to record 6 Off Check to not record 7 Continuous C Record continuously 8 Motion Detection M Check to set motion detection 9 Sensor S...

Страница 71: ...Holiday Setup How to Preset Holiday setup SETUP RECORD Recording Schedule Holiday Setup No Item Function 1 List Shows selected holiday list 2 Mon days of week 3 Day Date 4 Add Add day date 5 Del Remov...

Страница 72: ...71 4 4 NETWORK MENU Fourth icon on main menu directs you to networking...

Страница 73: ...tion 2 IP Address Choose Network type is LAN 3 Subnet Mask Choose subnet mask 4 Gateway Choose gateway 5 DNS Choose DNS Domain Name Server address 6 Bandwidth Limit Maximum 10 100Mbps 7 TCP IP Port Se...

Страница 74: ...73 4 4 1 1 NETWORK Network TCP IP Ports Setup MENU NETWORK Network TCP IP Port Setup No Item Function 1 TCP Set TCP IP port 2 UDP Set UDP port 3 Default Set as default 4 CLOSE Close without saving...

Страница 75: ...ption 2 DDNS Server For DDNS Server use Virtual Keyboard 3 TCP IP Port For TCP IP Port use Virtual Keyboard 4 UDP Port For UDP Port use Virtual Keyboard 5 ID TYPE MAC or DVR ID Select 6 TEST If DVR ID...

Страница 76: ...nt option 4 Add Add IP address with virtual keyboard 5 Modify Modify IP address with virtual keyboard 6 Delete Delete information 7 E Mail Check for update e mail 8 SMTP Server Use virtual keyboard fo...

Страница 77: ...tify Log in out 3 Setup User setup Start End recognition 4 System Start System start notification 5 Shutdown DVR shutdown notification 6 Sensor Notify sensor alarm 7 Motion Alarm Notify motion alarm 8...

Страница 78: ...77 4 5 BACKUP MENU Fifth icon on main menu directs you to backup information...

Страница 79: ...tes which device is used 3 File Format Type of format used 4 From From date 5 TO To date 6 Camera Choose back up camera 7 Estimated File Size Indicates file size 8 Add Viewer Check to add viewer 9 Pro...

Страница 80: ...off for continuous backup 4 Start Day Enter beginning day for the desired backup 5 Backup Interval Enter beginning date and ending date for desired backup 6 Camera s Select cameras for desired backup...

Страница 81: ...80...

Страница 82: ...81 5 Appendix...

Страница 83: ...nt instructions are included With the installation instructions A Elevated Operating Ambient If installed in a closed or multi unit rack assembly the operating ambient temperature of the rack environm...

Страница 84: ...uit Overloading Consideration should be given to the connection of the equipment to the supply circuit and the effect that overloading of the circuits might have on overcurrent protection and supply w...

Страница 85: ...84 5 2 TERMINAL BLOCK ASSEMBLY Terminal Block Component is used to connect alarm in out devices and RS 485 communication devices This drawing is an assembly to install 4 Terminal Block of female type...

Страница 86: ...ay Output Female 8 PIN NO NC DC 30V 1A 2 Alarm Output Female 16 PIN TTL DC 5V 300 3 Alarm Input Female 20 PIN TTL DC 5V 25 4 RS 485 Female 4 PIN TRX TRX AI1 AI16 16 Input port Alarm Input GND Ground A...

Страница 87: ...NO NC DC 30V 1A 2 Alarm Output Female 8 PIN TTL DC 5V 300 3 Alarm Input Female 12 PIN TTL DC 5V 25 4 RS 485 Female 4 PIN TRX TRX AI1 AI9 9 Input port Alarm Input GND Ground AO1 AO6 6 Output port Alarm...

Страница 88: ......

Отзывы: