background image

16

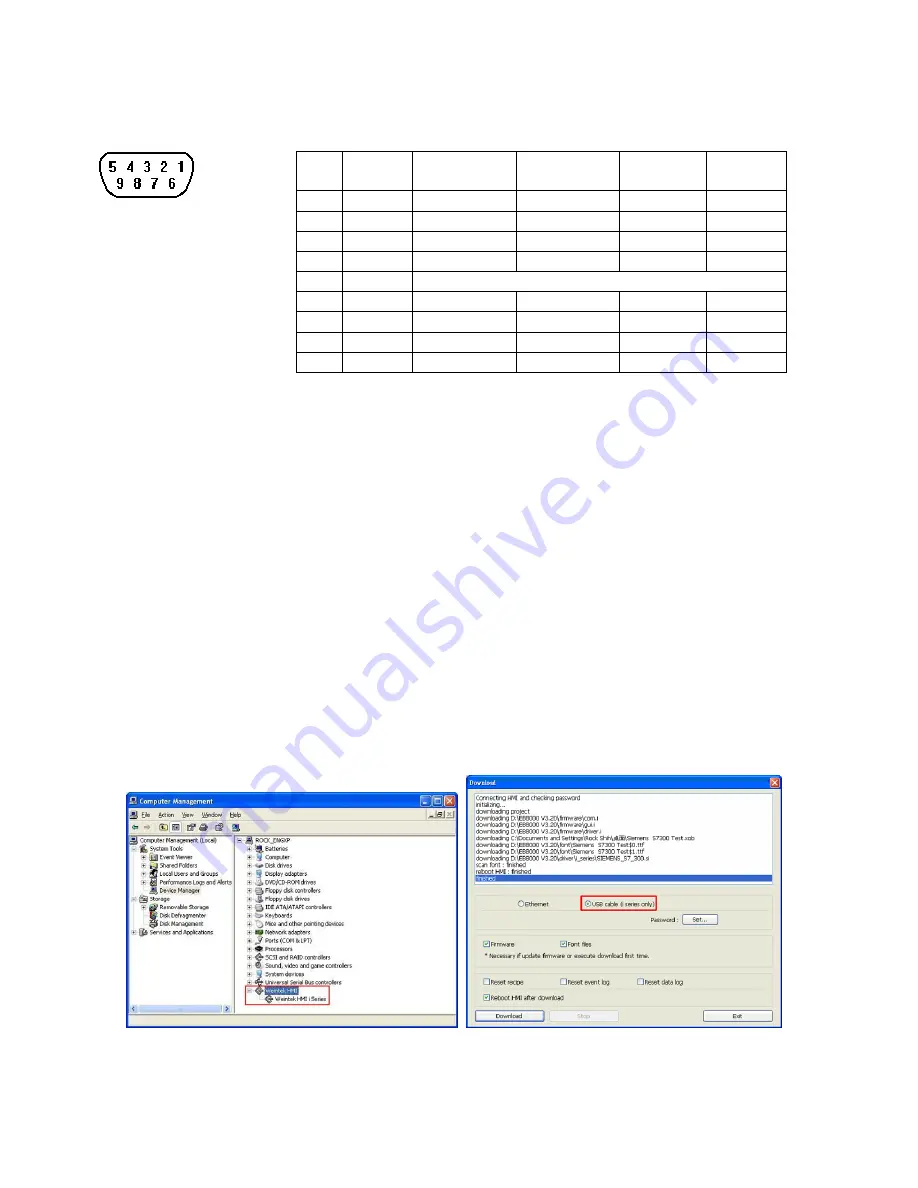
2.3.2 Connector COM1[RS485]


The 9 Pin, Female, SUB-D, COM1 [RS-485] Port on the back of the unit is the RS485/422 

communications port for connecting to a controller. 

Connection 


Pin Designations 


COM1 [RS-485]


Pin assignment of the 9 Pin, Female, SUB-D COM1 [RS-485] 

Pin# Symbol

Com1 
[RS485]2w 

Com1 
[RS485]4w 


1 Rx- 

Data- 

Rx- 


2 Rx+  Data+ 

Rx+ 


3 Tx- 


Tx- 


4 Tx+   

Tx+ 


5 GND 

Signal 

Ground 

6 Data- 


7 TxD   


8 RxD   


9 Data+ 


17

2.3.3 USB Host port 

USB 1.1 Host interface supports USB mouse, keyboard, USB Flash Drive and printer.   
While using external hard drive, please use external power supply. Do not use USB port to charge external 
device. 

18

2.3.4 USB client port 

It can use Mini USB cable (RZCMT6100) to download projects from PC by the USB 2.0 client port. Support 
USB 2.0 client interface. The cable regulation must accord with HI-SPEED USB Revision 2.0 SHIELDED. 

How to install USB driver of HMI series 

It is necessary to install USB driver of HMI on PC before at the first time enjoying this function. (The HMI 

models: MT6050i, MT6056i, MT6070iH, MT6100i, MT8070iH and MT8100i) 

1.


Using USB cable mini side plug to HMI and another side plug into PC. The PC will display “Found New 

Hardware Wizard” dialog. Select “Install from a list or specific location (Advanced)”. 

2.


Check “Include this location in the search”, and assign the path to install Weintek HMI i Series driver 

from C:\EB8000\usbdriver. 

3.


If the USB driver successfully be installed, user can check it at Computer Management / Device Manager 

to check. Then user can download project to HMI i series through USB cable. 


5


Содержание MT-6056i

Страница 1: ...s has been tested to conform to European CE requirements This means that the circuitry is designed to resist the effects of electrical noise This does not guarantee noise immunity in severe cases Proper wire routing and grounding will insure proper operation Mechanical Environment Avoid installing units in environments where severe mechanical vibration or shocks are present 1 2 0 Installation Inst...

Страница 2: ...splays Make sure that the displays are installed correctly and that the operating limits are followed See Specifications z Do not operate the unit in areas subject to explosion hazards due to flammable gases vapors or dusts z The unit should not be installed where fast temperature variations and or high humidity are present This will cause condensation of water in the device z Do not install these...

Страница 3: ...al 1 2 2 2 2 Grounding Requirements Chassis ground must be used DC ground is not directly coupled to Earth ground internally It is preferable not to ground DC negative return to chassis ground as poor site earths can introduce noise into a system but if necessary an earth connection should be made from the power supply return point to the central star earth point Ground conductors should be as sho...

Страница 4: ...dards To conform with ICS Safety Recommendations checks should be place in the controller to ensure that all writable registers that control critical parts of plant or machinery have limit checks built into the program wit Programming C an out of lim 3 304 81 Safety Recommendations Consid controller Where the operator is exposed to the machinery such as in loading or unloading a machine tool or wh...

Страница 5: ...0 to download projects from PC by the USB 2 0 client port Support USB 2 0 client interface The cable regulation must accord with HI SPEED USB Revision 2 0 SHIELDED How to install USB driver of HMI i series It is necessary to install USB driver of HMI on PC before at the first time enjoying this function The HMI models MT6050i MT6056i MT6070iH MT6100i MT8070iH and MT8100i 1 Using USB cable mini sid...

Страница 6: ...een parameter will be stored in Flash er Rom z If losing or forgetting system passwords users can set Dip Switch 1 to ON position the rest of Dips remain on OFF position and then reboot MT8000 series Under this situation MT8000 series will jump to Touch Adjust Touch screen calibration mode After calibration the pop up window appears as the illustration below Users will be inquired restoring the sy...

Страница 7: ... misuse including but not l b imit to incorrect set up and wiring current leakage from machine platform and incorrect input power modified in any way 3 0 Specifications Hardware Specification Display 5 6 TFT LCD Brightness 300 cd m2 Color 65 s r 536 colo Contrast Ratio 300 1 Resolution WxH dots 320 x 234 Back light LED Backlight life time avg 30 000 hr min Touch panel 4 wires resistive type Touch ...

Страница 8: ...Cutout dimensions MT 6056i 192mm 7 56 W x 138mm 5 43 H Front View Rear View Bottom View a DIP SW Reset button e USB Client port b Fuse f Com1 RS232 c Power connector g Com1 RS485 d VESA 75mm screw holes GME6056I0_MT6056i_Installation_101028 8 ...

Отзывы: