background image

海维宏电子科技股份有限公司


SHANGHAI WEIHONG ELECTRONIC TECHNOLOGY CO., LTD. 

38

 / 

47


4.4.6.


Set Workpiece Offset Compensation 

In actual machining, if the machined workpiece is tilted to one side, setting 
workpiece offset compensation is required. 

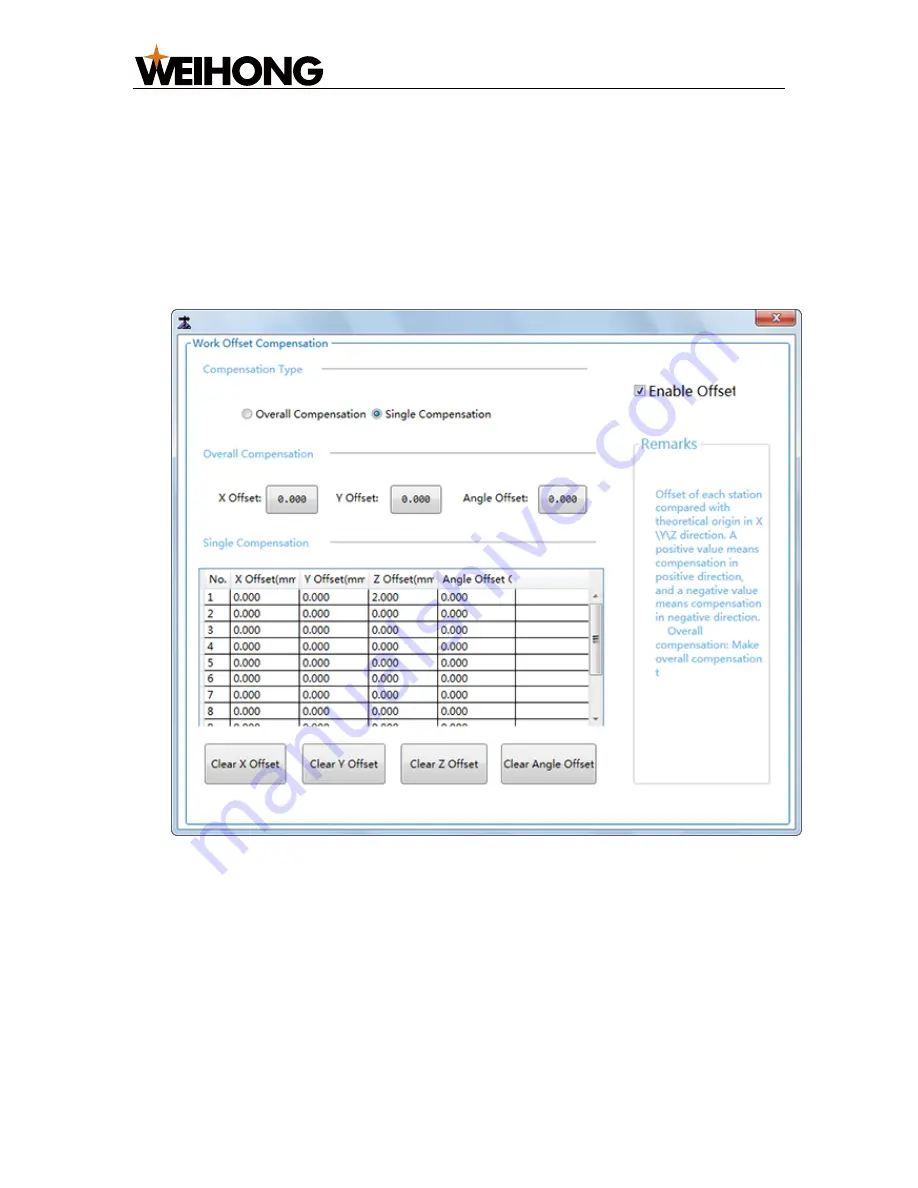
To set workpiece offset compensation, do the following: 

1.


Switch to 

Craft

 page and check 

Setting ON

2.


Click 

Set Part Offset Comp

Work Offset Compensation

 dialog box pops up: 


3.


Check 

Enable Offset

 to enable offset. 

4.


Select compensation type: 


Overall compensation 


It is the common compensation type. 


Wit

array machining

 enabled, the set workpiece offset compensation is 

suitable for all workpieces in the array. 

Содержание NCStudio V12

Страница 1: ...terface CCD Operations Frequently Asked Questions FAQ Terms 1 Configuration and Wiring Diagram This section introduces product configuration and wiring 1 1 Product Configuration Product configuration...

Страница 2: ...WEIHONG ELECTRONIC TECHNOLOGY CO LTD 2 47 1 2 Wiring Diagram Wiring Diagram includes the wiring diagram of the product and terminal boards 1 2 1 Product wiring diagram The product wiring diagram is a...

Страница 3: ...WEIHONG ELECTRONIC TECHNOLOGY CO LTD 3 47 1 2 2 Wiring Diagrams of Terminal Boards Terminal boards used in CCD system include Lambda 5M and EX31A1 The wiring diagram of Lambda 5M terminal board is as...

Страница 4: ...installing the following in order 1 Camera driver 2 NcStudio V12 CCD control system During installation plug in NcCloud will be installed automatically 2 1 Install Camera Driver To install the camera...

Страница 5: ...2 CCD Control System because it has been installed correctly when you own the NC65C host If you need to re install or update NcStudio do the following 1 Double click NcStudio V12 installer The window...

Страница 6: ...g this period plug in NcCloud will be installed automatically 3 Click OK to restart the computer Re installing updating NcStudio V12 succeeds If you need to uninstall the system delete the following N...

Страница 7: ...47 3 Operating Interface The operating interface of NcStudio V12 CCD Control System is as follows 1 Menu bar 2 Status bar 3 Machine control bar 4 Function windows 5 Manual control area 6 Tool informat...

Страница 8: ...Function windows include the following Coor window Track window Offset window HD List window Center window CCD Setting window Param window Port window Set Absolute Function window 3 1 1 Coor Window Th...

Страница 9: ...ow to directly edit the value of related parameters After axes have returned to the machine origin the sign will appear before related axes 3 1 2 Track Window This window shows the machining track of...

Страница 10: ...ece Coordinate Machine Coordinate Workpiece Offset Public O ffset Tool Offset With Automatic Layer Compensation enabled the relationship turns to Workpiece Coordinate Machine Coordinate Workpiece Offs...

Страница 11: ...Click Lift The workpiece origin of Z axis moves up the corresponding distance 3 1 4 HD List Window This window includes the following interfaces Local interface It shows the list of local program file...

Страница 12: ...the spindle to avoid danger from too fast spindle speed 2 Click StartCenter 3 Move the tool to one side of the workpiece and press Record X The system records the machine coordinates of current point...

Страница 13: ...dow you can execute operations of CCD setting To Shoot CCD moves to the related shooting position To Focal Height Spindle moves to the clearest position of the picture Simulate Spindle moves to the cl...

Страница 14: ...Param save CCD related parameters Import Param import parameters saved by Save Param operation To Focal Point move the camera to the focal height Homepage jump to CCD Setting window This function wind...

Страница 15: ...You can check and modify the values of parameters by Function Parameters are divided into Operation Feed Axis Parse and Tool In running state only parameters of tools except the current tool can be mo...

Страница 16: ...SHANGHAI WEIHONG ELECTRONIC TECHNOLOGY CO LTD 16 47 3 1 8 Port Window This window shows port information...

Страница 17: ...nown as datum This operation is required only commissioning for the machine tool is required To set datum do one of the following Click Set to set current coordinate as datum If you have replaced the...

Страница 18: ...peration Among them Clear F7 is used to clear the pubic offset Click it to select the corresponding axis to do clearing 3 3 Port Control Area In this area you can detect the communication of software...

Страница 19: ...SHANGHAI WEIHONG ELECTRONIC TECHNOLOGY CO LTD 19 47 3 4 Tool Information Area In this area you can check tool information Click Tool Compensation Param to set tool compensation parameters...

Страница 20: ...s an axis direction button and Jog The machine tool keeps running until you release the button HW mode The machine tool is controlled by handwheel Stepping mode Click an axis direction button and 0 1...

Страница 21: ...2 Set camera 3 Debug CCD and the machine 4 Set CCD and the workpiece 5 Execute other operations 4 1 Set the Camera This operation mainly contains setting the following two parameters Exposure Gain To...

Страница 22: ...ebug CCD and the Machine Focal length magnification and offset are fixed after the machine tool is installed If the machine tool is replaced or repaired e g the camera or lens is reinstalled these thr...

Страница 23: ...lue automatically fills to the right button 4 2 2 Measure the Magnification Aim of the operation To obtain the proportional relationship between the pixel and the displacement Wrong magnification resu...

Страница 24: ...wing 1 Click Start repeatedly to do several measurements 2 Click Record to view the measurement results 3 Remove the values changing greatly 4 2 3 Measure the Offset between the Spindle and CCD Withou...

Страница 25: ...SHANGHAI WEIHONG ELECTRONIC TECHNOLOGY CO LTD 25 47 5 Click Record 6 Turn the handwheel to find the hole position and move camera center to the tangent position of the hole in X axis direction...

Страница 26: ...Repeat the step to check the setting of tool radius If it is set correctly the CCD center should be on the other side of the tangent position 8 Repeat steps 6 and 7 to find the center position in Y a...

Страница 27: ...r to 1 4 3 2 Shoot To shoot do one of the following Shoot by single point Shoot by two points Shoot by three points Shoot by four points These methods differ in the number of shooting points Compariso...

Страница 28: ...wo Points With this shooting method the positions of the shoot points are the theoretical position on the drawing To shoot by two points do the following 1 Set the workpiece origin and the first shoot...

Страница 29: ...form a right triangle And when programming you need to set the center point of the hypotenuse as the workpiece origin To shoot by three points do the following 1 Switch to Param page and set the para...

Страница 30: ...X axis and Y axis to the position of the third shooting point and click Pick Current under Mark 3 5 Move X axis and Y axis to the position of the fourth shooting point and click Pick Current under Mar...

Страница 31: ...lowing 1 Click Edit The Outline Positioning dialog box pops up 2 Switch to Set Template page and click Reset Template 3 Drag the rectangle to the position of the feature point The size of the rectangl...

Страница 32: ...general the range of the minimum contrast is 20 80 and the range of the maximum contrast is 60 120 If the picture is blurry and the feature points are not obvious you can lower these two values Edge M...

Страница 33: ...of the picture Thus it is recommended to select a smaller range 6 Switch to Param page and set parameters for outline positioning Set the parameters Score and Level according to the picture quality I...

Страница 34: ...hining Enable CCD Set the workpiece origin by CCD center Set safety offset Set workpiece offset compensation Set workpiece size compensation Set Z axis depth compensation Execute simulation Set automa...

Страница 35: ...ON and enter the manufacturer password 3 Check Array Machining to enable array machining 4 Set line number and space and column number and space 5 Optional check Failed Template Exits Machining Check...

Страница 36: ...and enter the manufacturer password 3 Check Enable CCD to enable CCD 4 4 4 Set the Workpiece Origin by CCD Center There are two methods to set the workpiece origin By tool nose By CCD center This way...

Страница 37: ...ing the hollowed out area on the workpiece is quite small If the workpiece is tiled direct machining may damage the workpiece Thus it is necessary to set safety offset The range of the safety offset a...

Страница 38: ...red To set workpiece offset compensation do the following 1 Switch to Craft page and check Setting ON 2 Click Set Part Offset Comp Work Offset Compensation dialog box pops up 3 Check Enable Offset to...

Страница 39: ...ompensation is required 5 Set related parameters for overall compensation or single compensation 4 4 7 Set Workpiece Size Compensation During machining if the size of the machined workpiece is not the...

Страница 40: ...esults in the damage of a certain workpiece single compensation is required 5 Set the workpiece size 6 Set related parameters for overall compensation or single compensation After setting if the workp...

Страница 41: ...to enable offset 4 Set Compensation Type as Single Compensation 5 Set Z axis offset of the corresponding station The station number corresponds to the shooting order 4 4 9 Execute Simulation After fin...

Страница 42: ...mp dialog box pops up 2 Check Settings ON and enter the manufacturer password to enable setting 3 Check Auto Layer Comp to enable automatic layer compensation Check enable automatic layer compensation...

Страница 43: ...ool stops Not exceeded machining continues Not reached the value of Real time Length Comp keeps unchanged and machining continues until the value of Finished Times is equal to the value of Length Comp...

Страница 44: ...inished Workpiece What to Do If errors exist firstly confirm whether the error value is within the reasonable error range If the error value is within the reasonable error range do nothing If the erro...

Страница 45: ...e to ensure stable machining 5 4 How to Test the Installation of the Camera or Lens To test the installation do the following 1 Manually move X axis towards negative direction 2 Click To Shoot and sav...

Страница 46: ...hile Z axis moves at the focal height in simulation Before actual machining it is recommended to execute simulation to check all settings 5 7 What Are the Requirements for the Selected Feature Points...

Страница 47: ...e and CCD When the machine machines with CCD the position of the actual point is obtained according to the position of the picture and the shooting position however in actual machining it is the spind...

Страница 48: ...Shanghai Weihong Electronic Technology Co Ltd Address No 1590 Huhang Rd Fengxian Shanghai China 201401 Hot line 400 882 9188 Website www weihong com cn en SPECIALIZED CONCENTRATED FOCUSED...

Отзывы: