background image

6

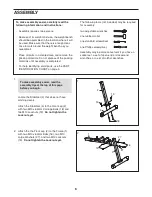
1.

Locate the Stabilizer (4) that does not have

warning decals.

Attach the Stabilizer (4) to the Front Leg (2)

with two M10 x 63mm Carriage Bolts (18) and

two M10 Locknuts (19).

Do not tighten the

Locknuts yet.

2. Attach the the Front Leg (2) to the Frame (1)

with two M10 x 63mm Bolts (16), two M10

Large Washers (27), and two M10 Locknuts

(19).

Do not tighten the Locknuts yet.

1

2

2

1

19

16

2

27

27

19

19

18

4

ASSEMBLY

To make assembly easier, carefully read the

following information and instructions:

• Assembly requires two persons.

• Because of its weight and size, the weight bench

should be assembled in the location where it will

be used. Make sure that there is enough clear-

ance to walk around the weight bench as you

assemble it.

• Place all parts in a cleared area and remove the

packing materials. Do not dispose of the packing

materials until assembly is completed.

• For help identifying small parts, use the PART

IDENTIFICATION CHART on page 5.

• The following tools (not included) may be required

for assembly:
two adjustable wrenches
one rubber mallet
one standard screwdriver
one Phillips screwdriver
Assembly may be more convenient if you have a

socket set, a set of open-end or closed-end

wrenches, or a set of ratchet wrenches.

To make assembly easier, read the

assembly tips at the top of this page

before you begin.

Содержание 30279.0

Страница 1: ...uestions or if parts are damaged or missing PLEASE CONTACT OUR CUSTOMER SERVICE DEPARTMENT DIRECTLY CALL TOLL FREE 1 888 936 4266 Mon Fri 8 00 until 17 00 ET excluding holidays OR E MAIL US customerservice iconcanada ca CAUTION Read all precautions and instruc tions in this manual before using this equipment Keep this manual for future reference USERʼS MANUAL ...

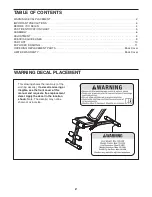
Страница 2: ...ERCISE GUIDELINES 9 PART LIST 10 EXPLODED DRAWING 11 ORDERING REPLACEMENT PARTS Back Cover LIMITED WARRANTY Back Cover This drawing shows the location s of the warning decal s If a decal is missing or illegible see the front cover of this manual and request a free replacement decal Apply the decal in the location shown Note The decal s may not be shown at actual size ...

Страница 3: ...l rental or institutional setting 5 Keep the weight bench indoors away from moisture and dust Place the weight bench on a level surface with a mat beneath it to protect the floor or carpet Make sure that there is enough clearance around the weight bench to mount dismount and use it 6 Inspect and properly tighten all parts regu larly Replace any worn parts immediately 7 Keep children under age 12 a...

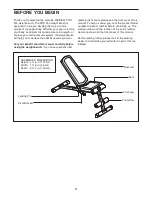
Страница 4: ...hieve the specific results you want For your benefit read this manual carefully before using the weight bench If you have questions after reading this manual please see the front cover of this manual To help us assist you note the product model number and serial number before contacting us The model number and the location of the serial number decal are shown on the front cover of this manual Befo...

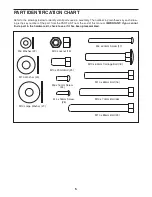
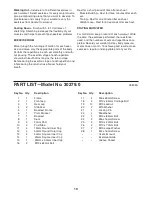
Страница 5: ...w 17 M6 x 16mm Screw 24 M10 Washer 20 M10 Large Washer 27 PART IDENTIFICATION CHART Refer to the drawings below to identify small parts used in assembly The number in parentheses by each draw ing is the key number of the part from the PART LIST near the end of this manual IMPORTANT If you cannot find a part in the hardware kit check to see if it has been preassembled ...

Страница 6: ...weight bench should be assembled in the location where it will be used Make sure that there is enough clear ance to walk around the weight bench as you assemble it Place all parts in a cleared area and remove the packing materials Do not dispose of the packing materials until assembly is completed For help identifying small parts use the PART IDENTIFICATION CHART on page 5 The following tools not ...

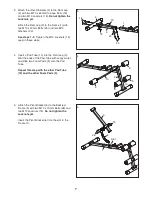
Страница 7: ... used in these steps 4 Insert a Pad Tube 10 into the Front Leg 2 Wet the ends of the Pad Tube with soapy water and slide two Foam Pads 9 onto the Pad Tube Repeat this step with the other Pad Tube 10 and the other Foam Pads 9 5 Attach the Pivot Bracket 6 to the Backrest Frame 5 with two M10 x 70mm Bolts 26 and two M10 Locknuts 19 Do not tighten the Locknuts yet Insert the Pivot Bracket 6 into the s...

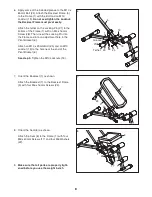
Страница 8: ... included grease to the M10 x 85mm Bolt 23 Attach the Backrest Frame 5 to the Frame 1 with the Bolt and an M10 Locknut 19 Do not overtighten the Locknut the Backrest Frame must pivot easily Attach the tether on the Locking Pin 21 to the bottom of the Frame 1 with an M4 x 16mm Screw 28 Then insert the Locking Pin into the Frame and into an adjustment hole in the Pivot Bracket 6 Attach an M10 x 20mm...

Страница 9: ... resistance Toning Tone your muscles by working them to a moderate percentage of their capacity Select a mod erate amount of resistance and increase the number of repetitions in each set Complete as many sets of 15 to 20 repetitions as possible without discomfort Rest for 1 minute after each set Work your muscles by completing more sets rather than by using high amounts of resistance Weight Loss T...

Страница 10: ...xercises from workout to workout Cooling Down Finish with 5 to 10 minutes of stretching Stretching increases the flexibility of your muscles and helps to prevent post exercise problems EXERCISE FORM Move through the full range of motion for each exer cise and move only the appropriate parts of the body Perform the repetitions in each set smoothly and with out pausing The exertion stage of each rep...

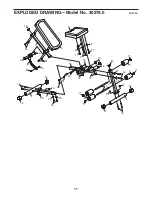
Страница 11: ...11 EXPLODED DRAWING Model No 30279 0 R0809A 1 4 12 12 18 19 3 19 20 20 25 21 13 19 23 13 28 19 19 27 27 16 22 22 17 17 17 8 14 9 9 11 11 2 9 10 11 11 4 12 12 19 18 19 7 15 24 5 24 6 26 19 19 25 ...

Страница 12: ...ht damage abuse misuse improp er or abnormal usage or repairs not provided by an ICON authorized service center products used for commercial or rental purposes or products used as store display models No other warranty beyond that specifically set forth above is authorized by ICON ICON is not responsible or liable for indirect special or consequential damages arising out of or in con nection with ...

Отзывы: