background image

www.weg.net  


11371757                                               Installation, operation and maintenance manual – Squirrel cage motor – M line – Vertical

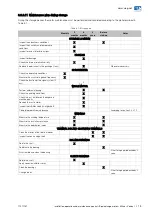
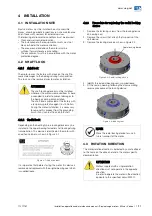
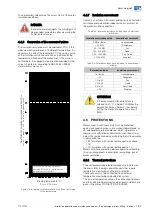
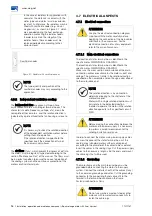
   l   31 


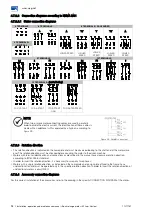
Figure 4.11: Angular alignment 


Figure 4.11 shows the angular misalignment and a 
practical form to measure it. 
The measurement is done in four points 90° away from 
each other, with the two half-couplings rotating together 
in order to eliminate effects of support surface 
irregularities on the dial gauge tip. Choosing the upper 
vertical point as 0°, half of the difference between the dial 
gauge measurements at the 0° and 180° points 
represents the vertical misalignment. In case of deviation, 
it must be corrected by adding or removing alignment 
shims. 
Half the difference between the dial gauge measurements 
at the 90° and 270° points represents the horizontal 
misalignment, which must be properly corrected by 
displacing the motor in the lateral/angular direction.  
Half of the maximum difference among the dial gauge 
measurements in a complete rotation represents the 
maximum angular misalignment found. 
The misalignment in a complete shaft rotation, with rigid 
or semi flexible coupling, cannot exceed 0.03 mm. 
When flexible couplings are used, greater values than 
those indicated above are acceptable, provided that they 
do not exceed the value allowed by the coupling 
manufacturer.   
It is recommended to keep a safety margin for these 
values. 
In the alignment/leveling, the influence of the 
temperature on the motor and the driven machine must 
be taken into account. Different expansions of the parts 
may change the alignment/leveling conditions during 
operation. 
 

4.8.8


Hollow shaft motor alignment 


Motors with hollow shaft require an exact alignment of 
the motor shaft with the driven machine shaft. The pump 
shaft works as a pendulum supported by the upper 
coupling and the motor bearing. 
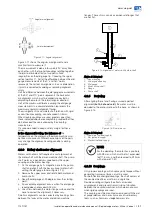
1.


Fix the dial gauge by its magnetic base to the pump 
shaft and align it with the base surface (motor shaft), 
setting the dial gauge to zero (Figure 4.12)

2.


Remove the upper cover and rotate both motor and 
pump shafts; 

3.


Read the dial gauge at 90 degrees from the starting 
point; 

4.


An acceptable alignment occurs when the dial gauge 
reading does not exceed 0.05 mm; 

5.


Use shims between the motor flange surface and the 
base to correct the alignment, if necessary. 

Small misalignments can be corrected by inserting shims 
between the faces of the motor and driven machine 

flanges. These shims can also compensate flanges that 
are not flat. 


Figure 4.12: Alignment of motors with hollow shaft


Figure 4.12 legend: 
1.


Upper bearing 

2.


Lower guide bearing 

3.


Dial gauge 

4.


Motor hollow shaft 

5.


Flange 

6.


Pump shaft 


4.8.9


 Doweling 

 
After aligning the set and having assured a perfect 
alignment 

(both, hot and cold)

, the motor must be 

doweled to the anchor plate or to the base, as shown in 
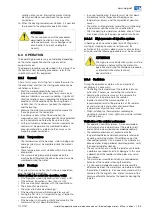
Figure 4.13. 


Figure 4.13: Dowel pin set 

 
Figure 4.13 
legend: 
1.


Dowel pin (optional supply) 

2.


Nut (optional supply) 

3.


Washer (optional supply) 


NOTE 

For the doweling, the motor has a pre-hole 
with Ø9 mm, which must be first expanded 
to Ø11.5 mm, and then reamed to Ø12 mm 
with a taper of 1:50.


4.8.10


Couplings 


Only proper couplings, which convey only torque without 
generating transversal forces, must be used.  
For both flexible and rigid couplings, the shaft centers of 
the coupled machines must be in a single line. 
Flexible couplings mitigate the effects of residual 
misalignments and prevent transmission of vibration 
between the coupled machines, which does not occur 
when rigid couplings are used. 
The coupling must be mounted or removed with the aid 
of proper devices and never by means of rudimentary 
tools, such as hammers, sledgehammers, etc. 
 

Angular misalignment 

Axial measurement 

Содержание M line Series

Страница 1: ...Motors I Automation I Energy I Transmission Distribution I Coatings Low and high voltage three phase induction motors M line Squirrel cage rotor Vertical Installation Operation and Maintenance Manual...

Страница 2: ......

Страница 3: ...Installation Operation and Maintenance Manual Document Number 11371757 Models MGA MGP MGD MGT MGV MGF MGR MGI MGW and MGL Language English Revision 7 May 2018...

Страница 4: ......

Страница 5: ...lly before proceeding with the installation operation or maintenance of the motor in order to ensure safe and reliable operation of your equipment and facility If you need any further information plea...

Страница 6: ......

Страница 7: ...olling bearing 17 3 3 3 5 3 Sleeve bearing 17 3 3 3 6 Terminal boxes 17 3 3 3 7 Air water heat exchanger 18 3 3 3 8 Cleanliness and conservation of the motor during storage 18 3 3 3 9 Inspections and...

Страница 8: ...2 Base loads 29 4 8 3 Motor mounting 29 4 8 3 1 Motor with solid shaft and flange 29 4 8 3 2 Motor with hollow shaft and flange 29 4 8 4 Anchor plate set 29 4 8 5 Natural frequency of the base 30 4 8...

Страница 9: ...sembly 42 7 9 2 Oil lubricated rolling bearing 42 7 9 2 1 Lubrication instructions 43 7 9 2 2 Oil type 43 7 9 2 3 Oil change 43 7 9 2 4 Bearing operation 43 7 9 2 5 Bearing disassembly 44 7 9 2 6 Bear...

Страница 10: ...www weg net 10 l Installation operation and maintenance manual Squirrel cage motor M line Vertical 11371757 14 WARRANTY TERM 56...

Страница 11: ...ors with major special features is necessary consult WEG All procedures and standards contained in this manual must be observed in order to ensure proper operation of the motor and the safety of the p...

Страница 12: ...ample keep people away avoid contact of children etc Those responsible for the safety of the installation must ensure that Only qualified personnel install and operate the equipment They have this man...

Страница 13: ...nals within the limits in accordance with the IEC60034 1 standard Voltage may vary within a range of 10 of the rated value Frequency may vary within a range of 5 to 3 of the rated value Figure 2 1 Vol...

Страница 14: ...ugs present in the terminal box holes These protections must remain in place until the moment of the final assembly A complete visual inspection of the motor must be carried out after removing the pac...

Страница 15: ...tor which is needed to ensure proper storage conditions Place the motor on platforms or foundations that ensure protection against humidity from the ground and prevent it from sinking into the soil Fr...

Страница 16: ...ckage must be covered with protection against dust moisture and other odd materials using resistant canvas or plastic The package must be placed on platforms or foundations that ensure protection agai...

Страница 17: ...rage period the following preservation procedures must be performed Close all the threaded holes with plugs Check if all the flanges e g oil inlet and outlet are closed If not they must be closed with...

Страница 18: ...ucts such as ammonia compounds and hydrogen sulfide are taken out of the radiator and not deposited inside 3 3 3 8 Cleanliness and conservation of the motor during storage The motor should be free of...

Страница 19: ...ons X Measure the circuit voltage and frequency X Check the function of the signal system if any X WHOLE MOTOR Perform external cleaning X X Check the painting conditions X Check the rust inhibitor on...

Страница 20: ...bled inspected and cleaned before starting the motor operation Reassemble the sleeve bearings and carry out lubrication Contact WEG to perform this procedure 3 3 4 3 Bearing lubrication Use the lubric...

Страница 21: ...this product from the grounding brush if any contact track on the shaft 4 2 2 Radial lock Depending on the bearing type a locking device may be installed in the upper bearing for radial shaft locking...

Страница 22: ...tions to the stator terminals Disconnect and insulate all CTs and PTs if any Ground the motor frame Measure the winding temperature Ground all temperature sensors Check the humidity The insulation res...

Страница 23: ...s and 1 minute Polarization Index Insulation assessment 1 or lower Unacceptable 1 5 Dangerous 1 5 to 2 0 Fair 2 0 to 3 0 Good 3 0 to 4 0 Very Good 4 0 Excellent ATTENTION If the measured insulation re...

Страница 24: ...with winding temperatures above the limits of the insulation thermal class the lifespan of the insulation and hence that of the motor will be significantly reduced or it may even result in the motor b...

Страница 25: ...that it is de energized before the motor is put into operation The values of the space heater supply voltage and power are informed in the connection diagram and in the specific plate affixed to the m...

Страница 26: ...e beginning the connection of the main cables and those of the accessories For the electrical connection of auxiliary equipment refer to their specific manuals 4 7 1 1 Main electrical connections The...

Страница 27: ...or connection diagrams 3 TERMINALS 6 TERMINALS 6 TERMINALS DAHLANDER Y LOWER SPEED YY HIGHER SPEED Y LOWER SPEED YY LOWER SPEED HIGHER SPEED 3 TERMINALS NEUTRAL 9 TERMINALS 12 TERMINALS YY Y YY Y 12 T...

Страница 28: ...ions 4 7 2 3 Rotation direction The rotation direction is indicated on the nameplate and must be observed looking to the shaft end at the motor drive end The rotation direction must be checked before...

Страница 29: ...e 6 Couple the motor shaft to the driven machine 7 Rotate the shaft of the set to ensure that it rotates freely 8 Align the equipment according to the procedure described in this manual 9 Tighten all...

Страница 30: ...horizontal planes Make the proper adjustments by placing shims under the motor The motor leveling must be checked with proper equipment NOTE At least 75 of the motor foot support surfaces must rest on...

Страница 31: ...rks as a pendulum supported by the upper coupling and the motor bearing 1 Fix the dial gauge by its magnetic base to the pump shaft and align it with the base surface motor shaft setting the dial gaug...

Страница 32: ...ing can be controlled with the insertion of a paper strip on which the trace of all teeth shows up after a gear turn 4 8 10 3 Belt drive Figure 4 15 Belt drive When a reduction or increase in speed is...

Страница 33: ...induction motors have a high starting current the time spent to accelerate loads with high inertia results in a quick rise of the motor temperature If the intervals between successive starts are too s...

Страница 34: ...ing parts of the motor must be protected to prevent accidents 15 The terminal box covers must be correctly fastened 16 Check if the power supply voltage and frequency comply with the data on the motor...

Страница 35: ...t start it is important to pay attention to unusual vibrations or noises If the bearing is not working silently and smoothly the motor must be shut down immediately In case of overheating the motor mu...

Страница 36: ...ct measurement of the shaft vibration The shaft vibration measured in these motors must comply with the IEC 60034 14 or NEMA MG 1 standard The alarm and trip values of Table 6 2 represent the acceptab...

Страница 37: ...ements must be done at regular intervals especially during humid weather and after prolonged motor stoppages Low values or sudden variations in the insulation resistance must be investigated The windi...

Страница 38: ...ove the radiator for maintenance use the following procedure 1 Close all the water inlet and outlet valves after stopping the ventilation 2 Drain the water through the radiator drain plugs 3 Remove th...

Страница 39: ...from being dragged into the rolling bearing For lubrication use only manual grease gun 7 9 1 2 Procedures for rolling bearing relubrication 1 Remove the drain plug 2 Clean with a cotton cloth around t...

Страница 40: ...0 to 150 0 94 Table 7 3 shows the most common rolling bearings used in vertical motors the quantity of grease and the speed limit for using alternative greases Table 7 3 Application of alternative gre...

Страница 41: ...ase change or for any damages arising from this change 7 9 1 7 Low temperature greases Table 7 4 Grease for application at low temperatures Manufacturer Grease Constant operating temperature C Applica...

Страница 42: ...move the KMT nut 9 5 Remove the screws 11 and 12 and remove the bearing hub 6 Remove the upper end shield 14 7 Move the intermediate ring and the inner bearing cap away from the bearing in order to ob...

Страница 43: ...s Between 85 and 90 C 8 000 hours Between 90 and 95 C 6 000 hours Between 95 and 100 C 4 000 hours The lifespan of the bearings depends on their operating conditions on the motor operating conditions...

Страница 44: ...olling bearing puller extract the set formed by the upper ring 130 lower ring 200 and rolling bearing 120 Figure 7 7 Lower bearing Figure 7 7 legend 10 Oil tank 20 Oil flinger 30 Oil guide 40 Bearing...

Страница 45: ...es place The water pressure must be 0 1 bar and the flow equal to 0 7 l s The pH must be neutral NOTE Under no circumstances can water leak into the oil tank because this will contaminate the lubrican...

Страница 46: ...ing of the oil level and its lubricating conditions Checking the bearing noise and vibration levels Monitoring of the operating temperatures and retightening of the fastening and mounting screws In or...

Страница 47: ...on the bearing protection system Alarm 110 C Trip 120 C The alarm temperature must be set 10 C above the operating temperature not exceeding the limit of 110 C 7 9 5 2 Disassembly assembly of the slee...

Страница 48: ...MBLY The following precautions must be taken when disassembling the motor 1 Before disassembling the motor disconnect the water cooling and lubrication pipes if any 2 Disconnect the motor electrical c...

Страница 49: ...437 290 M24 3 637 425 557 372 M27 3 926 615 810 538 M30 3 5 1260 838 1102 734 M33 3 5 1704 1130 1490 990 M36 4 2195 1459 1920 1277 M42 4 5 3507 2328 3070 2037 M48 5 5258 3488 4600 3052 Table 8 2 Screw...

Страница 50: ...mperature sensor for front and rear bearing Space heater Filter felt if any Grounding Brush Front and rear bearing for the fan motor if applicable Lubricant for bearings Vibration sensor for front and...

Страница 51: ...leaks and temperature x Lubricant quality control x Inspection of the bearing shell and shaft journal sleeve bearing x Lubricant change According to the period indicated on the bearing nameplate AIR...

Страница 52: ...s interrupted after the start Check the power cables The stator current oscillates under load with double the slip frequency Motor presents a humming noise during starting Rotor winding is interrupted...

Страница 53: ...ting conditions vibration etc bearing conditions The operating condition does not correspond to the nameplate data Keep the operating condition according to the nameplate or reduce the load Unbalance...

Страница 54: ...www weg net 54 l Installation operation and maintenance manual Squirrel cage motor M line Vertical 11371757 11 DECLARATION OF CONFORMITY...

Страница 55: ...product that has a long useful life however when it must be disposed WEG recommends that the materials of the packaging and of the product be properly separated and sent for recycling The non recycla...

Страница 56: ...s in lieu of all other warranties expressed or implied written or oral There are no implied warranties of merchantability or fitness for a particular purpose that apply to this sale No employee agent...

Страница 57: ...www weg net 11371757 Installation operation and maintenance manual Squirrel cage motor M line Vertical l 57 NOTES...

Страница 58: ...www weg net 58 l Installation operation and maintenance manual Squirrel cage motor M line Vertical 11371757...

Страница 59: ...remona Phone 39 374 340 404 www ferrarisrl it STIAVELLI IRIO S P A Via Pantano Blocco 16 Capalle 50010 Campi Bisenzio FI Phone 39 55 898 448 www stiavelli com JAPAN WEG ELECTRIC MOTORS JAPAN CO LTD Yo...

Отзывы: