background image

FR

ENTRETIEN

1. 

Nettoyez la pièce à main avec un 

chiffon humide en alcool, séchez-la bien 
après la désinfection. Assurez-vous qu’il 
n’entre pas du produit à l’intérieur. 
 
2. 

Ne baignez pas la pièce à main 

dans l’eau ou l’huile. Les composants 
internes pourraient s’endommager. 

3. 

Vous pouvez utiliser une soufflette 

à air comprimé pour éliminer la poussière 
restante en faisant attention à ne pas 
laisser entrer de l’air directement dans 
la pièce à main qui pourrait endommager 
les composants à l’intérieur. 

FICHE TECHNIQUE

Dimensions appareil

13,5 x 11,5 x 8 
cm

Dimensions pièce à 
main

16,5 x 3 cm

Poids

1.7 kg

Couple

2,8 N/cm

Voltage nominal 

220V/230V/240V

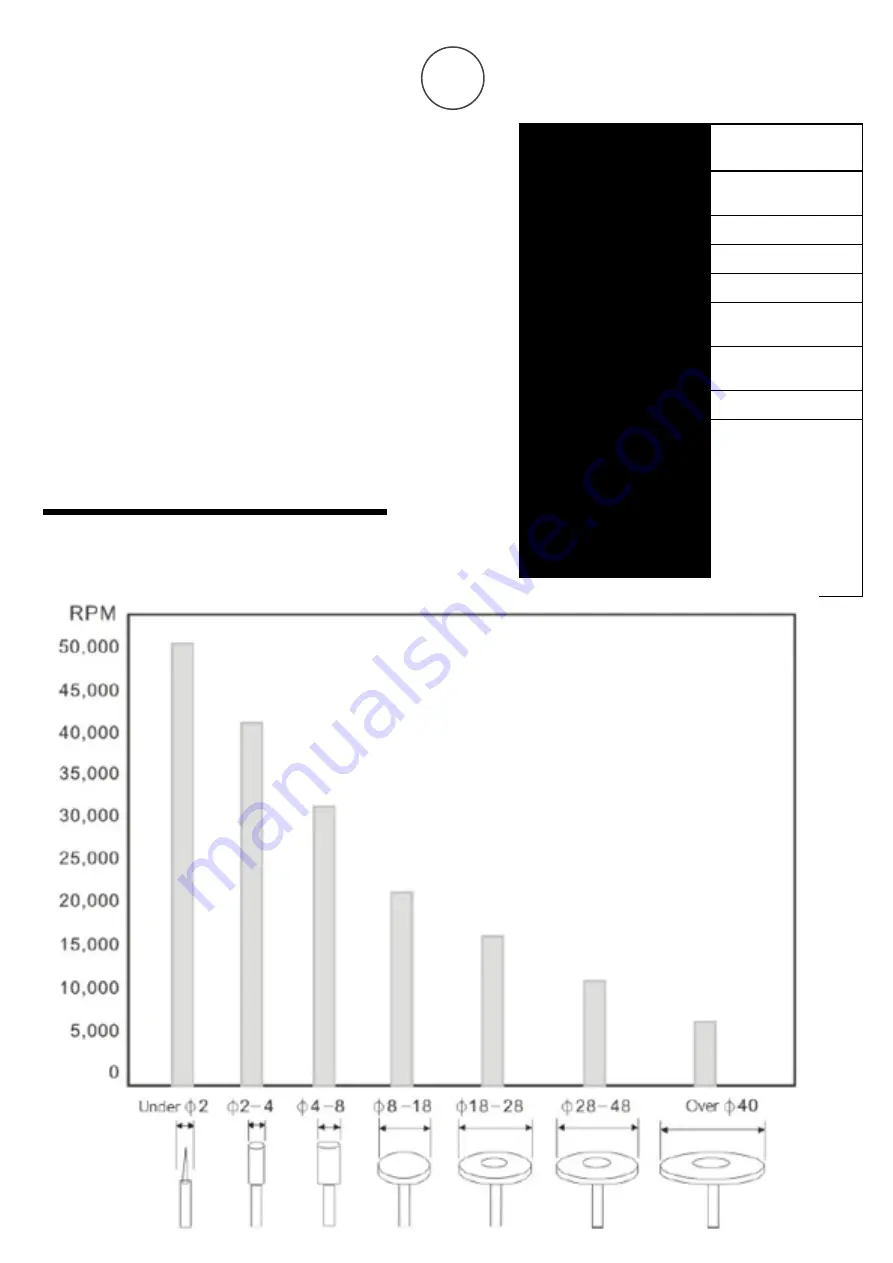
Vitesse de rotation 
maximale 

35.000 rpm

Courant de charge 
maximale

2A

Puissance 

65W

Compatibilité avec 
ponceuses 

2.35mm, 3.0mm, 
3.175mm (ISO 
7785-2 TYPE 
2). Longitude 
minimale et 
maximale de la 
ponceuse: 10/35 
mm. 

Содержание WIND WKP006

Страница 1: ...ction manual FR Mode d emploi DE Bedienungsanleitung IT Manuale d istruzioni WKP006 MICROMOTOR PARA PODOLOG A MICROMOTOR FOR PODIATRY MICROMOTEUR PODOLOGIE Fu pflegeger t ideal f r Podologie MICROMOTO...

Страница 2: ...Tensi n 2014 35 EU Directiva de Compatibilidad Electro magn tica 2014 30 EU RECICLAJE Cuando aparezca este s mbolo en cualquiera de nuestros productos el ctricos o su embalaje esto signi ca que dicho...

Страница 3: ...r pedal 10 Fusible ES INSTRUCCIONES DE USO 1 Aseg rese de que la unidad prin cipal est apagada antes de enchufarla a la corriente 2 Conecte la pieza de mano a la uni dad principal y coloque la pieza d...

Страница 4: ...equipo 7 Apague el equipo con el pedal para verificar que el pedal funciona correcta mente 8 Escoja ahora el sentido de rotaci n con Left Right para regular hacia la iz quierda o la derecha Encienda e...

Страница 5: ...r que el aire a presi n entre directamente en la pieza de mano y pueda da ar los componentes del interior FICHA T CNICA No utilice una fresa que est oxidada o torcida Aumente la velocidad de manera pr...

Страница 6: ...the following directi ves Low Voltage Directive 2014 35 EU Electromagnetic Compatibility Directive 2014 30 EU RECYCLING Whenever any of our electrical products or their presentation packa ging bear th...

Страница 7: ...9 Footswitch connector 10 Fuse EN OPERATION INSTRUCTIONS 1 Please make sure the main unit is switched off before plugging it into a wall socket 2 Connect the handpiece to the main unit and place the...

Страница 8: ...to check if it is working pro perly 8 Use Left Right to select the direc tion of rotation to the left or to the right Switch the device on to check if both directions are working properly 9 Once the...

Страница 9: ...ressed air gun to re move traces of dust Use it carefully to prevent the compressed air from entering inside the handpiece and damaging its internal components TECHNICAL SHEET Product size 13 5 x 11 5...

Страница 10: ...ns nonc es dans la Directive Basse tension 2014 35 EU Conditions nonc es dans la Directi ve Compatibilit lectromagn tique 2014 30 EU RECYCLAGE Si l un des composants lectri ques ou leur emballage de p...

Страница 11: ...necteur p dale 10 Fusible FR MODE D EMPLOI 1 Assurez vous que l unit princi pale est teinte avant de la brancher l alimentation 2 Branchez la pi ce main l unit principale et placez tr s attentivement...

Страница 12: ...vec la p dale pour v rifier qu elle fonctionne correcte ment 8 Choisissez maintenant le sens de rotation avec le bouton Left Right pour le r gler gauche ou droite Allumez l appareil pour v rifier si t...

Страница 13: ...liminer la poussi re restante en faisant attention ne pas laisser entrer de l air directement dans la pi ce main qui pourrait endommager les composants l int rieur FICHE TECHNIQUE Dimensions appareil...

Страница 14: ...RKL RUNG Dieses Produkt erf llt die folgenden Anfor derungen Die Vorschriften der Niederspannungsri chtlinie 2014 35 EU Die Vorschriften der Richtlinie ber elektro magnatische Vertr glichkeit 2014 30...

Страница 15: ...chluss DE BEDIENUNGSANLEITUNG 1 Vergewissern Sie sich dass das Hauptger t ausgeschaltet ist bevor Sie es an eine Steckdose anschlie en 2 Schlie en Sie das Handst ck an die Haupteinheit an und legen Si...

Страница 16: ...tioniert 8 W hlen Sie mit Links Rechts die Drehrichtung nach links oder rechts Schalten Sie das Ger t ein um zu ber pr fen ob beide Richtungen ordnungs gem funktionieren 9 Sobald das Ger t gut konfigu...

Страница 17: ...ckluftpistole Seien Sie vorsichtig um zu verhindern dass Druckluft in das Handst ck eindringt und dessen internen Komponenten besch digt werden TECHNISCHE ANGABEN Produktgr e 13 5 x 11 5 x 8 cm Handst...

Страница 18: ...nsione 2014 35 EU Le misure della Direttiva sulla compa tibilit elettromagnetica 2014 30 EU RICICLAGGIO Quando questo simbolo indi cato in uno qualsiasi dei nostri prodotti elettrici o nell imballaggi...

Страница 19: ...nnettore pedale 10 Fusibile IT ISTRUZIONI D USO 1 Assicurarsi che l unit principale sia spenta prima di collegarla alla co rrente 2 Collegare il manipolo all unit principale e posizionare con attenzio...

Страница 20: ...ficare che il pedale funzio ni correttamente 8 Scegliere ora la direzione di rota zione attraverso Left Right per regolarla verso destra o sinistra Accendere l appa recchiatura per verificare se entra...

Страница 21: ...compressa per pulire la polvere con molta attenzione per evitare che l aria pressurizzata entri direttamente nel manipolo e possa danneggiare i compo nenti interni SCHEDA TECNICA Dimensioni dell appa...

Отзывы: