background image

9

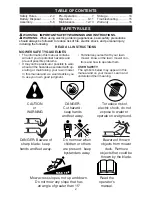
The operation of any lawn mower can result in foreign objects thrown into 
the eyes, which can result in severe eye damage. Always wear safety 
glasses or eye shields while operating your lawn mower or performing any 
ad just ments or repairs. We recommend standard safety glasses or a wide 
vision safety mask worn over spectacles.
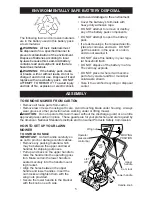
LEVER 
BACKWARD 
TO RAISE 
MOWER

LEVER 
FORWARD 
TO LOWER 
MOWER

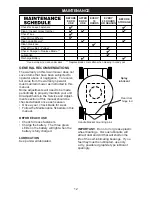
Height adjuster lever

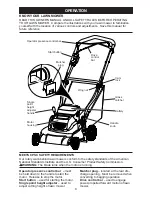
HOW TO USE YOUR LAWN MOWER

•   Your lawn mower is equipped with an 

operator pres ence control bar which 
requires the operator to be positioned 
behind the lawn mower handle to start 
and operate the lawn mower.

 CAUTION:  Federal reg u la tions require 

a motor control to be in stalled on this 
lawn mower in order to min i mize the risk 
of blade contact injury. Do not un der 
any cir cum stanc es attempt to de feat the 
func tion of the operator con trol. The blade 
turns when the motor is running.

TO START

•   Press the start button.
•   Hold down operator presence control 

bar to handle

.

•   Mower will begin to operate.

TO STOP

•   To stop motor, release operator pres-

ence con trol bar.

Let the blade come to a complete stop.

TO OPERATE DRIVE SYSTEM 
•     To start forward motion, lift drive con-

trol bar up to handle.

•     To stop forward motion, release drive 

control bar.

IMPORTANT:  Always keep drive control 
fully engaged against handle when in use.

OPERATION

TO ADJUST CUTTING HEIGHT 
Adjust cutting height to suit your re quire -
ments.  Me di um position is best for most 
lawns.  Raise wheels for low cut and lower 
wheels for high cut.  All four wheels are 
adjusted by a single lever.
•   Pull adjuster lever toward wheel. To 

lower mower, move lever forward to 
desired position. To raise mow er, move 
the lever toward the rear.

DRIVE CONTROL ENGAGED

Operator 
pres ence 
con trol bar

DRIVE CONTROL DIS EN GAGED

Drive 

con trol 

bar

Start 
button

Содержание 438175

Страница 1: ...OPERATOR S MANUAL MODEL NUMBER WE18XP BATTERY POWERED SELF PROPELLED 2 IN 1 18 ROTARY LAWN MOWER 438175...

Страница 2: ...s below may appear in this manual and on your mower Learn and understand their meaning CAUTION or WARNING DANGER Cut hazard keep hands and feet away To reduce risk of electric shock do not expose to w...

Страница 3: ...ght Do not operate the machine while under the influence of alcohol or drugs Never operate machine in rain or on wet grass Always be sure of your footing keep a firm hold on the handle and walk never...

Страница 4: ...y use batteries provided or approved by the manufacturer SAFETY RULES The batteries are sealed units and can not be opened or taken apart When a battery is no longer holding a charge take it to a loca...

Страница 5: ...TO SET UP YOUR LAWN MOWER TO UNFOLD HANDLE IMPORTANT Unfold handle carefully so as not to pinch or damage control cables Remove any packing material which may be between the upper and lower handles fo...

Страница 6: ...Plug the battery charger into the jack on the battery 4 Plug the other end of the battery charger into a 120 volt A C outlet The red light on the charger will illuminate indicating that the charger is...

Страница 7: ...atch what you are doing Use common sense Do not operate lawn mower when you are tired Store Idle Lawn Mower Indoors When not in use lawn mower should be stored in an indoor dry and locked up place out...

Страница 8: ...ols and adjustments Save this manual for future reference OPERATION Operator presence control bar must be held down to the handle to start the motor Release to stop the motor Start button used for sta...

Страница 9: ...ttempt to defeat the function of the operator control The blade turns when the motor is running TO START Press the start button Hold down operator presence control bar to handle Mower will begin to op...

Страница 10: ...the lawn mower housing when the rear door is lowered onto the grass catcher frame CAUTION Do not run your lawn mower without mulcher plug or approved grass catcher in place Never attempt to operate th...

Страница 11: ...See CLEANING in the Main tenance section of this manual The special mulching blade will recut the grass clippings many times and reduce them in size so that as they fall onto the lawn they will disper...

Страница 12: ...the battery will light when the battery is fully charged LUBRICATION Keep unit well lubricated Spray lubricant Rear door hinge rod Handle bracket mounting pins MAINTENANCE Check for Loose Fasteners Cl...

Страница 13: ...ls not turning freely means trash grass cuttings etc may be inside the drive wheel and dust cover area and must be cleaned out to free drive wheels If necessary to clean the drive wheels check both re...

Страница 14: ...Maintenance section of this manual Lubricate as shown in the Maintenance section of this manual Be sure that all nuts bolts screws and pins are securely fastened Inspect moving parts for damage break...

Страница 15: ...blade 1 Replace blade Tighten uneven blade bolt 2 Buildup of grass leaves 2 Clean underside of and trash under mower mower housing 3 Weak Battery 3 Remove battery and charge Excessive 1 Worn bent or l...

Страница 16: ...l or commercial purposes is limited to 45 days from the date of original purchase 5 This Warranty applies only to products which have been properly assembled adjusted operated and maintained in accord...

Отзывы: