Weber Summit 43270 Скачать руководство пользователя страница 2

2

WWW.WEBER.COM

®

LOCATING YOUR  GRILL

When determining a suitable location for your Summit

®

 gas grill installation, give attention 

to concerns such as exposure to wind, proximity to traffic paths, and keeping any 
gas supply lines as short as possible. Never locate the Summit

®

 gas grill in a garage, 

breezeway, shed, under an unprotected overhang, or other enclosed area. Locate the grill 
and structure so there is enough room to safely evacuate the area in case of a fire.

CLEARANCE FROM SURFACES OR STRUCTURES


WARNING: Clearance from any surface or structure is 24 
inches (609.6 mm) from the back and sides of the grill. 
Refer to “Typical Gas Supply Installation” before starting 
installation.


WARNING: The  structure, “island”, countertops, and adjacent 
work areas for the built-in grill installation must be built from 
noncombustible materials only.

NOTE: If you have questions on what materials are considered noncombustible, contact 
your local building materials supplier or fire department.


DANGER

Failure to follow the Dangers, Warnings and Cautions 
contained in this Owner’s Manual may result in serious bodily 
injury or death, or in a fire or an explosion causing damage to 
property.


Do not attempt to disconnect any gas fitting while your 
barbecue is in operation.


Keep any electrical supply cord and the fuel supply hose 
away from any heated surfaces.


Do not use this Weber

®

 tank enclosure kit unless all parts are 

in place.  The unit must be properly assembled according 
to the instructions outlined in the “Assembly Instruction” 
section of the Owner’s Guide.


Proposition 65 Warning: Handling the brass material on 
this product exposes you to lead, a chemical known to the 
state of California to cause cancer, birth defects or other 
reproductive harm. 


(Wash hands after handling this product.)

LIQUID PROPANE GAS UNITS ONLY:


Use the regulator that is supplied with your Weber

®

 Tank 

Enclosure Kit.


Do not attempt to disconnect the gas regulator or any gas 
fitting while your barbecue is in operation. 


A dented or rusty liquid propane cylinder may be hazardous 
and should be checked by your liquid propane supplier. Do 
not use a liquid propane cylinder with a damaged valve.


Although your liquid propane cylinder may appear to be 
empty, gas may still be present, and the cylinder should be 
transported and stored accordingly.


If you see, smell or hear the hiss of escaping gas from the 
liquid propane cylinder:


1.  Move away from liquid propane cylinder.


2.  Do not attempt to correct the problem yourself.


3.  Call your fire department.


WARNINGS

BUILT-IN CUTOUT DIMENSIONS

CLEARANCES

1

24˝ inches (610 mm) Any Surface

2

27˝ inches (685.8 mm) min. for lid clearance

a

Grill Frame

b

Note: For a countertop treatment: Recommended 3/4˝ (19.1 mm) 
overhang. Notch front edge for frame to fully slide in.


WARNINGS


Do not store a spare or disconnected liquid propane cylinder 
under or near the barbecue.


Improper assembly may be dangerous. Please carefully 
follow the assembly instructions in this manual. 


Do not operate the Weber

®

 gas barbecue if there is a gas leak 

present.


Do not use a flame to check for gas leaks.


Combustible materials should never be within 24 (60.96cm) 
inches of the top, bottom, back or sides of your Weber

®

 gas 

barbecue.


Do not put a barbecue cover or anything flammable on, or in 
the storage area under the barbecue.


Your Weber

®

 gas barbecue should never be used by children. 

Accessible parts of the barbecue may be very hot. Keep 
young children away while it is in use.


You should exercise reasonable care when operating your 
Weber

®

 gas barbecue. It will be hot during cooking or 

cleaning and should never be left unattended, or moved 
while in operation.


Liquid propane gas is not natural gas. The conversion or 
attempted use of natural gas in a liquid propane unit or 
liquid propane gas in a natural gas unit is dangerous and 
will void your warranty.

Содержание Summit 43270

Страница 1: ...1 Do not store or use gasoline or other flammable liquids or vapors in the vicinity of this or any other appliance 2 An LP cylinder not connected for use shall not be stored in the vicinity of this or any other appliance WARNING Follow all leak check procedures carefully in this manual prior to barbecue operation Do this even if the barbecue was dealer assembled NOTICE TO INSTALLER These instructi...

Страница 2: ...Use the regulator that is supplied with your Weber Tank Enclosure Kit Do not attempt to disconnect the gas regulator or any gas fitting while your barbecue is in operation A dented or rusty liquid propane cylinder may be hazardous and should be checked by your liquid propane supplier Do not use a liquid propane cylinder with a damaged valve Although your liquid propane cylinder may appear to be em...

Страница 3: ...1 4 768 35 mm 38 1 4 971 55 mm 1 4 1 4 6 35mm 2 34 3 8 873 13 mm 34 3 8 873 13 mm 1 4 1 4 6 35mm 3 23 584 2 mm 23 584 2 mm 1 4 1 4 6 35mm BUILT IN CUTOUT DIMENSIONS S 460 S 660 DIMENSIONS 1 24 minimum 610 mm 24 minimum 610 mm 2 4 3 4 120 65 mm 4 3 4 120 65 mm 3 6 1 4 158 75 mm 6 1 4 158 75 mm 4 10 1 2 266 7 mm minimum 10 1 2 266 7 mm minimum 5 23 584 2 mm 23 584 2 mm 6 34 3 8 873 13 mm 34 3 8 873 ...

Страница 4: ...Lid 1 Cookbox 1 Front Frame Rail 1 Rear Frame Rail 1 Rear Panel Assembly 1 Bottom Shelf 1 Left Door 1 Right Door 1 Warming Rack 1 Right Enclosure Panel 1 Left Enclosure Panel 1 Front Vent Panel 1 Rear Vent 1 Corrugated Gas Line 1 OR S 460 S 660 ...

Страница 5: ...otor 1 Rotisserie Bracket 1 Handle 2 Smoker 1 Smoker Bar 1 1 2 inch Bolts 20 x 1 2 inch Bolt 10 Nylon Washer 10 Hinge Pin 2 Hair Pin Cotter 2 10 32 x 1 4 inch Steel Screw 5 20 x 1 2 inch Truss Head Screw 2 10 Sheet Metal Screw 3 Flat Head Screw 2 Plastic Anchors 5 Keps Nuts 1 4 x 20 Keps Nut 2 1 inch Bolt 20 x 1 inch Bolt 2 Handle Hardware 4 7 16 inch Wrench 1 S 460 S 660 Right Front Vent Clip 1 L...

Страница 6: ...6 WWW WEBER COM ASSEMBLY 1 1 2 2 3 1 2 Arrow stickers on Frame Rail 1 and Left Side Panel 2 should point toward each other shown above Door Stop Bracket 3 should be positioned as shown left ...

Страница 7: ...7 WWW WEBER COM 7 ATTENTION Do not fully tighten screws Clips should slide freely when installed ASSEMBLY 3 4 ...

Страница 8: ...8 WWW WEBER COM ASSEMBLY 5 6 Back ...

Страница 9: ...9 WWW WEBER COM 9 ASSEMBLY 7 ...

Страница 10: ... island structure opening Make sure the frame is resting level on the finished surface of the structure B Adjust the Front Vent to rest squarely on ground ASSEMBLY 8 CLEARANCES 1 24 610 mm Any Surface a Grill Frame b Note For a countertop treatment Recommended 19 1 mm 3 4 inch overhang Notch front edge for frame to fully slide in ...

Страница 11: ...t are in contact with the island structure This will prevent moisture seepage The sealant you use must have a temperature rating above 120 F 48 8 C 1 4 6 35 mm Drill Bit ASSEMBLY ATTENTION Before applying any silicone sealant make sure the cookbox is flush with the front of the grill frame 9 10 A 1 S 460 S 660 ...

Страница 12: ...LY F S 460 11 BATTERY HOUSING WIRING 1 BLACK WIRE 2 GREEN WIRE 3 RED WIRE 4 RED WIRE 3 4 1 2 WARNING Make sure that all control knobs are turned to the OFF position before connecting the gas supply and operating the grill 3 D ...

Страница 13: ... ASSEMBLY 13 12 Requires 3 D alkaline batteries Included Use alkaline batteries only Do not mix old and new batteries or different types of batteries standard alkaline or rechargeable 1 2 3 Note Secure wire to side panel ...

Страница 14: ...14 WWW WEBER COM ASSEMBLY S 660 S 460 14 16 15 S 660 S 460 ...

Страница 15: ...15 WWW WEBER COM 15 ASSEMBLY S 660 S 460 A B C 17 Match Holder ...

Страница 16: ...16 WWW WEBER COM ASSEMBLY S 660 S 460 18 19 1 4 6 35 mm Drill Bit ATTENTION Before drilling any holes for the rear vent make sure the cookbox is flush with the front of the grill frame ...

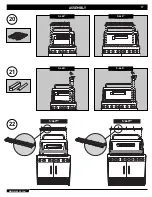
Страница 17: ...17 WWW WEBER COM 17 ASSEMBLY S 660 S 460 20 21 22 S 460 S 660 S 660 S 460 ...

Страница 18: ...18 WWW WEBER COM ASSEMBLY 23 S 660 S 460 ...

Страница 19: ...19 WWW WEBER COM 19 ASSEMBLY 24 S 460 S 660 ...

Страница 20: ...1 2 2 4 The Weber Grill Out Handle Light has a Tilt Sensor Lid up ON Lid Closed OFF The power button a activates or deactivates the Tilt Sensor For daytime use deactivate the sensor by pressing power button a ASSEMBLY Requires 3 AAA alkaline batteries not included ...

Страница 21: ...Gas Inlet Table 6 2 a Maximum Capacity of Metallic Pipe in Cubic Feet of Gas per Hour for Gas Pressures of 2 psi or Less and a Pressure Drop of 0 3 Inch Water Column Based on a 0 60 Specific Gravity Gas Nominal Iron Pipe Size Inches Actual ID Inches Length of Pipe Feet 10 20 30 40 50 60 70 80 90 100 125 150 175 200 1 2 622 131 90 72 62 55 50 46 42 40 38 33 30 28 26 3 4 824 273 188 151 129 114 104 ...

Страница 22: ...RT 1 Top View Close up 2 Typical Natural Gas Pipe Routing a Connecting Corrugated Gas Line to the Regulator b Gas and Regulator Connected c Hard piped gas supply d Cap Optional Side Burner e Corrugated Gas Line to Manifold f Regulator DANGER Do not use an open flame to check for gas leaks Be sure there are no sparks or open flames in the area while you check for gas leaks This will result in a fir...

Страница 23: ...enting per side Vents should be on two sides of the structure The above drawings are for reference only Location of the vents should be from the center outward Locate the vents at both the bottom of the structure and at the top of the structure The bottom vents should be as close to ground level as possible Make sure the vent area is not blocked by interior supports of the structure We recommend v...

Страница 24: ... United Kingdom Smokey Joe Weber Weber One Touch U S A Kettle Configuration Kettle Silhouette Smokey Joe Weber One Touch Firespice Go Anywhere U S A Kettle Configuration Kettle Silhouette Genesis Flavorizer Crossover Flamgo Performer Rapidfire Tuck N Carry Jumbo Joe Bar B Kettle Master Touch Spirit Grill Out Summit Platinum 1 800 Grill Out Ranch Matchless Flame Zimbabwe Weber Kettle Configuration ...

Отзывы: