background image

28 

WWW.WEBER.COM

® 


TIPS & HINTS 

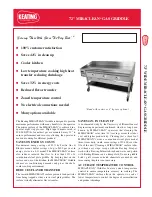
• Always preheat the grill before 

cooking. Set burner(s) on high 

heat and close lid; preheat for 

10 to 15 minutes. 

• The temperature of your gas 

grill may run hotter than 

normal for the first few uses. 

• Recipe grilling times are based 

on outside temperatures of 

70°F (21°C) and little or no 

wind. Allow for more cooking 

time on cold or windy days, or 

at higher altitudes. Allow for 

less cooking time in extremely 

hot weather. 

• Grilling conditions may require 

adjustment of the burner 

control knobs to attain the 

correct cooking temperatures. 

• Sear meats and cook with the 

lid down for perfectly grilled 

food every time. 

• Crowding food onto a cooking 

grate means more time will 

be required to cook the food. 

• Trim excess fat from steaks, 

chops, and roasts, leaving 

no more than a scant ¼ inch 

(6.4mm) of fat. Less fat 

makes cleanup easier, and is 

a virtual guarantee against 

unwanted flare-ups. 

• In general, large pieces 

of meat will require more 

cooking time per pound (kilo) 

than small pieces of meat. 

• Some foods, such as a 

casserole or thin fish fillets, 

will require a container for 

grilling. Disposable foil pans 

are very convenient, but any 

metal pan with ovenproof 

handles can also be used. 


• Foods in containers, such 

as baked beans, will require 

more time if grilled in a deep 

casserole than in a shallow 

baking pan. 

• Use tongs rather than a fork 

for turning and handling 

meats to avoid losing natural 

juices. Use two spatulas for 

handling large whole fish. 

• Always be sure the cookbox 

and removable catch pan are 

clean and free from debris. 

• Do not line the cookbox with 

foil. This could prevent the 

grease from flowing into the 

removable catch pan. 

• If an unwanted flare-up 

should occur, turn burner(s) 

off and move food to another 

area of the cooking grate. Any 

flames will quickly subside. 

After flames subside, relight 

the grill. NEVER USE WATER 

TO EXTINGUISH FLAMES ON 

A GAS GRILL. 

• Using a timer will help to alert 

you when “well done” is about 

to become “overdone.” 

• A light coating of oil will help 

brown your food evenly and 

keep it from sticking to the 

cooking grate. Always brush 

or spray oil onto your food, 

not directly onto the cooking 

grate. 

• When using a marinade, sauce 

or glaze with a high sugar 

content or other ingredients 

that burn easily, only brush it 

onto the food during the last 

5 to 10 minutes of barbecuing. 

PREHEATING 

Preheating the grill before grilling is important. To 

preheat: Light your grill according to the instructions in 

this Owner’s Guide; then turn burner(s) to start/high ( 

) position, close the lid, and preheat grill. This will take 

10 to 15 minutes depending on conditions such as air 

temperature and wind. After preheating, you can adjust 

the burner(s) as desired. 

WARNING: Should the burner(s) go out 

while grill is in operation, turn all gas 

valves off. Open the lid and wait five 

minutes before attempting to relight 

grill, using the igniting instructions. 

COVERED COOKING 

All grilling is done with the lid down to provide uniform, 

evenly circulated heat. With the lid closed, the gas grill 

cooks much like a convection oven. The thermometer 

in the lid, a feature on some of our grills, indicates the 

cooking temperature inside the grill. All preheating and 

grilling is done with the lid down. No peeking — heat is 

lost every time you lift the lid. 

GREASE COLLECTION SYSTEM 

Unique cooking grate design features angled, cast-iron 

rails that deflect drippings away from the burner tube(s), 

preventing flare-ups that can char food. The remaining 

drippings flow into a removable catch pan that slides out 

for easy cleaning. 

For more grilling tips and recipes, visit www.weber.com. 

GRILLING TIPS & HELPFUL HINTS 

Содержание Q 3200 Series

Страница 1: ...ld keep them for futureuse 48613 US ENGLISH 07 01 14 GRILLOWNER SGUIDE 37 57 REGISTER YOURGRILL Thank you forpurchasing a Weber grill Take a few minutes to protect your investment by registering your...

Страница 2: ...e an extra spare or disconnected liquid propane tank under or near this grill m After a period of storage and or nonuse the Weber gas grill should be checked for gas leaks and burner obstructions befo...

Страница 3: ...storms The use and or installation of parts on your WEBER product that are not genuine Weber parts will void this Warranty and any damages that result hereby are not covered by this Warranty Any conve...

Страница 4: ...4 WWW WEBER COM Q3200_US_LP_070114 1 24 2 25 3 4 5 6 7 8 9 10 11 12 13 26 14 15 16 17 27 28 29 18 19 30 20 21 31 22 32 23 WEBER Q 3200 EXPLODEDVIEW DIAGRAMADEDESPIECE VUEECLATEE...

Страница 5: ...teodesechable 16 Bandeja de recuperaci ndesmontable 17 Pata izquierda del carro 18 Soporte transversal frontal 19 Sujetador de herramientas 20 Descanso del tanque 21 Soporte del tanque 22 Correa del t...

Страница 6: ...6 WWW WEBER COM 1 1 1 1 2 1 1 1 1 2 1 2 1 1 1 1 1 2 12 4 1 2 1 1 1 1 1 1 2 2 1 PARTS LIST LISTA DE PARTES LISTE DES PIECES...

Страница 7: ...ASSEMBLY ENSAMBLAJE ASSEMBLAGE WWW WEBER COM 7 TOOLS NEEDED HERRAMIENTAS REQUERIDAS OUTILS NECESSAIRES 1 2...

Страница 8: ...ASSEMBLY ENSAMBLAJE ASSEMBLAGE 2 8 WWW WEBER COM 3...

Страница 9: ...on the right Ignition instruction m El bastidor de la ruedava a la derecha La etiqueta de instruccionesde encendidove hacia adelante m Le cadre des rouesse place droite L autocollant pour les instruct...

Страница 10: ...ASSEMBLY ENSAMBLAJE ASSEMBLAGE 6 10 WWW WEBER COM...

Страница 11: ...ASSEMBLY ENSAMBLAJE ASSEMBLAGE WWW WEBER COM 11 4 8 7...

Страница 12: ...ASSEMBLY ENSAMBLAJE ASSEMBLAGE 12 WWW WEBER COM 2 2 10 9...

Страница 13: ...ASSEMBLY ENSAMBLAJE ASSEMBLAGE WWW WEBER COM 13 1 11 12...

Страница 14: ...a la pata del carro mADVERTENCIA La manguera debesujetarse a la pata del carro usando el clip de retenci n El no hacerlo podr a causar da osa la manguera ocasionando un fuego o explosi n que pueden ca...

Страница 15: ...ASSEMBLY ENSAMBLAJE ASSEMBLAGE WWW WEBER COM 15 3 14 1 2...

Страница 16: ...ASSEMBLY ENSAMBLAJE ASSEMBLAGE 16 WWW WEBER COM 2 1 3 4 15...

Страница 17: ...AGE WWW WEBER COM 17 You may hear a rattle in lightpod This is normal Podr a escuchar un traqueteo en la l mpara Esto es normal Vous entendrez peut tre un bruit l int rieur de la douille de la lampe C...

Страница 18: ...ves ou diff rents types de piles standards alcalines ou rechargeables Si vous ne pr voyez pas d utiliser l Eclairage de Poign e Grill Out pendant un mois ou plus retirez les piles The Grill Out Handle...

Страница 19: ...ASSEMBLY ENSAMBLAJE ASSEMBLAGE WWW WEBER COM 19 1 18 19...

Страница 20: ...20 WWW WEBER COM STORAGEFEATURES CARACTER STICAS DE ALMACENAMIENTO FONCTIONS DE STOCKAGE...

Страница 21: ...hould also be checked for any obstructions Refer to ANNUAL MAINTENANCE US INSTALLATION CODES Installation must conform with local codes or in the absence of local codes with either the National Fuel G...

Страница 22: ...hose assemblies must be those specified byWeber Stephen Products LLC Be sure the regulator is mounted with the small vent hole pointed downward so that it will not collect water This vent should be fr...

Страница 23: ...cover from the tankvalve C Screw the regulator coupling onto the tank valve turning clockwise or to the right Hand tightenonly NOTE This connection tightens clockwise and will not allow gas to flow un...

Страница 24: ...bs in and turning them clockwise If they do not turn they are off If they do turn continue turning them clockwise until they stop then they are off B Turn gas supply on at source 2 m WARNING Do not ig...

Страница 25: ...line the removable catch pan with a Weber disposable drip pan which will help keep the removable catch pan cleaner longer Cleaning the removable catch pan is just as important as cleaning the cookbox...

Страница 26: ...e todosomay result inan explosive flare up which can cause serious bodily injury or death C Turn the LP tank on by slowly turning the tank valve counterclockwise wait 60 seconds 3 D Light the outside...

Страница 27: ...g to light the grill Failure todosomay result inan explosive flare up which can cause serious bodily injury or death C Turn the LP tank on by slowly turning the tank valve counterclockwise wait 60 sec...

Страница 28: ...move food to another area of the cooking grate Any flames will quickly subside After flames subside relight the grill NEVER USE WATER TO EXTINGUISH FLAMES ON AGASGRILL Using a timer will help to alert...

Страница 29: ...thod is the shortest route to great results and the best way to ensure doneness safety With each method you can adjust the burners as desired The control settings HIGH MEDIUM LOW or OFF are described...

Страница 30: ...el hose Burner flame pattern is erratic Flame is low when burner control knob is on high position Flames do not run the whole length of the burnertube Clean burner ports that run down the entire lengt...

Страница 31: ...ect screen s has have become dirty or blocked WEBER SPIDER INSECT SCREEN S The combustion air opening s of the burner tube s 5 is are fitted with stainless steel screen s to help prevent spiders and o...

Страница 32: ...g them clockwise until they stop then they are off C Open lid and remove cookboxcomponents Remove Burner Tubes You will need A 3 8 nut driver A Remove the screw that holds the outside burnertube to th...

Страница 33: ...istle brush to clean the outside of the burner tubes This is done to make sure all burner ports openings running along the length of the burner tubes are fullyopen 8 m CAUTION Do not enlarge the burne...

Страница 34: ...of burner tube 1 C When cleaning is complete replace the cooking grates Cookbox Wash inside of cookbox with warm soapy water then rinse with water Removable Catch Pan and Disposable Drip Pan Your gril...

Страница 35: ...is installed correctly 1 Some batteries have a plastic protective wrap around them This plastic must be removed before installing battery Do not confuse this plastic with thebattery label Make sure t...

Страница 36: ...36 WWW WEBER COM MEMO...

Страница 37: ...them clean by preheating your grill and brushing the grates with a stainless steel wire grate cleaning brush This simple step is essential for removi ng food particles and burned grease and for creati...

Страница 38: ...ss or bone in inch thick 10 to 14 minutes sear 6 minutes high heat and gri ll 4 to 8 minutes low heat 1 to 1 inches thick 14 to 18 minutes sear 8 minutes high heat and gri ll 6 to 1 0 minu tes low hea...

Отзывы: