background image

Barbecuing 

Your Q

TM

 has been designed to cook magnificent 

steaks. To get the best results with steak, cook on 

the grill bars rather than on a hotplate. Only use 

a hotplate when there is the potential for a lot of 

fat to come away from the meat or when cooking 

eggs, pancakes and the like. When a recipe in this 

cooking guide requires you to ‘barbecue’, it is 

recommended that you turn the meat only once, 

halfway through cooking. 

Always barbecue with 

the lid closed, these barbecues are not designed 

to cook with the lid up. Even when cooking on a 

hotplate always cook with the lid down.

Whether you are barbecuing meat on the grill 

or on the breakfast plate, it is important that 

you preheat the barbecue before cooking. The 

instructions for pre-heating your Q follow.

Preheating and barbecuing

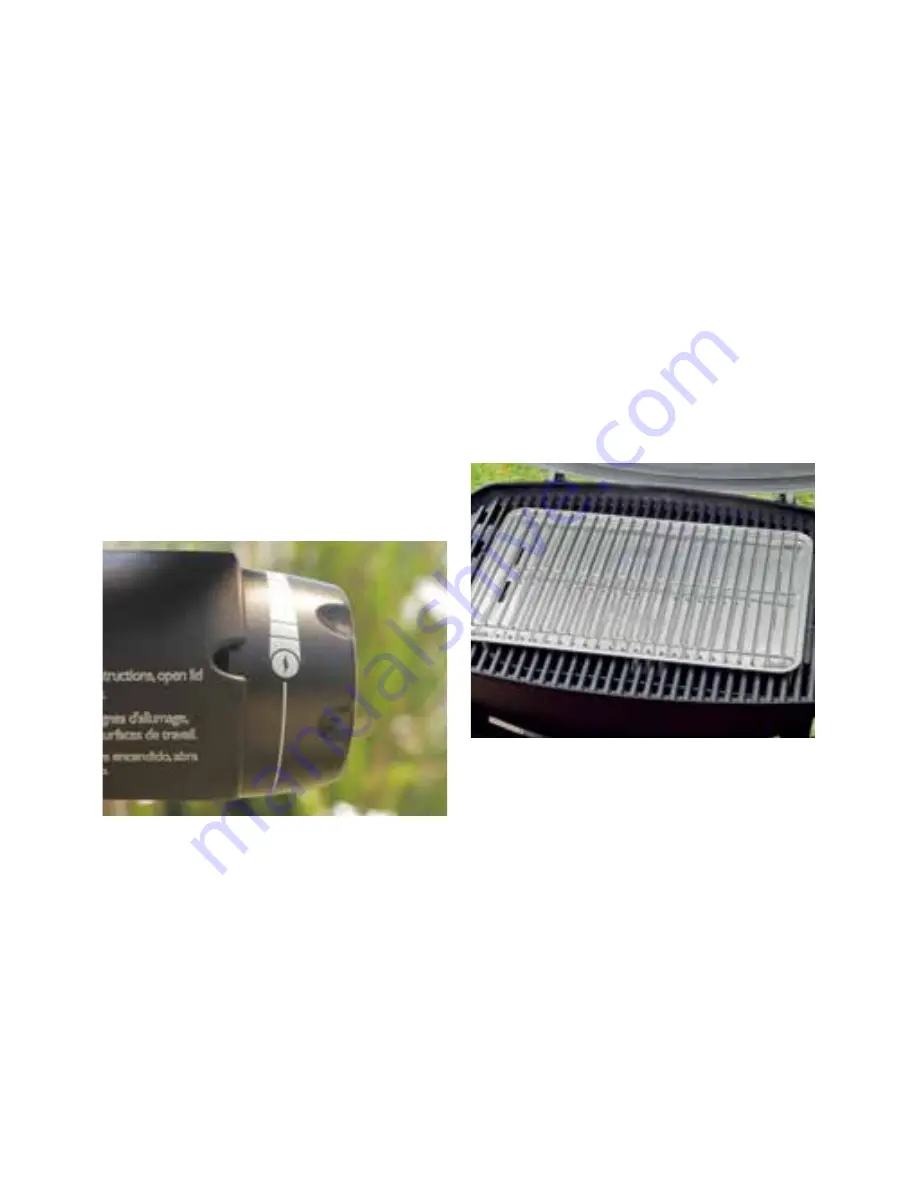
To preheat your Q, open the lid, unfold the 

work surfaces and turn the burner control 

knob to START/HI (photograph A). Immediately 

press the ignition button to light the barbecue. 

Once alight, close the lid and allow the barbecue 

to heat up for 10 minutes. Your Q is now preheated 

and ready for barbecuing. Leave the burner setting 

on START/HI throughout the barbecuing process. 

Remember to always cook with the lid down. If you 

are cooking with a hotplate, allow 10 to 15 minutes 

for it to heat up. Always preheat the plate with 

the lid down and test it with a droplet of water 

to make sure it’s hot enough to cook on. For more 

information on barbecuing and using a hotplate on 

your Q, have a look at the videos on our website at 

www.weberbbq.com.au (Australia)

www.webernz.co.nz (New Zealand)

Roasting and baking

When a recipe in this book requires you to ‘roast’ 

or ‘bake’, it is recommended that you remove the 

hotplate (if you have one), place both cooking 

grills in the barbecue and use a Q convection 

tray and Q trivet. The convection tray and trivet 

will transform your Q from cooking in barbecue 

mode to oven mode in seconds. The convection 

tray is engineered with vents designed to circulate 

the heat perfectly all around the food. The vents 

allow the fat from the roast to drain away, falling 

between the grill bars and into the drip pan below. 

To set up your Q for roasting and baking, place a 

convection tray on the grill so the four locating 

tabs sit inside the covered area of your cooking 

grill. The tray should now be positioned in the 

middle of your Q cooking grill. Place the Q trivet 

on the tray (photograph B). You are now set up to 

roast or bake.

When roasting or baking you must preheat the 

barbecue. The instructions for preheating the Q 

for roasting and baking follow.

Preheating and roasting or baking

To preheat your Q, open the lid and place the 

convection tray and trivet in position. Turn the 

burner control knob to START/HI (Photograph A). 

Immediately press the ignition button to light the 

barbecue. Preheat the barbecue for 10 minutes with 

the burner control knob on START/HI and the lid 

closed. Once your Q

TM

 is preheated, turn the burner 

control knob to the medium setting (Photograph C). 

Your Q is ready for roasting and baking. You 

can now place your food inside the Q. Continue 

cooking using these settings until the end of 

the cooking time. Unlike an indoor oven, your Q 

uses natural convection, allowing you to cook at 

higher temperatures. This is how your Q is able to 

produce such wonderful, flavoursome roasts and 

A

2

B

How to get the best from your Weber® Q™

Содержание Baby Q

Страница 1: ...Cooking with the Weber Q for Australia and New Zealand...

Страница 2: ...n connection of any other apparatus other than authorised Weber products improper maintenance or service or failure to perform normal and routine maintenance Weber may require proof of the date of pur...

Страница 3: ...with Crispy Skin Thai Cucumber Salad 9 Meat Lovers Pizza 11 Porterhouse Steaks 13 Prawn Satay with Peanut Dipping Sauce 15 Greek Style Roast Leg of Lamb 17 Roast Chicken 19 Baked Snapper 21 Traditiona...

Страница 4: ...oasting and baking When a recipe in this book requires you to roast or bake it is recommended that you remove the hotplate if you have one place both cooking grills in the barbecue and use a Q convect...

Страница 5: ...hen barbecue smoke is circulated all around the meat imparting a beautiful smokey flavour Third cooking times are greatly reduced about half of what you might expect on an open barbecue which means yo...

Страница 6: ...is is not possible face the back of your barbecue into the wind so that the wind cannot blow into the barbecue through the air vents on either side 4 Problem The gas will not relight after you ve been...

Страница 7: ...they are at least medium 71 C internal temperature and poultry until well done 74 C Cooking times In this cooking guide each recipe has the estimated cooking time included In addition pages 26 to 28...

Страница 8: ......

Страница 9: ...Method You will need an oiled hotplate accessory If cooking sausages place them on the preheated hotplate for 6 to 8 minutes with the lid down Turn them only once or twice Add the eggs bacon and the t...

Страница 10: ......

Страница 11: ...lmon fillets all over with olive oil Season with salt Barbecue the salmon on the hotplate skin side down for 4 minutes Turn the fillets and barbecue for another 2 or 3 minutes To make the salad Peel t...

Страница 12: ......

Страница 13: ...a Tray Spread pizza sauce evenly over the pizza base Place a small amount of cheese on top Cover with a mix of smoked ham salami and pepperoni and finish with a handful of cheese over the top Preheat...

Страница 14: ......

Страница 15: ...l teaspoon salt teaspoon freshly ground black pepper Method Lightly brush the steaks with olive oil Season evenly with the salt and pepper To cook to medium barbecue the steaks for about 4 minutes eac...

Страница 16: ......

Страница 17: ...add the oil and warm over medium high heat Add the garlic and ginger and cook until fragrant about 1 minute stirring occasionally Add cup of water followed by the peanut butter soy sauce pepper and To...

Страница 18: ......

Страница 19: ...the skin all over the leg of lamb Place a sliver of garlic and a small sprig of rosemary into each one Squeeze the lemon and smear the juice all over the skin Season with salt and pepper Roast the la...

Страница 20: ......

Страница 21: ...the chicken thoroughly and pat it dry Tuck the wings behind the back Brush the chicken with oil and season with salt and pepper Place the chicken on the Q trivet inside the barbecue and cook with the...

Страница 22: ......

Страница 23: ...the snapper on a double layer of good quality aluminium foil Make sure there is enough foil all around the edges to fold to create a parcel later Stuff the cavity with the lemon slices and bunch of or...

Страница 24: ......

Страница 25: ...s removed 1 teaspoon sugar extra 1 teaspoon ground cinnamon Method Beat the eggs with the sugar vanilla and milk Strain this into a lightly buttered aluminium drip tray Add the sultanas and walnuts Cu...

Страница 26: ......

Страница 27: ...n season with salt and pepper to taste Roast the turkey allowing 20 minutes and an additional 20 minutes per kilo e g for a 3 kilo turkey allow 20 minutes plus 3 x 20 minutes or a total of 80 minutes...

Страница 28: ...s barbecue 5 to 6 minutes per side Minced beef patty 20mm thick barbecue 4 to 5 minutes per side Sausages thin barbecue 3 to 4 minutes per side thick barbecue 4 to 5 minutes per side Game Quail whole...

Страница 29: ...and roast 30 to 40 minutes on roasting trivet Chicken whole 2 2kg to 2 4kg roast approx 1 to 1 hours on Q trivet Chicken half 570g to 650g roast 30 to 40 minutes on roasting trivet Rolled turkey breas...

Страница 30: ...minutes in husk barbecue 25 to 30 minutes Eggplant sliced barbecue 8 to 10 minutes halved barbecue 12 to 15 minutes Garlic whole roast 45 to 60 minutes Leek barbecue 14 to 16 minutes Mushrooms barbec...

Страница 31: ...e heat above below and all around the food No more fiddling with foil no fuss just great food Sit your trivet inside the convection tray pop the food in and close the lid Your Weber Q has now become a...

Страница 32: ...onds with the barbecue locked in place It s easy to transport or store and even creates a mobile trolley for your Q in the folded down position Patio cart A stylish permanent trolley for your Weber Q...

Страница 33: ...s with Easy Serve Pizza Tray Turn your Weber Q into a pizza oven and enjoy fantastic gourmet pizzas in your own backyard Includes comprehensive cooking instructions and recipe ideas iGrill Meat Thermo...

Страница 34: ...s illuminate the cooking surface of your Weber Q making cooking even easier Q Cookbox Scraper Designed to keep your Weber Q nice and clean Simply remove the grills and scrape any greasy build up into...

Страница 35: ...You can purchase this book by going to the store where you purchased your WeberQ or call Weber customer service and we can direct you to your nearest retailer Premium Trolley Cover for the Weber QTM T...

Страница 36: ...uth Roselle Road Palatine Illinois 60067 The shape of the Weber QTM is a registered trademark The Q design is covered by the following Australian patents Patent No 2007202420 Weber Q grill and support...

Отзывы: