


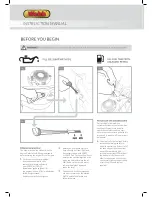


MAX
MIN
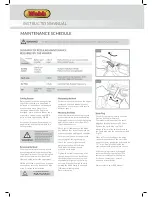
Air Filter
will reduce the performance and
life of the engine while making it
harder to start. Regular checks
are therefore essential, especially
when using the mower in dusty
conditions. Check and clean the air
often if the engine is used in a dusty
environment.
cartridge. Clean the cartridge in a
small bowl of warm water containing
a few drops of washing-up liquid
until it is perfectly clean and free
from all traces of grease and dust.
water and then squeeze gently to
remove most of the water. Let it air
dry until it is completely dry.
Clean the cover and inside of the air
Apply a uniform layer of oil to the
brush (you can use clean engine oil
lid, ensuring that each component
is in place and properly installed. If
very dirty, replace it using a genuine
part.
in. Remove the dipstick and check
the oil level holding the dipstick
horizontal.
The oil level should be between the
minimum and maximum oil level
marks on the dipstick (Fig.21). Add
oil if necessary and repeat the above
checking process. Running the
engine without oil or with too little
oil can cause serious engine damage.
Note: Dispose of used engine oil carefully,
responsibly and in accordance with local or
national regulations
Changing the oil
of mower use. Thereafter, change
the oil after every 25 hours use
or at least once a year. Leave the
engine running outdoors for several
minutes to warm the oil and make it
Remove the spark plug cap and
unscrew the oil level dipstick. Use a
suitable oil suction pump and follow
with new oil.
WARNING!
!
Parts of the engine will become very
hot and can cause severe burns.
WARNING!
The above advice is provided as an aid, please follow the instructions provided in your B&S engine manual, when maintaining your engine.
WARNING!
Do not twist the foam cartridge to
clean it as this could cause damage.
If your mower is not serviced
correctly, you could reduce your
mower’s ability to operate and void
warranty.
MAX
MIN
Fig17
Fig20
Fig18
Fig21
Fig19
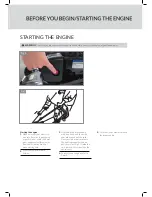
Adjusting the t
r
ansmission cable
In its transmission engaged position
(Fig. 18), the mower's Brake
Lever is pushed fully towards the
handlebar. An incorrectly adjusted
transmission cable can cause
premature wear to the mower's
drive system.
If the transmission cable is too
drive lever towards the handlebars.
Conversely, if the transmission
cable is not tight enough, the
transmission will function poorly
and will lack power.
To adjust the tension of the cable
transmission, increase or reduce
the length of the adjustment
device using the spanner (Fig. 19).
Check the effectiveness of the
transmission and the resistance of
the lever.
Once proper adjustment has been
reached, secure the adjustment
device by tightening the lock nuts.
Note: Depending on model.
Checking the oil l
evel
level surface. Unscrew the oil level
dipstick (Fig.20) and wipe dry.
Insert the dipstick until it reaches
!
BASIC MAINTENANCE
Holding the blade firmly in one hand, use
a spanner or socket to loosen the blade
screw & rotate anti-clockwise.
Wear appropriate protective gloves to
prevent possible injury when handling
the blade. Disconnect the spark plug cap
and tilt the mower on its side with air
filter and carburettor side uppermost.
Before and after each mowing session,
check that the blade, its attachment
bolts and drive shaft are not damaged
or excessively worn. Never try to
straighten a bent blade. Replace a
damaged, worn or bent blade as soon
as possible. Use only genuine WEBB
parts or those approved by WEBB.
Wear appropriate protective gloves to
prevent possible injury when handling
the blade. Disconnect the spark plug cap
and tilt the mower on its side with air
filter side uppermost.
Check that all components (the blade,
key, blade holder, screws and washers)
are present, clean and in good condition.
Tighten the screws connecting all of
the components. Make a final visual
check that all parts are present and
aligned before tightening the fixing
bolt very firmly with a wrench while
holding the blade firmly in one hand
(NB wear suitable gloves).
Rotate clockwise
Check the correct alignment and
matching of pads with the blade.
The blade must be positioned
precisely on its stand.
Position the blade on its support with
the cooling fins facing the engine.
For best mowing results, have the edges
sharpened and the blade balanced at
least once a year by a specialist service
dealer or agent.
Excessive vibration when mowing is a
good indication of a problem with the
cutting system.
Check the spark plug initially after the
first five hours of mower use.
Thereafter, maintenance of the spark
plug should take place every 25 hours.
Remove the spark plug cap
(Fig.15)
using a rotary motion and then remove
the spark plug with the wrench provided
(Fig.16).
If the spark plug is worn or damaged,
replace with a new spark plug of the
same or suitable type for the engine.
If in doubt, contact your point of
purchase or local dealer.
Alwasy refer to your B&S manual.
Clean off any carbon deposits using a
copper brush and check the electrode
gap with a feeler gauge (the gap should be
≈ 0.7 mm). Replace and tighten the
serviced spark plug and replace the cap.
The spark plug cap must be
removed before any attempt
is made to remove the blade
INSTRUCTION MANUAL
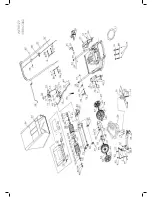
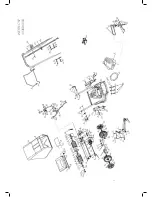
Содержание WERR17P
Страница 2: ......
Страница 17: ...NOTES...
Страница 18: ...WERR17P 193865002...
Страница 20: ...WERR17SP 193806004...
Страница 21: ......
Страница 28: ...Webb Lawnmowers Murdock Road Dorcan Swindon Wiltshire SN3 5HY...