Webb Werr17 Скачать руководство пользователя страница 9

8 User’s manual 

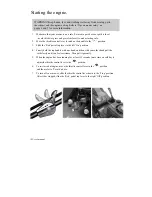
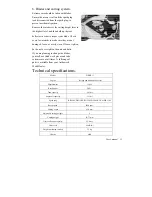
2. Fill fuel tank with unleaded petrol. 

Petrol is highly flammable so extreme caution must be 

taken when handling it. Always store petrol in approved 
containers and you must ensure that you use fresh 
petrol that is less than three months old. Do not mix oil 
with petrol. 

To put petrol in the fuel tank, firstly remove the warning 

label from under the petrol cap. It’s best to fill the tank 
using a clean funnel, but never fill it completely. Instead, 
leave at least 13mm from the bottom of the filler neck to 
allow for expansion. Ensure that you securely tighten the 
petrol cap after filling. 
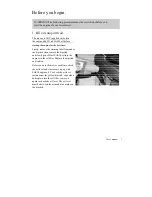
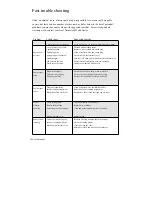
3. Attach the grass 

box or mulch plug

The grass catcher attaches easily by 

lifting the mower’s rear 

deflector

 and   

inserting t

he grass catcher

Just lift the rear

 deflector

 with one hand and then 

gently slide the catcher into 

position 


(as shown in photo on right). 

Your mower comes with a mulch plug, this
enables you to cut your grass without


collection, the cuttings disappear into your lawn. 

F

or efficient mulching you can only cut the top 1/3 of the height of your grass, cutting 

more than 1/3 stops the mulching action. To attach the mulch plug simply remove the 
grass catcher and insert the plug into the rear opening. 

Alternatively you can remove the grass catcher and mulch plug to discharge the cuttings
from the rear of the machine. 

Содержание Werr17

Страница 1: ...ANUAL AND PARTS LIST PETROL LAWNMOWER WERR17 Spares Support 01793 333212 www webblawnmower co uk Before use please read understand this manual paying particular attention to the safety instructions 12...

Страница 2: ...User s manual 1...

Страница 3: ...ance made easy 12 14 Technical speci cations 14 Fast trouble shooting 15 Warranty conditions 16 EC Declaration of Conformity 17 Notes 18 Warranty registration card 19 20 Webb products are monitored an...

Страница 4: ...Webb mower To ensure that you use your new mower responsibly and get the best results possible please read all of the safety and operating instructions carefully before using your lawnmower What you...

Страница 5: ...e v i r D 1 2 Operator presence control lever 8 Exhaust Oil filler and dipstick 9 l o r t n o c e l t t o r h T 3 r e l l o R 0 1 r o t c e l f e d r a e R 4 g a b n o i t c e l l o c s s a r G 1 1 k...

Страница 6: ...eet underneath the chassis of the lawnmower while the engine is running 6 Be aware that the machine s exhaust area and other parts of the lawnmower get very hot during use and will remain hot afterwar...

Страница 7: ...ll hot after use And please ensure that you securely tighten the petrol cap after lling 16 Do not transport the mower in a vehicle if there is any petrol in the tank 17 Store fuel and oil in a cool we...

Страница 8: ...remove the warning label from under the dipstick then remove the dipstick and slowly pour 591ml SAE30 oil into the engine via the oil ller Replace the dipstick and tighten Before you use the mower eac...

Страница 9: ...the petrol cap after lling 3 Attach the grass box or mulch plug The grass catcher attaches easily by lifting the mower s rear deflector and inserting the grass catcher Just lift the rear deflector wi...

Страница 10: ...stment is positioned on the rear left side There is a single 6 position lever that adjusts the front wheels and rear roller at the same time The lower the level the shorter the cut For very thick or m...

Страница 11: ...e position 3 Slide the Red petrol tap lever to the left On position 4 Firmly hold the top handle with one hand and then with your other hand pull the cord slowly until you feel resistance Then pull vi...

Страница 12: ...lug is NGK BR2LM When re tting the spark plug do not over tighten If adjusting yourself note the spark plug gap must be set to 0 75mm 2 Air lter Ensure the engine is cool unscrew the top air lter nut...

Страница 13: ...12 User s manual 3 Cleaning ABS deck often As the ABS material can be marked by petrol please clean the deck immediately whenever you find petrol on the deck or before storing...

Страница 14: ...ten but do not over tighten the nuts and bolts If you are planning to change the blades yourself use thick work gloves and take extreme care at all times A full range of parts is available from your A...

Страница 15: ...ap is not venting Wrong type of fuel Dirty air cleaner lter Incorrect height adjustment Blocked fuel cap vent holes Loose cutting blade Bent or broken blade Excessive grass dirt build up Blade worn da...

Страница 16: ...original purchaser that can provide original proof of purchase Defective parts will be replaced or repaired by an Authorised Webb Dealer without charge for labour or materials subject to conditions R...

Страница 17: ...Parts Diagram...

Страница 18: ...Front belt pulley 1 84 WE106 84 Tensioner bracket 1 29 WE106 29 Belt A710 1 85 WE106 85 Spring tensioner 2 30 WE106 30 BS500 engine 1 86 WE106 86 Cross recessed hexagon bolt with indentation M6 35 1...

Страница 19: ...ssessment procedure followed was in accordance with Annex VI of the Directive 2000 14 EC and the Directive 2005 88 EC Name of the Notified Body T V S D Product Service GmbH Address Ridlerstrasse 65 80...

Страница 20: ...User s manual Notes...

Страница 21: ...return to the address above Owner s Name Address Postcode Telephone No Email Address Agent Dealer Product Model Serial No Engine No Date of Purchase Date of Delivery Warranty Commences From Date of D...

Страница 22: ...Webb Lawnmowers Hobley Drive Stratton St Margaret Swindon Wiltshire SN3 4NS...

Отзывы: