Webb WER21HW Скачать руководство пользователя страница 13


12

CLEANING 

Carefully clean the machine with water after each cut; remove the grass debris and mud accumulated 

inside the chassis to avoid their drying and thus making the next start-up difficult. 

The paintwork on the inside of the chassis may peel off in time due to the abrasive action of the cut grass; 

in this case, intervene promptly by touching up the paintwork using a rustproof paint to prevent the 

formation of rust that would lead to corrosion of the metal. 

Remove the transmission casing by removing the screws and clean around the transmission and drive 

belts with a brush or compressed air once or twice a year. 

Once every season, the drive wheels should be cleaned internally. Remove both wheels. Clean the gear 

wheel and the wheel gear rim of grass and dirt using a brush or compressed air. 


CHANGING BLADES 

Empty the oil tank before removing the blade. 

To replace the blade, undo the screw. 


Reinstall as illustrated. Tighten the screw properly. Tightening torque 45 Nm.   

When replacing the blade, the blade screw should also be replaced. 
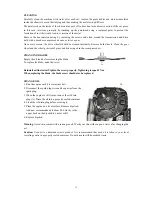
 

CHANGE OIL 

1. Run the engine until it is warm (not hot).                                                                                       

A


2. Disconnect the spark plug wire and keep away from the   

  spark plug. 

3. When the engine is still warm, remove the oil drain   

    plug (A). Drain the oil into a properly sealed container.   

4. Clean the oil drain plug before securing it. 

5. Place the engine on a level surface. Remove dipstick. 

Add new recommended oil about 0.6L slowly to the   

upper limit on the dipstick, do not overfill. 

6. Replace dipstick.   


Warning

:


Avoid skin contact with used engine oil. Wash your skin with soap and water after changing the 

oil. 

Caution: 

Used oil is a hazardous waste product. It is recommended that used oil is taken to your local 

recycling centre in a properly sealed container. Do not discard with household waste. 


Содержание WER21HW

Страница 1: ...MANUAL AND PARTS LIST PETROL LAWNMOWER WER21HW Spares Support 01793 333212 www webblawnmowers co uk Before use please read understand this manual paying particular attention to the safety instructions...

Страница 2: ...1...

Страница 3: ...Assembly Pre Operation 5 Petrol engine 190CC Operation 9 Engine speed 3000 min Maintenance 11 Cutting width 530mm Maintenance Schedule 14 Adjustable cutting height 24 78mm Trouble shooting 15 Grass co...

Страница 4: ...ny source of ignition until the petrol vapours have dissipated Replace all fuel tank and container caps securely d Replace faulty silencers e Before use always visually inspect to see that the blades...

Страница 5: ...n mind that the operator or user is responsible for accidents or hazards occurring to other people or their property x Do not trim near drop offs ditches or embankments The operator could lose footing...

Страница 6: ...rve the following safety instructions could result in serious injury or death WARNING In order to prevent accidental starting when setting up transporting adjusting or making repairs always disconnect...

Страница 7: ...the mower will cut and discharge the grass from the rear of the machine 3 Side Discharge Fit the mulch plug to the rear discharge opening of the mower and close the rear flap Lift the cover on the si...

Страница 8: ...7...

Страница 9: ...8...

Страница 10: ...e and pushing the drive control lever forward until it clicks then releasing the lever z Forward motion will stop when the operator presence control bar is released To stop forward motion without stop...

Страница 11: ...L z Fill the fuel tank to the bottom of the tank filler neck Do not overfill Use fresh clean regular unleaded petrol Do not mix oil with petrol Purchase fuel in quantities that can be used within 30 d...

Страница 12: ...the starter clean and clear of grass clippings and chaff This will help engine air flow and extend engine life MAINTENANCE IMPORTANT Regular careful maintenance will extend the lifespan of your machin...

Страница 13: ...mpressed air CHANGING BLADES Empty the oil tank before removing the blade To replace the blade undo the screw Reinstall as illustrated Tighten the screw properly Tightening torque 45 Nm When replacing...

Страница 14: ...ge set the gap to 0 75 mm 0 030 Refit the spark plug taking care not to overtighten it Air Filter Unclip the air filter cover and remove the paper filter element Close the air filter cover to avoid ob...

Страница 15: ...ICE PERIOD ITEM Perform at every indicated month or operating hour interval whichever comes first Before Each Use First Month or 5 Hrs Every 3 Months or 25 Hrs Every 6 Months or 50 Hrs Every Year or 1...

Страница 16: ...ble Cause Correction 1 Check the air cleaner Air cleaner elements clogged Clean or replace air cleaner elements p 13 2 Check the fuel Bad fuel engine stored without draining petrol or refuelled with b...

Страница 17: ...bin Take it to a recycling unit z Replace the silencer if faulty When carrying out repairs always use original spare parts z Always seek professional help when the carburettor requires adjustment z Cl...

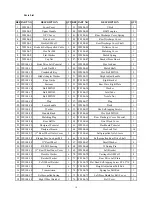
Страница 18: ...17 Parts Diagram...

Страница 19: ...zle Nut 1 19 WE104 19 Plug 2 57 WE104 57 Plug 1 20 WE104 20 Lower handle 1 58 WE104 58 Deck 1 21 WE104 21 Washer 6 59 WE104 59 Hex Self tapping Screws 3 22 WE104 22 Handle Knob 4 60 WE104 60 Hex Bolt...

Страница 20: ...eriod of 24 months This does not cover the product where the fault is due to misuse abuse use in contravention of the instructions or where the product has been the subject of unauthorised modificatio...

Страница 21: ...procedure followed was in accordance with Directive 2006 42 EC Annex VI Name of the Notified Body T V Rheinland LGA Products GmbH Address Tillystrasse 2 90431 Nurnberg GERMANY Measured Sound Pressure...

Страница 22: ...GE ES S E EL LE EC CT TR RI IC C P PE ET TR RO OL L R RO OT TA AR RY Y L LA AW WN N M MO OW WE ER RS S P PE ET TR RO OL L R RI ID DE E O ON N L LA AW WN N M MO OW WE ER R P PE ET TR RO OL L L LA AW W...

Страница 23: ...d return to the address above Owner s Name Address Postcode Telephone No Email Address Agent Dealer Product Model Serial No Engine No Date of Purchase Date of Delivery Warranty Commences From Date of...

Страница 24: ...Webb Lawnmowers Hobley Drive Stratton St Margaret Swindon Wiltshire SN3 4NS...

Отзывы: