background image

13


4.


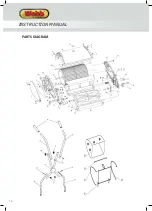
Now attach the upper & middle handle assembly from figure 1 to the lower handle. 


5.


Follow step 4 & 5 for the opposite side lower handle. 


GRASS COLLECTOR 

1.


Insert the two side Frames into the square collection box main frame. 

2.


Insert the support arm into the two side frames.  

3.


Fit the fabric collector over the frame, ensuring the split securing plastic u-shape is secured around the 

frame.  


FITTING THE GRASS COLLECTOR 

1.


To fit the grass collector to your lawnmower, position the two hooks on the bottom of your grass collector 

assembly, between the front roller and cutting cylinder, using the two hooks to locate and slot inside the 

two inner plates. 


SETTING UP YOUR CYLINDER 


CAUTION 

This operation must be undertaken close to the cutting cylinder blade. We strongly recommend the use of 

thick gardening gloves on both hands and the lawnmower body is secured to stop the cutting cylinder blade 

from rotating. 


1.


The fixed bottom blade must be set correctly for the lawnmower to work efficiently.  

2.


Carefully tighten the two top “Click” adjusting knobs, by turning them in small increments, in a clockwise 

direction.  

3.


Each click moves the cylinder by 0.05mm. 

4.


When the cylinder blade contacts the fixed bottom blade, turn the “Click” adjusting knob anti-clockwise, 

until you can rotate the cylinder cutting blade and you can hear light contact with the fixed bottom blade. 

5.


To check the machine is cutting correctly, place a piece of good quality paper, along the whole length of 

the fixed bottom blade (from underneath the lawnmower), with each of the five cutting blades. This 

should provide evidence of a good even cut. 


INSTRUCTION MANUAL

Содержание WEH12R

Страница 1: ...uld put the operator or machine in danger Whilst every effort has been made to ensure the accuracy of information contained in this manual our policy of continuous improvement determines the right to make modifications without prior warning Images are used for illustration purposes only en Original Instructions ASSEMBLY REQUIRED Minimum Two Persons Push Rear Roller Cylinder Mower WEH12R 193814003 ...

Страница 2: ...onal use only Commercial copying redistribution hiring or lending is prohibited No part of this publication may be stored in a retrieval system or transmitted in any other form or means without written permission from Handy Distribution In all cases this copyright notice must remain intact INSTRUCTION MANUAL 15 Oct 2020 ...

Страница 3: ...3 CONTENTS INTENDED USE GENERAL SAFETY INSTRUCTIONS SPECIFICATIONS KNOW YOUR MACHINE ASSEMBLY OPERATION MAINTENANCE STORAGE TROUBLE SHOOTING PARTS DIAGRAM LIST DECLARATION OF CONFORMITY WARRANTY ...

Страница 4: ... Please be aware that this Instruction Manual may cover a range of product specifications for various models Characteristics and features discussed and or illustrated in this manual may not be applicable or exact to all models We reserve the right to change product specifications designs and equipment without notice and without incurring obligation If you have any problems or questions concerning ...

Страница 5: ...approached stop the machine immediately Safety alert symbol Used to alert you to potential personal injury hazards Obey all safety messages that follow this symbol to avoid possible injury DANGER Indicates an imminently hazardous situation which if not avoided will result in serious injury WARNING Indicates a potentially hazardous situation which if not avoided could result in serious injury CAUTI...

Страница 6: ...fitting trousers and shirts Shirts and trousers that cover the arms and legs and steel toed shoes are recommended Never operate this machine in bare feet sandals slippery or light weight e g canvas shoes 10 Do not put hands or feet near or under rotating parts Always keep clear of discharge area as the rotating blades can cause serious injury 11 Never operate the machine without proper shields gua...

Страница 7: ...sion of a child who may run into the machine 5 Never allow children under 16 years of age to operate this machine Children 16 and over should read and understand the instructions and safe operation practices in this manual and on the machine and be trained and supervised by an adult SERVICE General Service 1 Before cleaning repairing or inspecting make certain the blades and all moving parts have ...

Страница 8: ...his machine can cause you to lose control may result in series personal injury 5 Use safety equipment Always wear eye protection Safety equipment such as a dust mask non skid safety shoes hard hat or hearing protection used for appropriate condition will reduce personal injuries 6 Dress properly Do not wear loose clothing or jewellery Keep your hair clothing gloves away from moving parts Loose clo...

Страница 9: ...mm 23 5mm Collector 18 ltr Number of Blades 5 Blade Material Hardened Steel Overall Dimensions mm H 1210 W 420 L 740 Weight N W 11 1kg G W 13 5KG The manufacturer reserves the right to change the product specification and livery according to continued product improvements ...

Страница 10: ... 2 Centre Handle 3 Lower Handle 4 Grass Collector 5 Rear Roller 6 Cutting Cylinder 7 Height Adjuster 8 Front Roller 9 Delivery Plate 10 Cylinder Adjuster Image may vary from actual machine 1 2 3 4 5 6 7 8 10 9 INSTRUCTION MANUAL ...

Страница 11: ... 8 30am 5 00pm Closed Bank Holidays FITTING THE HANDLE CAUTION This operation must be done close to the cutting cylinder blade We strongly recommend the use of thick gardening gloves on both hands and the lawnmower body is secured to stop the cutting cylinder blade from rotating 1 Align the holes on both upper handles with those on the middle handles 2 Secure both handles together using wingnuts b...

Страница 12: ...or the opposite side lower handle GRASS COLLECTOR 1 Insert the two side Frames into the square collection box main frame 2 Insert the support arm into the two side frames 3 Fit the fabric collector over the frame ensuring the split securing plastic u shape is secured around the frame INSTRUCTION MANUAL ...

Страница 13: ...om rotating 1 The fixed bottom blade must be set correctly for the lawnmower to work efficiently 2 Carefully tighten the two top Click adjusting knobs by turning them in small increments in a clockwise direction 3 Each click moves the cylinder by 0 05mm 4 When the cylinder blade contacts the fixed bottom blade turn the Click adjusting knob anti clockwise until you can rotate the cylinder cutting b...

Страница 14: ...ower anti clockwise 3 Move the roller up or down to set the required height 4 Ensure that both sides are set at the correct height otherwise your lawnmower will cut unevenly ADJUSTING THE DELIVERY PLATE If the grass is not being delivered to the grass collector sufficiently the delivery plate can be adjusted 1 Slacken the two screws A 2 Move the delivery plate forwards or backwards to improve the ...

Страница 15: ... the chain causes the chain skate B to rise at its peak and at that point tighten the nut OPERATION Before operating the machine please ensure you are fully aware of the instructions failure to do so could invalidate your manufacturer s warranty 1 For best results place the lawnmower on the edge of the lawn mow in a forward direction 2 Then at right angles at the end of each turn slightly overlapp...

Страница 16: ...s roller and blades We suggest regular application of multi purpose oil or lubricant i e WD 40 This should be applied to all cutting surfaces and cutting reel axle shaft Never put hands inside the cylinder when it is rotating STORAGE For years of trouble free service make sure the lawnmower is clean and dry beforestoring Before storing clean the lawnmower thoroughly as indicated above Store indoor...

Страница 17: ...17 Notes ...

Страница 18: ...18 PARTS DIAGRAM INSTRUCTION MANUAL ...

Страница 19: ...Cutting Cylinder 1 13 WE108 13 Knob 2 40 WE133 40 Cutter Bar Assembly 1 14 TH133 14 Hex Head Bolt 4 41 WE108 41 Rear Roller Cover 1 15 TH133 15 Left Side Plate Assembly 1 45 TH133 45 Handle Bolt 4 16 TH133 16 Right Side Plate Assembly 1 46 TH133 46 Handle Wing Nut 4 17 TH133 17 Reel Spring 1 47 WE109 N011 12 02 Centre Handle 1 18 TH133 18 Grease Delivery Plate 1 48 TH133 48 Lower Handle 2 19 TH133...

Страница 20: ...s last amended by EEC directive 2006 42 EC The conformity assessment procedure followed was in accordance with EN ISO 12100 1 2003 EN ISO 12100 2 2003 EN 1050 1997 Notified Body Shanghai BVCE Certification Testing Technologies Co Ltd Addresses 4D1th Building Dongming Square Lujiazui Pudong New Area Shanghai City P R China Authorised signatory and technical file holder Date 15 10 2020 Signature Nam...

Страница 21: ...21 Notes ...

Страница 22: ...ne using the following pages or at www webbgardenpower co uk By registering your machine you agree to maintain the machine in accordance with the service schedules specified in this manual and services duly recorded Not applicable for Webb electric handheld machines You may be asked to produce this booklet as proof of servicing in the event of a claim Proof of purchase should also be kept as a refe...

Страница 23: ...arter cords Fluids lubricants Spark plugs Blades Lawnmowers Brushcutters Cutter bars Hedgecutters Drive clutch cable surfaces Nylon Lines Line Trimmers Carburettor cleaning Bearings Bushes Electric cable Grass collectors 3 Not covered by this warranty a The warranty policy does not cover any depreciation or damages caused by ordinary wear rusting or corrosion lack of correct maintenance or operati...

Страница 24: ... is the owner s responsibility to ensure that their Webb machine is maintained at specific intervals Any approved Webb service dealer can undertake a service which are specialised in our products and will be aware of your particular machine and any technical updates which will save valuable time money If you are using your machine in dry dusty or high temperatures you will need to service the machi...

Страница 25: ...ions have been completed PLEASE ENSURE THE SERVICE BOOK IS AVAILABLE FOR THE DEALER DURING SERVICE WORK 1st Service This must be stamped by an approved service dealer to qualify for a free second year warranty Excluding the Webb Electric Handheld machines 24 Months Date Date 36 Months 12 Months Date SERVICE BOOK ...

Страница 26: ...26 Service Record 48 Months Date Date Date Date Date Date Date Date 72 Months 96 Months 120 Months 60 Months 84 Months 108 Months 132 Months INSTRUCTION MANUAL ...

Страница 27: ... regarding our products services offers or just opinions which may be used for marketing research or analysis purposes If you wish to be contacted by any of the following methods please tick the relevant boxes Post Telephone Email You may give Webb Lawnmowers notice in writing at any time that you no longer wish to receive direct marketing communications House Number House Name Address 1 Address 2 ...

Страница 28: ...Webb Lawnmowers Murdock Road Dorcan Swindon Wiltshire SN3 5HY ...

Отзывы: