7
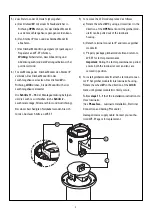
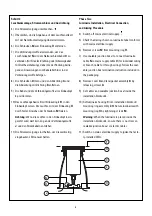
To rotate the gimbal optic
(360° rotatable)
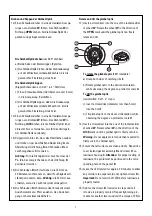
a) Grasp both sides of catching ribs
E
.
b) Rotate gimbal optic to the desired orientation,
while observing the degree on protractor scale
G
.
To tilt the gimbal optic
(swivel-tilted 0-20°, 2° steps)
c) Insert a screwdriver (diameter less than 5 mm)
into the hole
T
d) Tilt gimbal optic to the desired orientation, while
observing the degree on protractor scale
U
.
13) Insert a screwdriver into the one of the radial cavities
of wheel
W
. Rotate wheel
W
in the direction of the
LOCK
mark until the gimbal optic is firmly secured.
Warning:
Do not apply more torque than required to
firmly sucre the Gimbal optic.
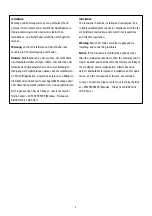
14) Ensure that all surfaces are clean and dry. Reposition
cover
A
, lens/gasket assembly
B
and screws
D
on
luminaire housing
C
.
Attention:
For proper sealing of
luminaire, the pin
Z
must be positioned in the corre-
sponding hole of the gasket
B
.
15) Leave the LED ignited for approx. 30 minutes to allow
any moisture to evaporate (do not tighten screws
D
).
Important:
Do not switch off LED before luminaire is
properly sealed.
16) Tighten the screws
D
crosswise in steps until all
screws are properly secured. Repeat tightening pro-
cedure for another two rounds with a torque of 3 Nm.
Drehen und Kippen der Gimbal-Optik
12) Einen Schraubendreher in eine der radialen Ausspa -
rungen von Drehrad
W
führen. Das Drehrad
W
in
Richtung
OPEN
drehen, bis die Gimbal-Optik frei
gedreht und gekippt werden kann.
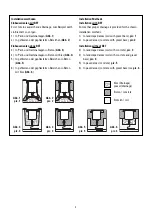
Rotate and tilt the gimbal optic
12) Insert a screwdriver into the one of the radial cavities
of wheel
W
. Rotate the wheel
W
in the direction of
the
OPEN
mark until the gimbal optic can freely
rotate and tilt.
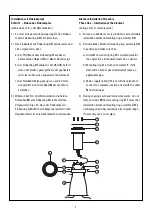
Die Gimbal-Optik drehen
(um 360° drehbar)
a) Beide Seiten der Klemmrippen
E
greifen.
b) Die Gimbal-Optik drehen, dabei die Gradanzeige
auf der Winkel messer skala
G
beachten, bis die
gewünschte Einstellung erreicht ist.
Die Gimbal-Optik kippen
(Kippen/Schwenken von 0-20° in 2°-Schritten)
c) Einen Schraubendreher (Durchmesser unter 5 mm)
in die Aussparung
T
einführen.
d) Die Gimbal-Optik kippen, dabei die Gradanzeige
auf der Winkel messerskala
U
beachten, bis die
gewünschte Einstellung erreicht ist.
13) Einen Schraubendreher in eine der radialen Ausspa -
rungen von Drehrad
W
führen. Das Drehrad
W
in
Richtung
LOCK
drehen, bis die Gimbal-Optik sicher
einrastet. Nur so festziehen, wie für das Verriegeln
der Gimbal-Optik notwendig .
14) Vergewissern Sie sich, dass alle Oberflächen sauber
und trocken sind. Anschließend Abdeckring
A
, die
Abdeckung mit Dichtung
B
und Schrauben
D
am
Leuchtengehäuse
C
montieren.
Achtung:
Für die Dichtigkeit der Leuchte muss der
Pin
Z
in das entsprechende Loch der Dichtung
B
positioniert werden.
15) Die Schrauben
D
nicht festziehen, die LED für ca.
30 Minuten leuchten lassen, damit Feuchtigkeit voll-
ständig verdunsten kann.
Wichtig:
die LED erst aus-
schalten, wenn die Leuchte korrekt versiegelt ist.
16) Die Schrauben
D
schrittweise über Kreuz mit einem
Anziehmoment von 3 Nm anziehen. Den Anzieh vor -
gang noch zweimal wiederholen.
<-Open
Loc
k->
G
W
T
E
U
Z


