background image


7

Picture Menu


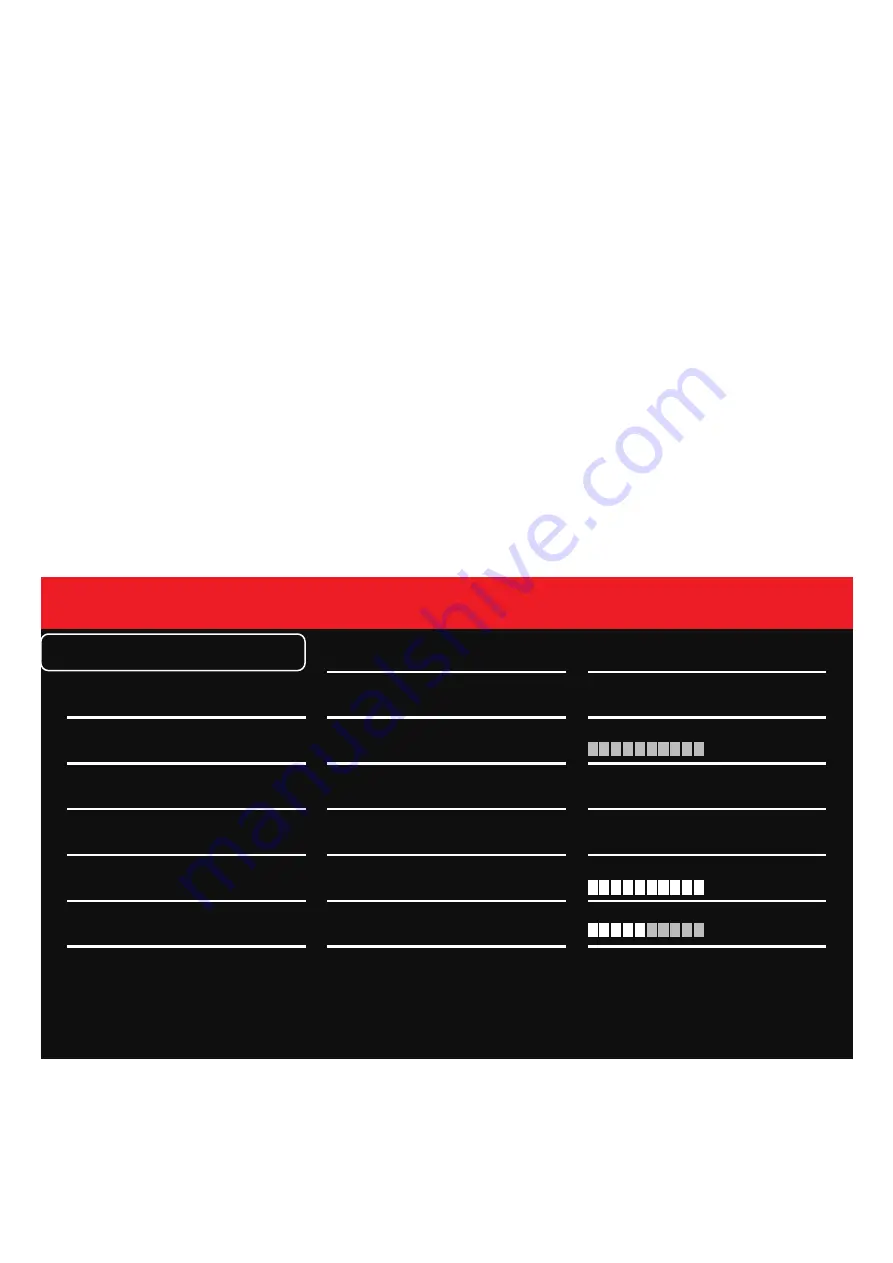
Relating to the MENU main screen as per below - 

● 

Press MENU - show MENU screen.

● 

 The menu has 3 columns and multiple rows. Red text shows current position within the 

menu.

● 

Using the arrows - allows to go up/down the specific menu column.

● 

 Pressing E - Once or twice - will get you out of the Menu display. 

● 

Say, we are on Picture setting ( red text ), the other 2 columns show related sub-menus 

for this setting. To go to column 2  to deal with sub-menu settings - Press MENU, then one
 can use arrows to scroll up/down the functions. 

● 

For example - we are on Picture Setting --> press MENU--> brings us to 2nd column --> 

using arrows, placing red text on Anti Burn-in --> pres MENU again will take us to the 3rd 
column --> pressing MENU again, will allow us to choose ON/OFF settings. 

● 

Once we are done, press E once, twice, 3 times  to leave MENU screen. 


Picture Setting

Color Setting

Input Source

Display Setting

Other Setting

Super ECO

Anti Burn-In

DCR

On

On

Off

Off

Brightness

Low Blue Light

Flicker free

Contrast

Information

100

50

0

Содержание 0E-24EVGHDMI

Страница 1: ...0E 24EVGHDMI 0E 27EVGHDMI ECO ENERGY EFFICIENT LED COLOR MONITOR Tech Support 833 574 9124 Option2 info wboxtech com ...

Страница 2: ...Disconnect the monitor from all power before cleaning Use a damp cloth for cleaning and do not use liquid or aerosol cleaners 5 Never use the monitor in damp areas or near water 6 Never place the monitor on an unstable surface if the monitor falls it may cause serious damage to people or property 7 When selecting a location for placement installation please ensure A To allow for sufficient ventila...

Страница 3: ...insert objects of any kind into the monitor cabinet slots Never spill any kind of liquid on the monitor 13 Do not attempt to service this monitor yourself as opening or removing the cover may expose you to dangerous voltage points or other risks 14 If any of the following occur disconnect the power to the monitor and refer servicing to qualified service personnel A The power cord or plug is damage...

Страница 4: ...ose slots Avoid placing the monitor in direct sunshine or near a heating appliance Do not use the monitor against a bright background or where sunlight and other light sources will shine directly on the monitor Neither the monitor itself nor any other heavy object should rest on the power cord Damage to a power cord can cause fire or electrical shock POWER SUPPLY CORD IS USED AS MAIN POWER DISCONN...

Страница 5: ...ceiver o Connect the equipment into an outlet on a circuit different from that to which the receiver is connected o Only a shielded interface cable should be used Finally any changes or modifications to the equipment by the user not expressly approved by the grantee or manufacturer could void the user s authority to operate such equipment DOC Compliance Notice This digital apparatus does not excee...

Страница 6: ...n range the screen brightness will automatically reduce to the lowest in order to achieve the purpose of energy saving When there is activity in the induction range the screen will be automatically adjusted to the preset brightness Small movement such as shoulder movement hand lifting and other body movements can be detected Minor movements such as opening mouth blinking eyes finger movements and ...

Страница 7: ... up down to highlight the desired then press left right to complete the selection To verify the current input selection press to display the pop up then press M MENU again to dismiss the pop up Press the button to display all the signal channel menus When Main MENU display as confirmation key during the OSD operation B MENU button M Press the button to show the On Screen Display main menu Press th...

Страница 8: ...etting To go to column 2 to deal with sub menu settings Press MENU then one can use arrows to scroll up down the functions For example we are on Picture Setting press MENU brings us to 2nd column using arrows placing red text on Anti Burn in pres MENU again will take us to the 3rd column pressing MENU again will allow us to choose ON OFF settings Once we are done press E once twice 3 times to leav...

Страница 9: ...tness Contrast Adjusts the range of difference between light and dark areas of the picture Gamma Allows the user to select ON OFF the gamma model Color Temp Allows the user to select the sRGB 9300K 6500K 7500K User Color When set the color Temperature to USER model can adjust the Red Green Blue value Red Adjust the red 0 100 Green Adjust the green 0 100 Blue Adjust the blue 0 100 Color Setting Pic...

Страница 10: ...Setting Color Setting Input Source Display Setting Other Setting Auto Select VGA HDMI Information Picture Setting Color Setting Input Source Display Setting Other Setting AspectRatio Auto Adjust Auto Color Full H Position V Position Clock Phase Information 50 50 50 50 ...

Страница 11: ...ish Italian Netherlands Polish Czech Danish Volume Adjust the volume 0 100 Mute Allows the user to select ON OFF the mute model OSD H Position Adjust the osd h position 0 100 OSD V Position Adjust the osd v position 0 100 OSD Timeout Adjust the osd timeout 0 100 seconds Reset Restore initial settings Other Setting Picture Setting Color Setting Input Source Display Setting Other Setting Language Vo...

Страница 12: ...11 Resolution 1920x1080 H freq 68 KHz V freq 60 Hz Information Picture Setting Color Setting Input Source Display Setting Other Setting 1920 x 1080 H freq 68 KHz V freq 60 Hz Information ...

Страница 13: ...placing the screws in their original holes 2 Attach the VESA mounnt 0E 24EVGHDMI 100mm x 100mm 0E 27EVGHDMI 100mm x 100mm plate to rear of the monitor andfollow all of the instructions provided with the mount to complete the mounting process CAUTION The wall mount must bear a minimum of five times the monitor s net weight To mount your MONITOR to the wall or another surface you need to purchase a ...

Страница 14: ...he monitor is designed for security surveillance applications When there is NO video input and the power is ON No signal shows for few seconds then having black Screen when signal is provided the monitor changes state from sleep standby to active mode Power Cable Qty 1 Screws Type Metric M4 L8 mm Qty 4 Screw for Mounting Monitor HDMI Cable Qty 1 Stand support Qty 1 Base of stand Qty 1 Qty 2 User M...

Страница 15: ...h of viewable area H Height of viewable area I Thickness of monitor inch 24 1 14 3 1 9 17 7 8 4 7 4 23 9 13 4 0 6 0 7 0 1 inch 20 2 12 6 1 7 16 1 8 4 7 4 21 11 9 0 5 0 5 0 1 J Bottom bezel width K Side bezel width mm 363 5 614 1 49 5 450 7 214 6 190 607 1 342 8 15 17 2 3 5 mm 321 8 514 4 43 8 409 214 6 190 535 303 6 14 3 15 3 2 B A D E F H C I J K G 0E 24EVGHDMI 0E 27EVGHDMI ...

Страница 16: ...p to 1920 x 1080 Analog Video In Out VGA up to 1920 x 1080 1x3 5mm mini jack 20W Typical 21 3 x12 6 x1 7 541 4 321 8 43 8mm 541 4 409 190mm 21 3 x16 1 x7 5 100x100 0 5 Matte black Plastic Yes 5 15 AC 100 240V 50 60Hz 1 8A 0 C 40 C 32 104 20 C 50 C 4 122 10 90 6 9Ibs 3 15 Kg 9 7Ibs 4 4 Kg 7 7Ibs 3 5 Kg 10 5Ibs 4 8 Kg Power cable VGA cable HDMI cable screws stand user manual CE FCC ROHS HDMI UL WEEE...

Страница 17: ... services or repaired III Damage is caused by outside natural occurrences such as lightning power surges fire floods acts of nature or the like IV Defects resulting from unauthorized modification misuse vandalism or other causes unrelated to defective materials or workmanship or failures related to batteries of any type used in connection with the products sold here under ADI only warrants those p...

Страница 18: ... of Warranties Limitation of Liability THERE ARE NO WARRANTIES OR CONDITIONS EXPRESS OR IMPLIED OF MERCHANTABILITY OR FITNESS FOR A PARTICULAR PURPOSE OR OTHERWISE WHICH EXTEND BEYOND THE DESCRIPTION ON THE FACE HEREOF TO THE FULLEST EXTENT PERMITTED BY LAW IN NO CASE SHALL ADI BE LIABLE TO ANYONE FOR ANY I CONSEQUENTIAL INCIDENTAL INDIRECT SPECIAL OR PUNITIVE DAMAGES ARISING OUT OF OR RELATING IN...

Страница 19: ...bility shall not in any case exceed the purchase price of the product which shall be fixed as liquidated damages and not as a penalty and shall be the complete and exclusive remedy against ADI FOR THE AVOIDANCE OF DOUBT ADI DOES NOT SEEK HEREUNDER TO EXCLUDE OR RESTRICT ITS LIABILITY IN RELATION TO I FRAUD II DEATH OR PERSONAL INJURY DIRECTLY RESULTING FROM ITS NEGLIGENCE OR III ANY MATTER IN RESP...

Страница 20: ...WWW WBOXTECH COM Be sure to have the model number and the nature of the problem available In the event of replacement the return product will be credited to Buyer s account and a new invoice issued for the replacement item ADI reserves the right to issue a credit only in lieu of replacement If any WBox Technologies product is found to be in good working order or such product s inability to functio...

Страница 21: ...wboxtech com Tech Support 833 574 9124 Option2 info wboxtech com 0E 24EVGHDMI 9 8 1 1 9 1 4 0 2 0 0 5 0E 27EVGHDMI 9 8 1 1 9 1 4 0 2 0 4 7 ...

Отзывы: