[19]
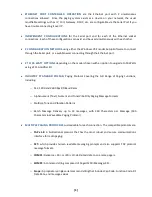
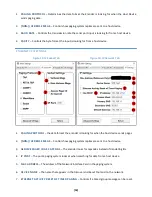
1.
PAGER ID/CAPCODE
– Enter an ID that’s in
PAGER FAMILIES
, or a capcode if
ID as Capcode
is turned
on. If capcodes are used, the first Family sets the
Data Rate
,
Pager Type
, and
Function Code
.
2.
FUNCTION CODE
– Sets the function code manually. Only used with Scope protocol testing.
3.
RF DATA RATE
– Sets the data rate manually. Used with Scope and WaveWare protocol testing.
4.
SEND
– Pushes a single page to the radio transmitter using the parameters set in Test Encoder.
5.
PAGER MESSAGE
– A textbox where any valid paging message can be written. You can also type out
any messages you want to save.
6.
SAVED MESSAGES
– A repository of messages saved to disk. Best used for OTA Commands. The
ADD
,
REPLACE
, and
DELETE
buttons allow users to easily change the repository.
7.
COM PORT LOG
– Shows easily readable serial responses from the paging system.
8.
LOG TO FILE
– Toggles whether any Test Encoder or Range Test activity is logged.
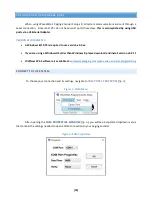
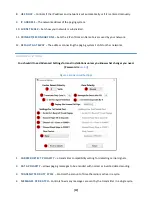
The
START RANGE TEST
button takes you to the
RANGE TEST
window (
fig. 18
), which allows you to
repeatedly send messages to a specific pager ID.
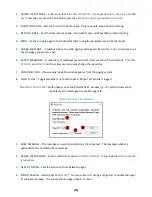
Figure 18: Range Test Window
1.
BASE MESSAGE
– The message you want to send during the range test. The message number is
appended to the end of the base message.
2.
PAGER ID/CAPCODE
– Enter a valid ID that exists in
PAGER FAMILIES
, or any capcode if
ID as Capcode
is turned on.
3.
REPEAT TIMER
– Sets the amount of time between pages.
4.
START/CANCEL
– Starts/Exits
RANGE TEST
. You can press
Start
during a range test to update the pager
ID and base message. This causes the message number to reset.

