wattstopper PW-100-24 Скачать руководство пользователя страница 8

Lights do not turn OFF

1.  There can be up to a 30 minute time delay after the last motion is 

detected. To verify proper operation, set DIP switch 1 to 

ON

, then reset 

switches 1, 2, and 3 to 

OFF

 to start Test Mode. Move out of view of the 

sensor. The lights should turn 

OFF

 in approximately 5 seconds.

2.  Verify that the sensor is mounted at least six feet (2 meters) away from 

any heating/ventilating/air conditioning device that may cause false 

detection. Verify that there is no significant heat source (e.g., high 

wattage light bulb) mounted near the sensor.

3.  If the lights still do not turn 

OFF

, call 800.879.8585 for technical support.

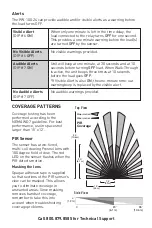
Sensing motion outside desired areas

1.  Select PIR Sensitivity      – Low (DIP switch 5 = 

ON

) if necessary.

2.  Mask the PIR sensor’s lens to eliminate unwanted coverage area.

Red LED is lit all the time and the sensor features don’t work.

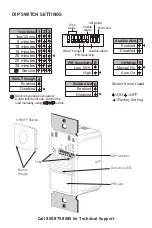
1.  Check DIP switches 1,2,3. If they are all

 ON

 the unit is in Service Mode. 

Set the DIP switches to a valid Time Delay setting.

2.  If re-setting the Time Delay switches does not clear the LED call 

technical support.

COVER PLATES

WattStopper PW series wall switches fit behind industry standard 

decorator-style switch cover plates. Cover plates are not included.
Units come in the following colors, which are indicated by the final suffix of the 

catalog number (shown here in parentheses): 
      White (-W), Light Almond (-LA), Ivory (-I), Grey (-G), Black (-B).

Please 

Recycle

2800 De La Cruz Boulevard, Santa Clara, CA 95050

Technic

al Support: 800.879.8585 • www.watt

stopper.com

Warranty Information

WattStopper warranties its products to be free of defects in materials and 

workmanship for a period of five years. There are no obligations or liabilities 

on the part of WattStopper for consequential damages arising out of or in 

connection with the use or performance of this product or other indirect 

damages with respect to loss of property, revenue, or profit, or cost of removal, 

installation or reinstallation.

07178r2  6/2011

Содержание PW-100-24

Страница 1: ...C VAC Time Delay Adjustment 5 to 30 minutes Walk Through Mode 3 minutes if no activity after 30 sec Test Mode 5 sec for 10 min with DIP switch setting PIR Adjustment High or Low DIP switch Light Level Adjustment 8fc to 180 fc Alerts Selectable Audible Visual US Patents 6617560 PW 100 24 v3 Passive Infrared Low Voltage Wall Switch Occupancy Sensor Santa Clara CA 95050 800 879 8585 ...

Страница 2: ... With the ON Mode DIP switch in the ON position the occupant must press the ON OFF button to turn ON the load The sensor keeps the load ON until no motion is detected for the selected time delay There is a 30 second re trigger delay If occupancy is detected during the delay the sensor turns the load back ON After the re trigger delay elapses the ON OFF button must be pressed to turn ON the load Au...

Страница 3: ...ically after ten minutes or when you set a fixed time delay When the Test Mode times out the sensor assumes a 20 minute time delay To restart Test Mode change the time delay setting to any fixed amount and then return it to the Test setting Reduces sensitivity by approximately 50 Useful in cases where the PIR is detecting movement outside of the desired area also consider masking the lens and wher...

Страница 4: ...verage 7 5 2 2m 15 4 5m 20 6 1m 35 10 6m Major motion Minor motion Alerts The PW 100 24 can provide audible and or visible alerts as a warning before the load turns OFF Unit will beep at one minute at 30 seconds and at 10 seconds before turning OFF load When Walk Through is active the unit beeps three times at 10 seconds before the load goes OFF If Visible Alert is also ON the one minute time out ...

Страница 5: ...etected Relay Common must be used for proper operation Normally Open N O Closed when occupancy is detected The bottom terminal on the sensor is not used 4 Turn the power on 5 Test and adjust the sensor if necessary 6 Install industry standard decorator wall switch cover plate not included INSTALLATION WARNING TURN THE POWER OFF AT THE CIRCUIT BREAKER BEFORE INSTALLING POWER PACKS OR SENSORS Visit ...

Страница 6: ...isabled Enabled Walk Through 9 1 2 3 4 5 6 7 8 Time Delay Walk Through ON ON Mode Not Used Audible Alerts PIR Sensitivity Visible Alerts Test 20 min 10 minutes 15 minutes 20 minutes 25 minutes 30 minutes Service 5 minutes 1 2 3 Time Delay Service bypasses occupancy light level functions Control the load manually using ON OFF button 6 Disabled Enabled Visible Alert Switch 9 is not used Call 800 879...

Страница 7: ... from the unit When the adjustments are completed replace the button cap by inserting its hinges into the tabs on the main unit and then squeeze the top of the button while pressing it into the unit Reinstall the cover plate Light Level Adjustment The light level can be set with loads ON or OFF To enable light level control and set the threshold 1 Make sure the room is lit appropriately 2 Put the ...

Страница 8: ...es 1 2 3 If they are all ON the unit is in Service Mode Set the DIP switches to a valid Time Delay setting 2 If re setting the Time Delay switches does not clear the LED call technical support COVER PLATES WattStopper PW series wall switches fit behind industry standard decorator style switch cover plates Cover plates are not included Units come in the following colors which are indicated by the f...

Отзывы: