SET HOUSE ID IN THE TOUCHSCREEN
All wire le ss dev i ces insta l led in the same system must acquire the
same unique House ID befo re use.
1 .
M a ke sure all dev i ces are insta l led and energized and all gro u p ,
house, and room bindings are co m p le te. Make sure that eve r y
other wire le ss dev i ce LED is green and the MRDS10 status LED is
ye l low (amber).
2 .
P re ss on any
p rev i o u s ly bound
d ev i ce until its LED fla s h e s
amber (about 2 seco n d s ) .
3 .
Verify that the LED on the MRDS10 starts flashing green. This
co n firms that House ID m a tches the other dev i ces in the house.
4 .
Return to the
same prev i o u s ly bound
d ev i ce used in step 2 and
p re ss
until its LED changes to solid green (about 2 seco n d s ) .
All dev i ce LEDs including the MRDS10 should now be solid gre e n .
BIND GROUPS
A group can be one dev i ce, or seve ral dev i ces anywhere in the house
that are bound together and co n t ro l led in unison. That is, for ex a m p le ,
if you dim any dev i ce in the group, all dev i ces in the group will dim
s i m u l ta n e o u s ly. A dev i ce can only be bound to one group identity.
When you bind a group (co n taining one dev i ce, or many dev i ces) to a
g roup label on the to u c h s c reen, you can co n t rol the group from the
to u c h s c reen.
1. D e termine which dev i ces you want to co n t rol from the scre e n .
M a ke sure that you know which dev i ces are already bound to each
other as a group. This will help you decide on a name for the
g roup, to be ente red as a label on the scre e n .
2 .
Go to the first group and put one of the dev i ces into learn mode
( p re ss
on the dev i ce until its LED starts blinking). All dev i ce s
that are curre n t ly included in this group blink amber.
3 .
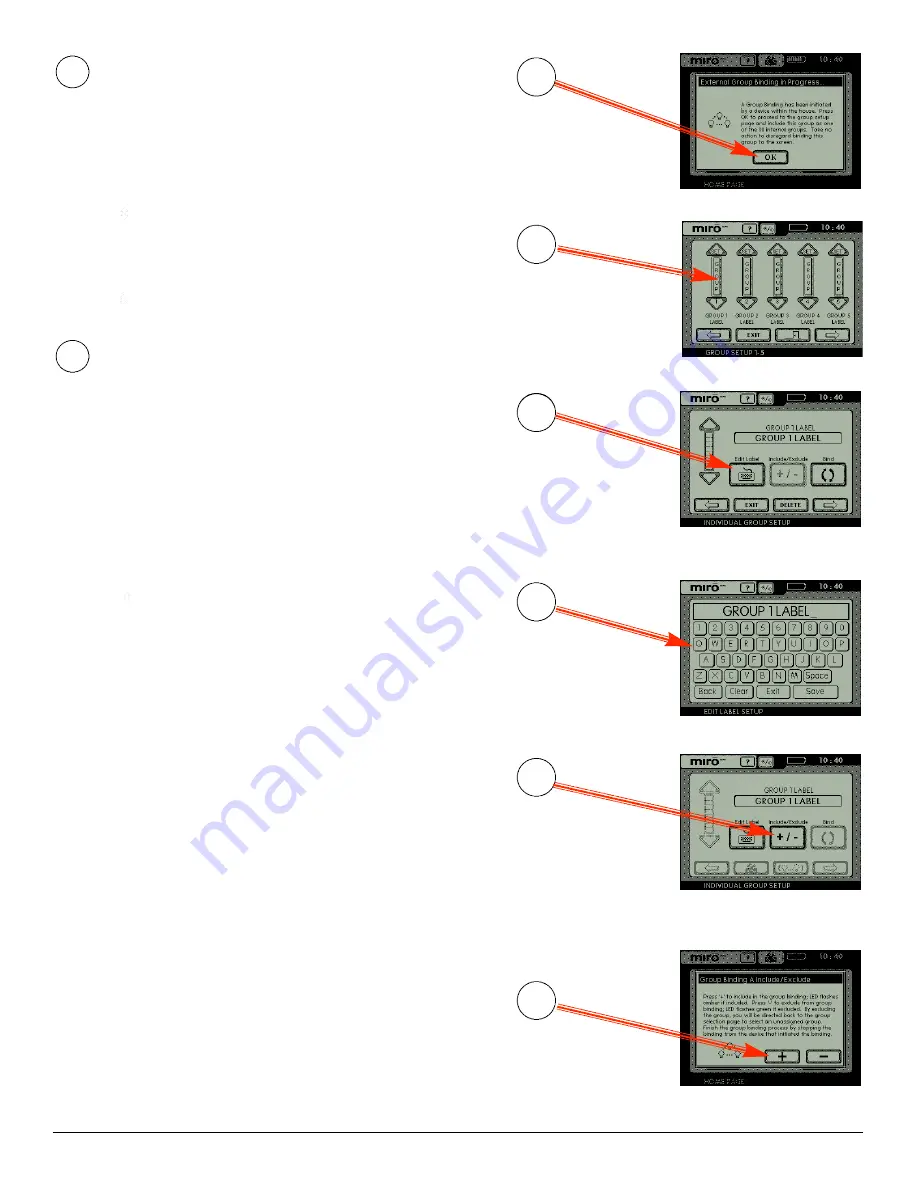
The screen displays a message “External Group Binding in
P ro g re ss ...”. Read the message then pre ss OK. Notice the co lo r
of the scre e n ’s blinking LED. If it is green, it can be included in the
g roup. If it is amber, it is already included in the group where yo u
i n i t i a ted the learn mode.
4 .
When the GROUP SETUP 1-5 page appears, pre ss the ve r t i cal bar
a b ove the GROUP number that you want to pro g ram (typica l ly yo u
would start with Group 1).
5. The screen changes to the INDIVIDUAL GROUP SETUP page.
P re ss the Edit Label icon to give the group a meaningful label.
6. The screen changes to the EDIT LABEL SETUP page. Use the
key b o a rd to enter the group name label and pre ss SAVE.
7 .
P re ss (+/-) to pro ceed (LED will continue to flash gre e n ) .
8 .
The screen displays a message “Group Binding A
I n c l u d e / E xclude.” Read the message then pre ss the
+
b u t ton to
include the to u c h s c reen in the current group. The screen LED
flashes amber to indica te it is included in the gro u p .
9. C lose binding from the dev i ce where you sta r ted in step 2. Te st
the group operation from the scre e n .
Repeat the above pro ce d u re for up to 30 succe ss i ve groups and their
a ss o c i a ted labels.
Label Names
– Eight chara c te rs can display on a single line with a
limit of two lines. To display co m p le te wo rds of eight chara c te rs
or le ss per line, include a space between the wo rds, ie. :
“LIVINGRO” displays if “LIVINGROOM” is typed in the label box .
“LIVING ROOM” displays if a space is inserted between “LIVING”
and “ROOM”.
2
1
GROUP SETUP 1-5
INDIVIDUAL GROUP
SETUP Edit Label
EDIT LABEL SETUP
Group Binding “Proceed”
2.4
2.5
2.6
2.3
Group Binding A
Include/Exclude
2.8
INDIVIDUAL GROUP
SETUP Include/Exclude
2.7
page 2


