background image

Page 12


√ 

Stage 1 - Sediment Filter (part #: 104017) 


√  

Stage 2 - Carbon Filter

√ 

Stage 4 - Carbon Filter   


• Part#:101009: WP-4, WP4-50    


Part#:101009   


• Part#:100037: KP-4 


Note: The KP-4 R.O. unit is equipped with annual filters, therefore require only one annual change. 

Clean filter housings (bowls) with a mild soap solution and rinse with 

water.  Check O-rings and lubricate with water soluble lubricant. 

KY 

Jelly

®

 or other water based lubricants may be used.  Petroleum based 

lubricants (such as Vaseline

®

must not be used.

For more leverage you may leave the RO module attached to wall of 
cabinet.  If you are unable to access the module while it hangs, remove 

it prior to changing filters. Starting with the closest housing

(Stage 1), remove it by turning it clockwise, empty water, then discard 

filter.  Continue on to the 2

nd 

& 3

th 

housing (Stage 2 & 4). 

Insert the new sediment filter (cloth like appearance) into the 1st filter 

housing which is the one closest to the side with tubing connections 
and re-install housing.

6 Month System Maintenance

Turn off the incoming water supply to the RO at the adapt-a-valve. 

(Follow the green tube away from the RO system to find the adapt-a-

valve.)

Step 1     

Step 3

Step 4

Step 5

Step 6

Let system sit for a few minutes after tank is empty to depressurize 

before attempting to remove filter housings.   

Open the RO Faucet and allow water to drain from the tank until it is 
completely empty.

Insert the new Carbon Block filter (White End Caps) into the 2nd and 

4th stage housing and re-install housing.    

Step 7

Step 2

Step 8 

*Order filters by calling 1-800-752-5582 or buy online at www.wattspremier.com.

Turn water on to the unit at the adapt-a-valve.

Note:

Water Can be saved in a container for drinking or to rinse system 
parts.

Before re-installing the filter bowls back on to the system , 

check O-rings to make sure they are still in place.

Caution:     

Open the RO faucet and leave it open until water begins to trickle out 

(it will come out slowly).

Step 10

Step 9

Close the RO faucet allowing the storage tank to fill with water.

  It 

may take 4 to 6 hours to fill the tank completely depending on the 

production capability of the membrane, local water temperature and 
water pressure. 

Содержание WP-4

Страница 1: ...3 866 5666 Save manual for future reference MODEL WP 4 WP4 50 KP 4 RO 4M Warning Please read carefully before proceeding with installation Your failure to follow any attached instructions or operating...

Страница 2: ...iment and other particulate matter like dirt silt and rust which affect the taste and appearance of your water Stage 2 Carbon filter recommended change 6 months The second stage contains a 5 micron ca...

Страница 3: ...teel Sink 5 Faucet Installation 6 Adapt a Valve Installation 7 Drain Saddle Installation 7 Drill hole and Connect 3 8 Black Tube from Faucet to the Drain Saddle 8 Green Tube Connection 8 Reverse Osmos...

Страница 4: ...r line only Copper Tubing Reverse Osmosis water should not be run through copper tubing as the purity of the water will leach copper causing an objectional taste in water and pin holes may form in the...

Страница 5: ...cating oil or liquid soap to keep the hole saw cool during cutting Step 2 Drill a Hole for the Faucet in a Porcelain Sink Punch a Hole for the Faucet in a Stainless Steel Sink Drill a pilot hole Use a...

Страница 6: ...r first slide on the rubber gasket item 6 the slotted washer item 7 the white spacer with the open end UP item 8 the hex nut washer item 9 and lastly secure with nut item 11 Step 8 Make sure the plast...

Страница 7: ...as shown 1 Black compression nut 1 Semicircle bracket with opening 2 Screws 1 Foam gasket 2 Nuts for screws 1 Semicircle bracket Gather the pieces of the drain saddle Caution Do not over tighten the...

Страница 8: ...sing an electric drill with a Phillips bit screw them into the cabinet wall 6 apart and 16 from the bottom of the cabinet Do not cut any RO system tubes at this time Note With the drain saddle secured...

Страница 9: ...Guest locking system holds the tube firmly in place without deforming it or restricting flow It is essential that the outside diameter be free of score marks and that burrs and sharp edges be removed...

Страница 10: ...t fitting on the RO Manifold Make sure the tube is pushed in all the way to the tube stop See Picture Insert the blue 3 8 tube from the faucet into the port on the module marked FAUCET Make sure the t...

Страница 11: ...that the tank is empty when the flow rate from the RO faucet is down to a trickle Repeat this step two more times The fourth tank can be used for drinking Don t Forget To Register Open the RO faucet a...

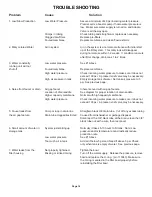
Страница 12: ...th System Maintenance Turn off the incoming water supply to the RO at the adapt a valve Follow the green tube away from the RO system to find the adapt a valve Step 1 Step 3 Step 4 Step 5 Step 6 Let s...

Страница 13: ...er run for 30 seconds Turn off the RO faucet and let the unit rest for 2 minutes Finally open the RO faucet and let the water run for 5 more minutes Turn off the incoming water supply to the system by...

Страница 14: ...such as KY Jelly Insert the end with the two black O rings into the cap Twist the membrane as you push it firmly into the manifold Step 4 Step 5 Step 6 Replace the membrane housing onto the cap by tur...

Страница 15: ...k Air Pressure in the Tank Important Step 3 Check air pressure only when tank is empty of water Step 1 Turn off the incoming water supply to the RO at the adapt a valve Follow the green tube away from...

Страница 16: ...et or drain Air gap faucet Inherent sound with air gap faucets Location of drain saddle See diagram for proper location of drain saddle Higher capacity membrane Normal with high capacity membrane High...

Страница 17: ...to pentavalent arsenic A combined chlorine residual also called chloramine may not convert all the trivalent arsenic If you get your water from a public water utility contact the utility to find out...

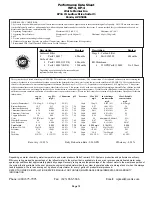
Страница 18: ...ead Radium 226 228 Selenium Perchlorate 100 ug L 2 None Microbiological Contaminants and Turbidity Inorganic Radiological Contaminants Organic Contaminants not applicable Rated Service Capacity 9 gall...

Страница 19: ...50 psi 0 005 mg L 0 10 10 0 006 Radium 226 228 25pCi L 5pCi L 80 0 7 24 50psi 5pCi L 25pCiL 10 5pCiL Selenium 0 10 0 001 99 0 50psi 0 001 0 10 10 0 05 TDS 765 24 96 8 7 84 50psi 39 0 750 40mg L 187 T...

Страница 20: ...duction Rate 9 86 GPD Efficiency 6 08 Depending on water chemistry water temperature and water pressure Watts Premier s R O Systems production and performance will vary Efficiency rating means the per...

Страница 21: ...brane 50GPD 5 3 113018 Filter Bowl 6 1 113035 Membrane Vessel 7 3 113041 O Ring Filter Bowl 8 1 113045 O Ring Membrane Vessel 9 1 116001 Faucet AG Chrome 10 1 119007 Tank Pressure 3GAL White 11 1 1250...

Страница 22: ...unique top mount design allows for easy above counter installation The Monitored version of this faucet has an LED light that turns red to notify you for filter replacement Part No 116091 Chrome Non...

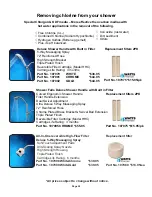
Страница 23: ...ws the membrane to maximize its use of the available feed pressure PERMEATE PUMP KIT Part No 560041 65 95 ea Fills product tank up to 4 times more rapidly Reduces waste water by as much as 80 Lowers T...

Страница 24: ...xtension Triple Plated Finish Reversible Filter Cartridge Model HHC Cartridge Life Rating 3 months Part No 107095 CHROME 55 95 All In One reversible High Flow Filter Replacement filter Deluxe 5 Way Ma...

Страница 25: ...ter your information XXXXX XXXXXX Watts Premier Inc is concerned for the safety of your personal information Watts Premier collects personal information when you register with Watts Premier This infor...

Страница 26: ...ntry USA CANADA MEXICO OTHER ____________ Phone ______ __________ __________ Email Address ______________________ Date of Purchase ___________________ Date of Install _______________________ Installed...

Страница 27: ...of Purchase __________ Date of Install ___________ Installed by __________________ Serial No _____________________ Date 1st Stage Sediment 6 months 2nd Stage Carbon 6 months 4th Stage Carbon 1 year T...

Страница 28: ...re inch 6 Incoming water to the RO cannot exceed 105 degrees F 40 degrees C 7 Incoming TDS Total Dissolved Solids not to exceed 1800 ppm 8 Do not use with water that is microbiologically unsafe or of...

Отзывы: