background image

Do not use with water that is microbiologically unsafe or of unknown quality, without adequate
disinfection before or after the system. Instalation needs to comply with state and local plumbing
regulations.

Operational Parameters

2 Filters
1 Parts Bag
1 Manual and Warranty Card

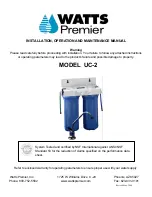
1 UC-1 Unit

If any of the items are missing, please contact Watts Premier prior to installing.

Tools Recommended For Installation

√ 

A small knife

√ 

Variable Speed drill

√ 

1/8” (3mm), 1/4” (6.4 mm) and 7/16” (11.0mm) Drill bits

√ 

1/2” and 5/8” open-end wrenches (or adjustable Wrenches)

√ 

Phillips screwdriver

Contents of Under Counter System

Installation

This system has been designed to fit under most kitchen sinks.  Please read
carefully before proceeding with installation.

3

Step 1: 

Mounting System Under Sink

A. Locate a space under the sink that allows

the unit to be mounted close to the cold water
supply and allows for easy access when
changing filters.  Allow 2"  a (5cm) clearance
between the bottom of the filter housing and
the floor of the sink cabinet for filter changes.

B. Using the mounting hole on the bracket,

mark the location for the mounting screws
on a wall under the sink.

C. Screw the (2) screws into the wall at the

marked location.

D. The UC-2 bracket is designed to be

mounted without removing the (2) screws.
Hang the UC-2 module on the screws using
the mounting holes in the bracket.

HOT

COLD

Green Tubing

Blue Tubing

Sink

Counter Top

Two Stage Under Counter (UC-2)

HOT

COLD

Green Tubing

Blue Tubing

Sink

Counter Top

Two Stage Under Counter (UC-2)

Maximum

Minimum

Operating Temperatures

100 ºF (37.8 ºC)

40 ºF (4.4 ºC)

Operating Pressure

100 psig (7.43 g/cm2)

20 psig (1.406kg/cm2)

pH Parameters

8.5

6

Flow Rate

0.5 GPM @ 60 psig

Содержание UC-2

Страница 1: ...82 www wattspremier com Fax 623 931 0191 Warning Please read carefully before proceeding with installation Your failure to follow any attached instructions or operating parameters may lead to the prod...

Страница 2: ..._ _ _ _ _ _ _ _ _ _ _ _ _ _ _ _ _ _ _ _ _ _ _ _ _ _ _ _ _ _ _ _ _ _ _ _ _ _ _ _ _ _ _ _ _ _ _ _ _ _ _ _ _ _ _ _ _ _ _ _ _ _ _ _ _ _ _ _ _ _ _ _ _ _ _ _ _ _ _ _ _ _ _ _ _ _ _ _ _ _ _ _ _ _ _ _ _ _ _ _...

Страница 3: ...p 1 Mounting System Under Sink A Locate a space under the sink that allows theunittobemountedclosetothecoldwater supply and allows for easy access when changing filters Allow 2 a 5cm clearance between...

Страница 4: ...be drilled Mark the center of the hole on the tape Note Stainless steel sinks go to Step F Porcelain Sinks A Using the variable speed drill on the slowest speed drill a 1 8 3 0 mm pilot hole at the ce...

Страница 5: ...cut to length and attached later in the installation Adapta Valve Installation Configuration for 3 8 compression fittings Configuration for 1 2 fittings Step 4 START UP Lift black faucet handle up on...

Страница 6: ...handle to relieve the water pressure B Remove filter housing from lid by turning it to the left as shown in Figure D C Remove used filter cartridges and discard Discard the P CB 1 gaskets NOTE Do not...

Страница 7: ...ing Washer 4 131002 Nut Brass 1 4 C 15 116047 Black Rubber Washer 5 140007 Tubing 1 4 Green 4ft 16 116053 Escutcheon Plate 6 125034 Elbow 90o 1 4 C x 1 4 MPT 17 Faucet Body 7 113004 Black Lid 1 4 FPT...

Страница 8: ...gallons of water 170019 UV Replacement Lamp Ultra UV R 12 months or 9000 hours Testing parameters Flow rate 0 5 gpm pH 6 5 and 8 5 Water pressure 50 psi Cyst Reduction Gallons Influent Effluent 1 Effl...

Страница 9: ...40 degrees C 5 Do not use with water that is micro biologically unsafe or of unknown quality without adequate disinfection before or after the system This warranty does not cover any equipment that i...

Отзывы: