background image

7

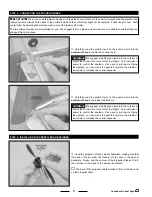
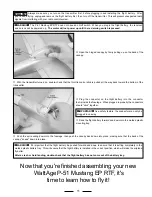
While holding the horizontal tail in place and aligned, secure it to

the fuselage by threading eight small screws through the predrilled
holes in the fuselage and into the plastic tape on the horizontal tail.

IMPORTANT

  Four screws should be installed on  the top and

four on the bottom.  Tighten the screws gently.  Overtightening
them can strip the plastic tape.

PRO TIP

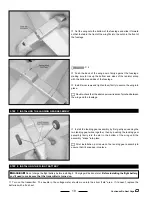
STEP 3:  INSTALLING THE VERTICAL TAIL

Continued On Next Page


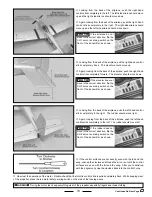
Carefully slide the front portion of the vertical tail down into the

mounting slot in the fuselage.

Push the vertical tail down in position.  When aligned properly,

the tab in the base of the vertical tail should fit into the notch in the
middle of the horizontal tail, and the vertical tail should be pushed
down firmly against the top of the horizontal tail.

X 8

If you have a problem threading the screws into the plastic tape, carefully use a push-pin to make a pilot hole in the

plastic tape for each of the screws.

While holding the vertical tail in place and aligned, secure it to

the fuselage by threading four small screws through the predrilled
holes in the fuselage and into the plastic tape.

IMPORTANT

  Two screws should be installed on  each side.

Tighten the screws gently.  Overtightening them can strip the
plastic tape.

PRO TIP

X 8

If you have a problem threading the screws into the plastic tape, carefully use a push-pin to make a pilot hole in the

plastic tape for each of the screws.

Содержание P-51 MUSTANG EP RTF

Страница 1: ...r Wing Loading 13 7 Ounces Per Square Foot 41 7gr dm2 Molded from Durable Plastic and Foam Preinstalled 4Ch FM 27Mhz Radio Control System Four Channel Control Ailerons Elevator Rudder and Throttle Rec...

Страница 2: ...n fire The flight battery should be recycled at an authorized recycling center Always turn on the transmitter before turning on the airplane and always turn off the airplane before turning off the tra...

Страница 3: ...ter Flight Battery Horizontal Vertical Tails Flight Battery Charger Wing Assembly Fuselage Assembly NOT SHOWN SMALL WOOD SCREWS 12 Landing Gear TX Flag Wing Screws Propeller Spinner w Screws Distincti...

Страница 4: ...n move both right and left and up and down at the same time and is used to apply power to the motor and make the airplane yaw right and left The stick is proportional meaning that motor power can be a...

Страница 5: ...which pulls the airplane forward Vertical Tail Provides stability for the airplane during turns Wing The wing has a special airfoil shape and provides the main source of lift for the airplane The flig...

Страница 6: ...lide the horizontal tail into the slot in the back of the fuselage When aligned properly the horizontal tail should be pushed forward all the way and the outside edges of the strips of plastic tape sh...

Страница 7: ...of the vertical tail should fit into the notch in the middle of the horizontal tail and the vertical tail should be pushed down firmly against the top of the horizontal tail X 8 If you have a problem...

Страница 8: ...later The two aileron clevises are preinstalled for you We suggest that you take a quick moment now to double check that they are snapped firmly into place PRO TIP Carefully snap the plastic clevis on...

Страница 9: ...cure the spinner cone into place Continued On Next Page Thread two hex nuts onto the propeller shaft and tighten them by hand until they will not thread on any further IMPORTANT When tightening the he...

Страница 10: ...ASSEMBLY Install the landing gear assembly by first gently squeezing the two landing gear wires together then by pushing the landing gear assembly firmly into the slot in the bottom of the wing until...

Страница 11: ...s installed in the correct position which will make the airplane fly better After a crash or hard landing double check that the flight battery has not come out of the battery tray Always make sure you...

Страница 12: ...flight mode as described above the airplane can be made to yaw right or left i e move the nose of the airplane right or left with minimal bank by using the rudder control stick This is the same stick...

Страница 13: ...nt of the transmitter as shown PRO TIP Looking from the back of the airplane push the left hand control stick completely to the right The rudder should move right Again looking from the back of the ai...

Страница 14: ...ou can fly the airplane in light wind no more than 10 15 miles per hour Flying in stronger wind is not recommended STEP 2 CHOOSING A DAY TO FLY IMPORTANT Before charging the flight battery the flight...

Страница 15: ...an fly into The flying field should be large enough that you can land anywhere if you get into trouble Until you are proficient at flying the airplane you don t want to have to worry about landing in...

Страница 16: ...he fuselage once Set the airplane on the ground making sure that the airplane is pointing directly into the wind Slowly push the throttle control stick forward until the motor is running at full power...

Страница 17: ...airplane has turned in the direction you want move the control stick gently in the opposite direction to level the wing then allow the control stick to return to center The longer you hold the control...

Страница 18: ...a time when you might crash If the crash isn t too bad most damage can be repaired quickly and easily If the damage is beyond repair spare parts are available for purchase If a foam part is going to...

Страница 19: ...sun or you may lose sight of the airplane Separate flight batteries can be purchased and charged before going to the flying field An extra flight battery will double your flight time See the replaceme...

Страница 20: ...oo much wind A Fly when there is no wind right or left without any B The airplane is out of trim adjustment B Adjust the transmitter trim tab as control input described on page 18 5 Airplane constantl...

Страница 21: ...21...
Страница 22: ...e unit to us by United Parcel Service Federal Express or by Insured Mail Postage is non refundable Send your package to WattAge guarantees this kit to be free from defects in both material and workman...

Страница 23: ...__________________ ____________________________________ ____________________________________ 8 What did you like most about this kit Assembly Manual Parts Fit Hardware Supplied Price Other ___________...

Страница 24: ...Hobby Distributors Attn Global Services 18480 Bandilier Circle Fountain Valley CA 92728 8610 Post Office will not deliver without proper postage _____________________________ ________________________...

Отзывы: