background image

3  ESSENTIAL THREE-LEG DESK ASSEMBLY INSTRUCTIONS

Save These Instructions

OPERATING INSTRUCTIONS – Please refer to the provided Installation Instructions and User Guide.

POLARIZED PLUG INSTRUCTIONS


– To reduce the risk of electric shock, this furnishing has a polarized plug (one blade is wider than 

the other). This plug will fit in a polarized outlet only one way. If the plug does not fit fully in the outlet, reverse the plug. If it still does 
not fit, contact a qualified electrician to install the proper outlet. Do not change the plug in any way.

SERVICING OF DOUBLE-INSULATED PRODUCTS – In a double-insulated product, two systems of insulation are provided instead of 
grounding. No grounding means is provided on a double-insulated product, nor is a means for grounding to be added to the product. 

Servicing a double-insulated product requires extreme care and knowledge of the system, and is to be done only by qualified service 

personnel. Replacement parts for a double-insulated product must be identical to the parts they replace. A double-insulated product 
is marked with the words “DOUBLE INSULATION”, “DOUBLE INSULATED”, or     .

This product is for use on a nominal 120-V circuit. Make sure that the product is connected to an outlet having the same 

configuration as the plug.  No adapter should be used with this product.

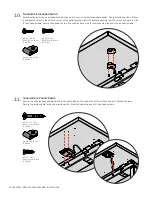
If Using Optional Utility Power - 

1.  The electrical desk plug must be plugged into the utility power when present.

2.  This product is for use on a nominal 120-volt circuit and has a grounding plug that looks like the plug illustrated in  


sketch A (see Figure 77.1). Make sure that the product is connected to an outlet having the same configuration as the    


plug. No adapter should be used with this product.

Содержание 360.394.1300

Страница 1: ...ASSEMBLY 360 394 1300 watsonfurniture com V 21 0 06 2021 Essential Three Leg Desk...

Страница 2: ...ord or plug if it is not working properly if it has been dropped or damaged or dropped into water Return the furnishing to a service center for examination and repair 5 Keep the cord away from heated...

Страница 3: ...grounding to be added to the product Servicing a double insulated product requires extreme care and knowledge of the system and is to be done only by qualified service personnel Replacement parts for...

Страница 4: ...tended Corner Desk Surface Outer Support Rail End Brackets Shroud Brackets Shroud Plates Outer Desk Feet Embedded Two Button Switch Undersurface Paddle Switch Anti collision Dongle Control Box DL6 Lif...

Страница 5: ...h as a 90 Degree Bit and an 18 Extension are helpful for some steps No torque or ball bits should be used Electric Drill M6 1 0 Nylock Nut Zinc 888152 M6 1 0 X 40MM Button Head Screw Zinc 125293 Switc...

Страница 6: ...is free of debris Place support rail segments top down Verify orientation of support rails matches the handed rail assembly mounting pattern on desk surface a Align the inner rail end tab with the slo...

Страница 7: ...Legs to Support Rail Assembly Slide lifting columns into the ends of the support rail as shown a Attach legs with 8 button head screws 2 on each side of each leg b 2 a b M6 1 0 X 12MM Button Head Scr...

Страница 8: ...g columns a and slide the shroud brackets over the lifting columns and plates b 3 Attach Desk Feet Attach the mid leg foot to the center leg with 4 button head screws Attach each outer foot to the out...

Страница 9: ...f the control box a Place the assembly centered on the outer support rail and route the power cable through the rear cutout in the side of the support rail as shown Secure control box in place with M6...

Страница 10: ...Feed switch cable through the support rail cutout and plug into port A2 a Detailed steps for switches steps 5 6 If the customer specified the Bluetooth Add On for desk operation plug the splitter into...

Страница 11: ...he cutout in the side of the outer support rail and back into the cutout in the inner support rail Route the switch cable two button switch or paddle switch through the cutout in the support rail and...

Страница 12: ...Y INSTRUCTIONS Mount Desk Surface Coil any excess cables in the support rail trough ensuring they are inside the support rail Rotate worksurface onto support rail assembly and align brass inserts with...

Страница 13: ...CTIONS Secure Desk Surface to Base Attach worksurface to support rail assembly with 14 button head screws 4 screws per outer leg and 6 screws for the mid leg 9 M6 1 0 X 12MM Button Head Screw Black or...

Страница 14: ...ws Secure the switch cable to the undersurface with 2 switch cable clips and 2 pan head screws 10 8 X 5 8 Flat Head Screw Black 116754 8 X 1 2 Pan Head Screw Black 127000 Switch Cable Clip 038000 Unde...

Страница 15: ...SENTIAL THREE LEG DESK ASSEMBLY INSTRUCTIONS Attach Cable Clips Secure single sided cable clips to the undersurface with 1 pan head screw per clip 12 10 X 5 8 Pan Head Screw Zinc 122800 Cable Clips 48...

Страница 16: ...pport Rail End Covers Attach support rail end covers to outer legs and the short end cover to mid leg using the remaining brass inserts with 2 button head screws per cover 13 M6 1 0 X 12MM Button Head...

Страница 17: ...rrow once to initialize desk The desk will travel down a fraction of an inch then stop The desk is now ready to travel up and down using the switch Place the desk in the workstation setting maintainin...

Отзывы: