


Page 8 of 8
PRODUCT INSTALLATION:
INS31006
MIRO CONFERENCE
WATSON DESKING
800.426.1202
www.watsondesking.com
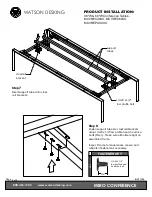
Step 16 -
for 10' and 12' tables
Tilt and slide center leg into place.
A partner may be used to slightly lift one end
of table to aid in installation of center leg.
Align leg with pilot holes in center of table.
Center leg plate will capture support tubes.
FASTENER KEY
F
IG
-2
#10 x 3/4"
wood screw
3/4"
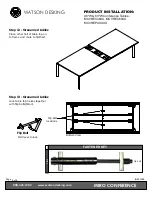
Step 17 -
for 10' and 12' tables
Fasten center leg to table top using
#10 x 3/4" wood screws (FIG-2).
#10 x 3/4"
wood screw
center leg
48"W & 60"W Conference Tables -
MCVREC48XX, MCVREC60XX,
MCVREPXXXXX
Step 18
Level table glides using
provided wrench.
Содержание Miro Conference MCVSQR Series
Страница 1: ......


