


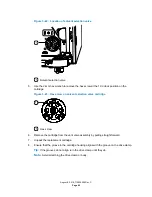


Tip:
Use the 2-mm hex wrench to tighten it.
11. Use the 1/4-inch open-end wrench to reattach all fittings, and tighten them as much as 1/6-
turn beyond finger-tight, for existing fittings, or 3/4-turn beyond finger-tight, for new fittings.
12. Prime the solvent manager (see
3.15 Replacing the optional solvent selection valve cartridge
Warning:
Observe Good Laboratory Practice (GLP) at all times, particularly when
working with hazardous materials. Consult the Material Safety Data Sheets regarding
the solvents you use. Additionally, consult the safety representative for your
organization regarding its protocols for handling such materials.
Notice:
To avoid contaminating system components, wear clean, chemical-resistant,
powder-free gloves when performing this procedure.
Requirement:
Wear clean, chemical-resistant, powder-free gloves when performing
this procedure.
Required tools and materials
• Chemical-resistant, powder-free gloves
• 2-mm hex wrench (startup kit)
• Solvent selection valve cartridge
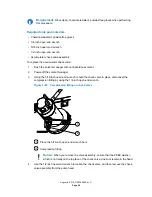
To replace the optional solvent selection valve cartridge:
1.
Open the solvent manager’s door.
2.
Ensure that the solvent-selection valve is set to D
6
.
Warning:
To avoid injuries arising from contact with spilled solvent (the result of
unintentional siphoning), move the solvent bottles to a location below the solvent
manager.
3.
Move the solvent bottles to a location below the solvent manager.
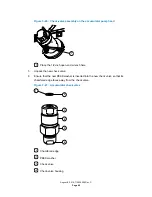
4.
Remove the finger-tight fittings attached to the solvent selection valve cartridge.
August 8, 2016, 715005050 Rev. C
Page 61