

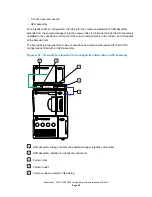


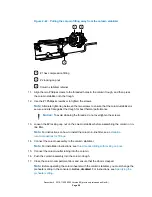


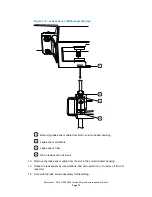


Interconnect cable connecting the CH-A to the sample manager
25-pin, D-sub receptacle on the sample manager's rear panel
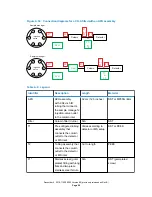
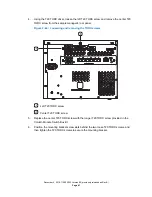
2.4.1 Installing the Column Module Switch Box
With the optional Waters Column Module Switch Box, you can physically connect a CH-A and a
30-cm column module (either a CH-30A or a 30-cm CHC) to the SM-FTN and switch the electrical
control of the column modules via the SM-FTN console.
The switch box is mounted to the rear of the SM-FTN. The SM-FTN interconnect cable is
connected to the SM port of the switch box, the CH-A interconnect cable is connected to the CH-
A port, and either the CH-30A or the 30-cm CHC interconnect cable is connected to the 30CM
port.
Note:
You must change the fluidics configuration manually.
Requirement:
Both firmware and ICS must be updated to Waters Driver Pack 2018 Release 1.
Required tools and materials
• Flat-blade screwdriver
• T20 TORX driver
• Column Module Switch Box kit
To install the Column Module Switch Box:
Notice:
To avoid damaging the electronic components of the sample manager and the
column heater, always power-off the sample manager before connecting or
disconnecting the column heater's interconnect cable.
Notice:
To avoid damaging the electronic components of the Column Module Switch
Box, do not remove the cover from the switch box. The switch box does not contain any
user serviceable parts.
Notice:
To avoid damaging the Column Module Switch Box mounting bracket, do not
lift the sample manager by the bracket.
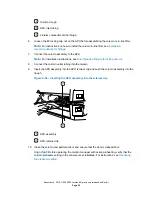
1.
Stop any flowing mobile phase.
2.
Power-off the sample manager.
If you have a 30-cm CHC, power-off the module using the power on/off switch on its lower,
right-hand side.
3.
Using the flat-blade screwdriver, loosen the two retaining screws, and then remove the CH-
A interconnect cable connector from the D-sub receptacle on the rear of the sample
manager.
December 4, 2019, 715005052 Version 02 (previously released as Rev.B)
Page 60


