background image

Direct the jet tip into the 

bottom of the sink basin 

and turn the on/off 

switch on the box 

of the unit to the 

“on” position. 

Bend over the sink and guide the jet to your teeth and 

gums. Start with the back teeth and work toward the 

front teeth. Glide tip along gumline and pause briefly 

between teeth. Continue until you have cleaned the 

inside and outside of both the upper and lower teeth. 

Keep your mouth slightly open to allow the water to 

run into the sink.

Turn the unit off. 

Empty any water remaining in 

the reservoir after use

. Unplug the unit.

If you used mouthwash or other solution, after each 

use, rinse the unit to prevent clogging by partially filling 

reservoir with warm water and running unit with tip 

pointed into sink until unit is empty.

Direct the stream of water towards the gumline at 90 

degrees, so that contact is made where the tooth and 

gums meet. Manoeuvre the flow of water from tooth to 

tooth remembering to pause briefly between each tooth.

Direct the water flow by turning 

the ring at the top of the handle

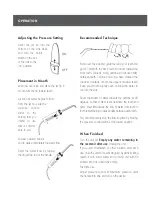
Adjusting the Pressure Setting

Recommended Technique

Placement in Mouth

OPERATION

ON

OFF

H

L

When Finished

Lean low over sink and place the jet tip in 

mouth. Aim the tip toward teeth.

As soon as water begins to flow 

from the jet tip, slide the 

pressure control 

slider to the 

setting that you 

intend to use, 

that is comfort-

able to you

Lowest position allows 

you to pause completely the water flow


You can temporarily stop the flow anytime by moving 

the pressure control switch at the lowest position

First time use:

Adjust pressure control at maximum pressure, point 

the handle into sink and turn on the device 

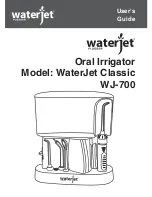
Содержание Classic WJ-700

Страница 1: ...Oral Irrigator User s Guide Model WaterJet Classic WJ 700...

Страница 2: ...cleanses your teeth and gums removing food particles from between your teeth and reducing bacteria that can lead to gingivitis and other periodontal diseases To maximize your benefit from the WaterJet...

Страница 3: ...CONTENTS 12 11 10 7 9 6 4 5 Troubleshooting Important Safeguards Features Operation Maintenance Warranty...

Страница 4: ...ctrocution fire or injury to persons Do not plug this device into voltage system that is different from the voltage system specified on the device Never operate this product if it has a damaged cord o...

Страница 5: ...or periodontal surgery in the previous twelve months contact your dentist prior to use Do not use this product for more than 8 minutes in each two hour period Closely instruct and supervise children 8...

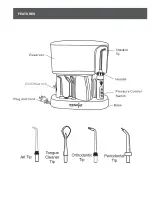
Страница 6: ...FEATURES On Off switch Standard Tip...

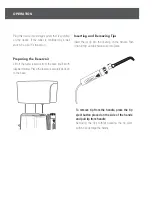
Страница 7: ...ater Place the reservoir securely back on to the base To remove tip from the handle press the tip eject button placed on the side of the hande and pull tip from handle Removing the tips without pressi...

Страница 8: ...into sink until unit is empty Direct the stream of water towards the gumline at 90 degrees so that contact is made where the tooth and gums meet Manoeuvre the flow of water from tooth to tooth remembe...

Страница 9: ...last molar back tooth Place tip at 90 degree angle to the tooth at the gumline Gently glide tip along gumline pausing briefly to lightly brush area between teeth and all around orthodontic bracket be...

Страница 10: ...cleaning unplug from the electrical outlet Wash the dirt off from inside using a brush or similar and wipe off with a cloth There are no consumer serviceable parts in this appliance and it does not re...

Страница 11: ...center or contact our company for a self service repair kit Reservoir leaks Missing reservoir value or reservoir valve is upside down Replace reservoir valve Turn valve right side up Inadequate pressu...

Страница 12: ...tee becomes void if repairs are undertaken by unauthorized persons and if original WaterJet parts are not used To obtain service within the guarantee period hand in or send the complete appliance with...

Отзывы: