

PURCHASE INFORMATION
Installation Instructions
A fuse and manual override switch are recommended with the installation of a
Water Witch electronic bilge switch.
1. Disconnect the battery.
2. Select a mounting location for the Water Witch; the water sensor, the lower sen-
sor furthest from the wires, should be above the standing water level.
3. Always keep the wire connections above the “Standing Water Line”.
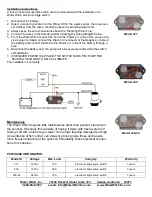
4. Connect the wires in the following order following the wiring diagram below
5. From the Water Witch connect the Tan to the Positive (+) side of the pump or de-
vice being controlled, connect the Black to the Ground or the Negative (-) side of
the battery and connect the Red to the Positive (+) side of the battery through a
fuse.
6. Reconnect the battery and the pump will run several seconds while the switch
self-calibrates.
7. WHENEVER POWER IS APPLIED, THE SWITCH RUNS THE PUMP FOR
SEVERAL SECONDS TO SELF-CALIBRATE.
The installation is complete.
Maintenance
The Water Witch requires little maintenance other than periodic cleaning of
the sensors. Ordinarily this consists of hosing it down with fresh water and
wiping it off with a clean rag or towel. Some high foaming detergents or high
concentration of fish “slime” can delay or prolong cycle times and require
more frequent cleaning of the sensors. Periodically check electrical connec-
tions for corrosion.
Model 217
Model 230
Model 230-24
Water Witch, Inc. 10744 Rockvill Street, Suite 103 Santee, California 92071
1-800-654-4783 e-mail: [email protected] www.WaterWitchInc.com
Model #
Voltage
Max. Load
Category
Warranty
217
12Vdc
10A
electronic bilge pump switch
7 years
230
12Vdc
20A
electronic bilge pump switch
7 years
230-24
24Vdc
15A
electronic bilge pump switch
7 years


