background image

Body Temperature Detection Camera 
User Manual


                                                              www.watchnetinc.com


  45 


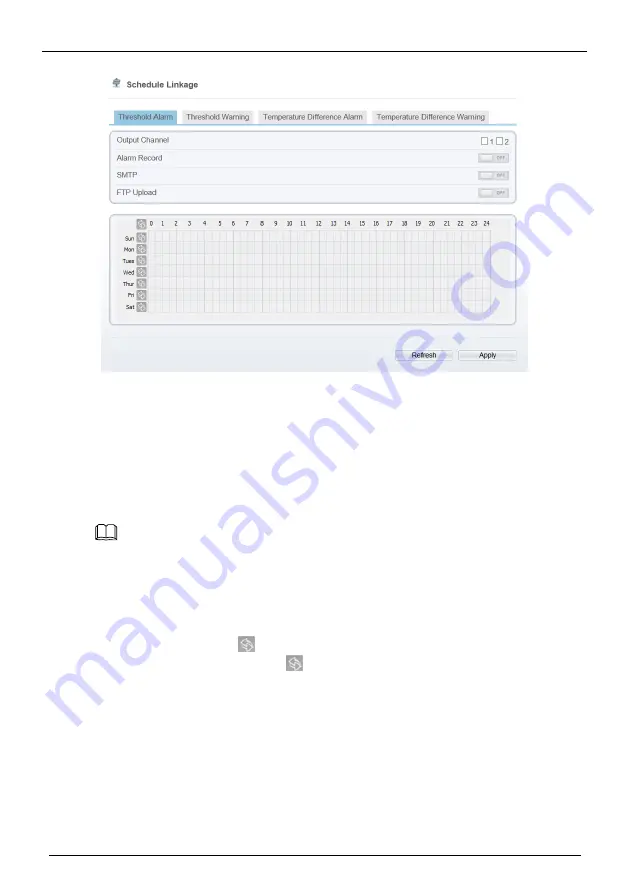
Figure 5-4


Schedule Linkage 


Step 2


Choose threshold alarm, threshold temperature difference alarm, threshold warming 
and temperature difference warming to set. All of these four settings are the same 
ways to set. 

Step 3


Check the output channel. 

Step 4


Set schedule linkage.     

Step 5


Click 

Apply

Step 6


The message "

Apply success

" is displayed, the system saves the settings.   

NOTE


Method 1

Click


left mouse button to select any time point within 0:00-24:00 from 

Monday to Sunday as shown in Figure 5-4.


Method 2

Hold down the left mouse button, drag and release mouse to select the alarm 

time within 0:00-24:00 from Monday to Sunday. 


When you select time by dragging the cursor, the cursor cannot be moved out of the time 

area. Otherwise, no time can be selected.   


Method 3

Click 

  in the alarm time page to select the whole day or whole week. 


Deleting alarm time: 

Click 

  again or inverse selection to delete the selected alarm 

time. 


----End 

Содержание TNC-20-BDC

Страница 1: ...Body Temperature Detection Camera User Manual Issue V1 1 Date 2019 11 28 TNC 20 BDC...

Страница 2: ...rate dangers which if not avoided may cause minor or moderate injuries It alerts you to risks Neglect of these risks may cause device damage data loss device performance deterioration or unpredictable...

Страница 3: ...ice may be damaged if working beyond the temperature range for a long period During the outdoor installation prevent the morning or evening sunlight incidence to the lens of the thermal imaging camera...

Страница 4: ...ice is idle for a long time Before unpacking check whether the fragile sticker is damaged If the fragile sticker is damaged contact customer services or sales personnel The manufacturer shall not be h...

Страница 5: ...3 Changing the Password 9 2 4 Browse Video 10 2 4 1 Install Plugins 11 2 5 Setting Local Network Parameters 12 3 Visible Sensor Configuration 15 3 1 Accessing the Sensor Interface 15 3 2 Mode 15 3 3...

Страница 6: ...Double Virtual Fences 60 6 4 Object Left 64 6 5 Object Removed 66 7 Alarm Setting 70 7 1 Alarm Output 70 7 2 Disk Alarm 71 7 3 Network Alarm 71 7 4 I O Alarm Linkage 72 7 5 Motion Alarm 73 7 6 Push Me...

Страница 7: ...Body temperature detection camera User Manual Contents www watchnetinc com VI A Troubleshooting 88...

Страница 8: ...detection area make sure there are no omissions Intelligent body temperature and visible light image channel display details information to easily monitor and discriminate Smart over temperature alarm...

Страница 9: ...fference alarm and over temperature alarm Outputting three code streams in real time and satisfying local storage and network transmission of the video 1 channel audio input and 1 channel audio output...

Страница 10: ...Body temperature detection camera User Manual Product Overview www watchnetinc com 3 1 3 Device Dimensions 1 4 shows the dimensions of device Figure 1 1 Dimensions unit mm...

Страница 11: ...tinc com 4 1 4 Cable Connection Figure 1 2 the multi connector combination cable of the thermal imaging integrated network camera For details about the multi connector combination cable please refer t...

Страница 12: ...ernal pan tilt 2 ALARM IN2 Connects to the alarm device 3 ALARM OUT2 4 ALARM IN1 5 ALARM OUT1 6 Audio Input Inputs the audio signal and receives the analog audio signals from the sound pick up device...

Страница 13: ...8 0 121 in the address box and press Enter The login page is displayed as shown in Figure 2 1 Figure 2 1 Login page Step 2 Input the user name and password The default name and password both are admin...

Страница 14: ...d logout of the system Figure 2 2 is shown the homepage layout Table 2 1 lists the elements on the homepage layout Figure 2 2 Homepage layout Table 2 1 Elements on the homepage NO Element Description...

Страница 15: ...sword 6 Sign Out You can click to return to the login page 7 Channel Channel 1 visible light Channel 2 thermal image 8 Stream Four streams You can set details at configuration base stream interface St...

Страница 16: ...displayed as shown in Figure 2 3 Figure 2 3 Change password dialog box The change password page will be displayed if you don t change the default password when you login the system for the first time...

Страница 17: ...in to the web for the first time Step 1 Open the Internet Explorer Choose Tools Internet options Security Trusted sites Sites In the display dialog box click Add as shown in Figure 2 4 Figure 2 4 Add...

Страница 18: ...p 3 Download and install the player control as prompted The login page is displayed when the control is loaded 2 4 1 Install Plugins You will be prompted with a message click here to use short delay P...

Страница 19: ...nnel 1 view the visible picture channel 2 is thermal picture During installing plugins you need to close the browser finish the installation login the device again End 2 5 Setting Local Network Parame...

Страница 20: ...32 bits Setting method Select a value from the drop down list box Default value IPv4 DHCP The device automatically obtains the IP address from the DHCP server Setting method Click the option button N...

Страница 21: ...ter a value manually Default value 192 168 0 2 MTU Set the maximum value of network transmission data packets Setting method Enter a value manually NOTE The MTU value is range from 1280 to 1500 the de...

Страница 22: ...e and right click on the page A shortcut menu is displayed as shown in Figure 3 1 Figure 3 1 Sensor setting interface Step 2 Choose Sensor Configure and the Sensor Setting dialog box appears All senso...

Страница 23: ...et the Start Time set the End Time DN linkage Mode the day mode is correspond to scheme 1 the night mode is correspond to scheme 2 Step 4 Click Save the message Save succeed is displayed the system sa...

Страница 24: ...s the borders become clearer and the number of noise points increases Setting method Drag the slider Default value 50 Saturation It indicates the color saturation of an image As the value increases th...

Страница 25: ...cription Configuration Method Scene Indoor or outdoor Setting method Select a value from the drop down list Default value Indoor Mirror It is used to select the pixel location of an image Normal The i...

Страница 26: ...n Method Exposure Mode The exposure modes include Auto The system performs auto exposure based on the monitoring environment Manual You can set Shutter Setting to fixed values manually Iris Priority Y...

Страница 27: ...reases the image becomes brighter Setting method Select a value from the drop down list Default value 1 25 Max gain It indicates the maximum gain The device automatically adjusts the gain based on the...

Страница 28: ...o display the real color of a monitoring scenario when the color temperature changes Auto camera adjusts automatically Tungsten at tungsten lamp environment Fluorescent fluorescent environment Dayligh...

Страница 29: ...Body Temperature Detection Camera User Manual www watchnetinc com 22 Figure 3 7 Day night Table 3 5 describes the parameters on the Special Function tab page Table 3 5 Parameters of day night...

Страница 30: ...te Day mode The image is colored and the filter is in the day state preventing infrared light from entering the sensor Night mode The image is black and white and the filter is in the night state allo...

Страница 31: ...iption Configuration Method 2D NR Auto manual default value is auto By comparing and screening the images of the two frames before and after the noise point position is found out and gain control is c...

Страница 32: ...e clear image performance in strong backlight areas such as exterior light coming through a window or glass door High contract light conditions are no longer a problem when you need to capture detaile...

Страница 33: ...ight The electronic shutter of the camera basically adjusts its exposure to try to allow for more light to be allowed in the darker areas This parameter applies only to visible light Setting method Dr...

Страница 34: ...setting tab page Table 3 8 Parameters of zoom focus Parameter Description Configuration Method D N Auto Focus Enable the function if the light is changed it will focus automatically Setting method Ti...

Страница 35: ...dure Step 1 On the Internet Explorer interface or the client software interface choose channel 2 select and right click the surveillance image to the set as shown in Figure 4 1 Figure 4 1 Sensor confi...

Страница 36: ...g and choose Debug Mode Step 3 Choose switch mode from the drop down list Step 4 Time mode Set the Start Time set the End Time DN linkage Mode the day mode is correspond to scheme 1 the night mode is...

Страница 37: ...ngs NOTE Brightness It indicates the total brightness of an image As the value increases the image becomes brighter It ranges from 0 to100 Contrast It indicates the contrast between the bright part an...

Страница 38: ...om drop list Step 4 Click Save the message Save succeed is displayed the system saves the settings NOTE Mirror providing the selection of image pixel locations Normal the image is not flipped Horizont...

Страница 39: ...om 0 to 255 by the algorithm In the black white display mode this range is converted to the gray scale tones For example 0 indicates completely black and 255 indicates completely white The temperature...

Страница 40: ...temperature fields flat field By means of FFC the camera can update the correction coefficients to output more uniform images Throughout the FFC process the video image is frozen for two seconds and...

Страница 41: ...u feel that the image is obviously degraded but the automatic FFC is not performed you can use the manual FFC function to check whether the image quality can be improved FFC interval min In the automa...

Страница 42: ...se reduction interface Table 4 2 lists the Noise reduction parameters Table 4 2 Parameters on the Noise reduction interface Parameter Description Setting 2DNR Decrease the image noise How to set Selec...

Страница 43: ...e image interface Figure 4 8 Enhance image interface Step 2 Click in the lower left corner of Sensor Setting and choose enhance image Step 3 Tick defog then drag the slider to set It ranges from 0 100...

Страница 44: ...inc com 37 5 Human Thermometer Setting 5 1 Parameter Configure Operation Procedure Step 1 Choose Configuration human thermometer parameter configure The parameter configure page is displayed as shown...

Страница 45: ...era User Manual www watchnetinc com 38 Step 2 Set the parameters according to Table 5 1 Table 5 1 Parameter of face detection Parameter Description Setting Face detection Detect face of human Setting...

Страница 46: ...e 8 areas can be set to detect temperature Choose from the drop list left click to draw the area right click to finish the set Setting method Choose from drop list Default value 1 Face pixel min 1 200...

Страница 47: ...tion Setting method Input a number from 0 to 90 Default value 30 Tilt degree 0 90 The face is deflected and both eyes cannot appear in the picture Setting method Input a number from 0 to 90 Default va...

Страница 48: ...value from the drop down list box Default value Celsius Ambient Type The ambient of camera Outside and Inside are available Inside suggest to be selected when the ambient temperature change frequently...

Страница 49: ...measured object temperature is 37 and actual temperature is 30 so the correction coefficient is 7 Setting method Enter a value manually Default value 0 00 Mount distance The actual distance between th...

Страница 50: ...Parameter Description Setting Output channel Choose channels to output alarm Setting method Tick the channels Default value Uncheck Alarm rules Set the maximum temperature greater than set value Defau...

Страница 51: ...method Enable SMTP Enable when there is an alarm the camera will send mail Setting method Enable FTP upload Enable when there is an alarm the camera will upload FTP Setting method Enable End 5 1 1 Sc...

Страница 52: ...is displayed the system saves the settings NOTE Method 1 Click left mouse button to select any time point within 0 00 24 00 from Monday to Sunday as shown in Figure 5 4 Method 2 Hold down the left mou...

Страница 53: ...as shown in Figure 5 5 Figure 5 5 Thermal mapping interface Po int 1 Point 2 Point 3 Po in t 1 Poin t 2 Po int 3 Step 2 Settings please refer to Table 5 4 Table 5 4 Parameter of thermal mapping Param...

Страница 54: ...ross Point two is red cross Point three is blue cross Setting method Select from drop list Step 3 Click Apply The message Apply success is displayed the system saves the settings End 5 3 Bad Point Che...

Страница 55: ...re Detection Camera User Manual www watchnetinc com 48 Figure 5 6 Bad point check interface Bad Point 1 Bad Point 2 Step 2 Click the white point at image click Apply to recover the bad point as shown...

Страница 56: ...lick Apply The message Apply success is displayed the system saves the settings End 5 4 Thermal Calibration Enable the thermal calibration function you need the special calibration tool to check the t...

Страница 57: ...figuration human thermometer thermal mapping as shown in Figure 5 8 Figure 5 8 Thermal calibration interface Step 2 Enable the button and display area info Step 3 Input the target temperature emission...

Страница 58: ...inc com 51 NOTE Emission rate is the thermal calibration device blackbody s is 0 98 Distance depends the actual installation distance The version information should be provided to sales technicians if...

Страница 59: ...r Description The perimeter function refers to that an alarm is generated when the targets of specified types such as person car and both person and car enter the deployment area Procedure Step 1 Sele...

Страница 60: ...rmal Choose one channel to set Enable Enable the button to enable the alarm How to set Click Enable to enable Default value OFF Limit Target Type Effective alarms are set based on target type with opt...

Страница 61: ...target information by clicking below the real time video in a browser to turn into When an alarm is triggered the target movement trace can be displayed The trace can be seen only within the deployme...

Страница 62: ...reset Scan Track Tour How to set Select from the drop down list Value Select corresponding value from value after select PTZ type How to set Select from the drop down list Step 3 Set a deployment area...

Страница 63: ...button to select any time point within 0 00 24 00 from Monday to Sunday as shown in Figure 6 3 Method 2 Hold down the left mouse button drag and release mouse to select the deployment time within 0 0...

Страница 64: ...forbidden travel direction An alarm is generated when the targets of specified types such as person or car cross this line Procedure Step 1 Select Configuration Intelligent Analysis Single Virtual Fen...

Страница 65: ...t Target Type Default value OFF Limit Target Size The target size for triggering an effective alarm is set based on the actual target size The minimum size is 1000 square centimeters and the maximum10...

Страница 66: ...eras and select corresponding PTZ type Preset Scan Track Tour How to set Select from the drop down list Value Select corresponding value from value after select PTZ type How to set Select from the dro...

Страница 67: ...ecognized to have crossed the single virtual fence The single virtual fence which detects person foot as the recognition target cannot be too short because a short single virtual fence tends to miss t...

Страница 68: ...le 6 3 Description of Parameters for Double Virtual Fence Parameter Description Setting Enable Enable the button to enable the alarm How to set Click Enable to enable Default value OFF Limit Target Ty...

Страница 69: ...arget movement trace can be displayed The trace can be seen only within the deployment area and disappears after the target leaves the deployment area How to set Click to enable Upload Target Info Def...

Страница 70: ...ine move the cursor to the drawing interface hold down the left mouse button and move the cursor to draw two lines When you release the left mouse button two numbered virtual fences are generated Choo...

Страница 71: ...ion of a target takes time after target appearance on the screen and an alarm is generated only when the object is recognized to have crossed the double virtual fences The double virtual fences which...

Страница 72: ...o draw a line and then click to generate another point This is how a line is generated In this way continue to draw lines to form any shape and right click to finish line drawing NOTE A drawn line can...

Страница 73: ...ng time of an object within the deployment area meets the set shortest removing time Procedure Step 1 Select Configuration Intelligent Analysis Object Removed to access the Object Removed setting inte...

Страница 74: ...rated when the object removed time is longer than the shortest removing time Setting range 5 60 seconds How to set Enter a value in the area box Default value 5s Upload Target Info Enable the function...

Страница 75: ...onding value from Value after select PTZ type How to set Select from the drop down list Step 3 Set a deployment area Move the cursor to the drawing interface and click to generate a point move the cur...

Страница 76: ...Body Temperature Detection Camera User Manual www watchnetinc com 69 End...

Страница 77: ...ion alarm alarm output to access the alarm output setting interface as shown in Figure 7 1 Figure 7 1 Alarm output interface Step 2 Set alarm output of channel name enable valid signal and alarm time...

Страница 78: ...gure 7 2 Figure 7 2 Disk alarm interface Step 2 Enable the disk full alarm Set alarm interval the value is from 10 to 86400 s Step 3 Tick the channel to push alarm message Step 4 Click apply to save t...

Страница 79: ...d enable exceptional alarm to set alarm interval Tick output channel Step 3 Enable the alarm record Step 4 Click apply to save the settings click refresh will return last settings 7 4 I O Alarm Linkag...

Страница 80: ...ble other linkages such as alarm input PTZ linkage alarm record SMTP and FTP upload Step 3 Set alarm schedule choose the duration of linkage Step 4 Click apply to save the settings click refresh will...

Страница 81: ...set alarm interval and sensitivity enable other linkages such as alarm record SMTP and FTP upload Step 3 Set motion alarm schedule Step 4 Click apply to save the settings click refresh will return las...

Страница 82: ...User Manual www watchnetinc com 75 Figure 7 6 Push message interface Step 2 Enable the push message you will receive the message when the alarm happened Step 3 Click apply to save the settings click...

Страница 83: ...com 76 8 Other Web Configurations 8 1 Device Information You can view the information about device as shown in Figure 8 1 Figure 8 1 Device information interface 8 2 Stream 8 2 1 Base Stream Step 1 C...

Страница 84: ...ype video encode level audio encode type resolution frame rate frame interval bit rate type and bit rate from all drop list Step 3 Set name of base stream enable smart encode Step 4 Click Apply The me...

Страница 85: ...gure 8 3 SVC stream interface Step 2 Choose SVC stream ID elementary stream ID and P frame rate from drop list Step 3 Click Apply The message Apply success is displayed the system saves the settings 8...

Страница 86: ...pply success is displayed the system saves the settings 8 2 4 Snapshot Step 1 Choose configuration stream snapshot as shown in Figure 8 5 Figure 8 5 Snapshot interface Step 2 Choose snapshot resolutio...

Страница 87: ...You can set local network device port data and time camera OSD microphone CVBS system voice denoise and software licenses as shown in Figure 8 6 Figure 8 6 Device interface 8 4 External Device Choose...

Страница 88: ...Body Temperature Detection Camera User Manual www watchnetinc com 81 Figure 8 7 External device interface...

Страница 89: ...d rule cycle store or save days and stream name At this interface you can also view or modify the information of record directory Figure 8 8 Device record interface 8 6 Privacy Masking Choose configur...

Страница 90: ...e 8 9 Privacy masking interface 8 7 Network Service Choose configuration network service You can set 802 1x DDNS PPPoE Port mapping SMTP IP filter CGI alarm service center SNMP and QOS 8 8 Privacy Man...

Страница 91: ...Detection Camera User Manual www watchnetinc com 84 Figure 8 10 Privacy manager interface 8 9 Protocol Choose configuration protocol You can set protocol information security CMS configuration and mul...

Страница 92: ...Manual www watchnetinc com 85 Figure 8 11 Protocol interface 8 10 Device Log Choose configuration device log You can view operation log and alarm log or collect all log information as shown in Figure...

Страница 93: ...intenance You can restart update reserve IP setting and restore to factory default as shown in Figure 8 13 Figure 8 13 Maintenance interface 8 12 Local Config Choose configuration local config You can...

Страница 94: ...Body Temperature Detection Camera User Manual www watchnetinc com 87 Figure 8 14 Local config interface...

Страница 95: ...powered on and the temperature of the cavity is unstable The temperature of the cavity is stable within 15 to 30 minutes after the device is powered on The target configuration is incorrect Check whet...

Страница 96: ...ct upgrade package again Canada 351 Ferrier Street Unit 5 Markham Ontario L3R 5Z2 Tel 416 410 6865 Toll Free 1 866 843 6865 info watchnetinc com USA 171 Cooper Ave Suite 110 Tonawanda NY 14150 USA Tel...

Отзывы: