


• Install the device in a secure location, preferably in a locked equipment rack or secure
server room.
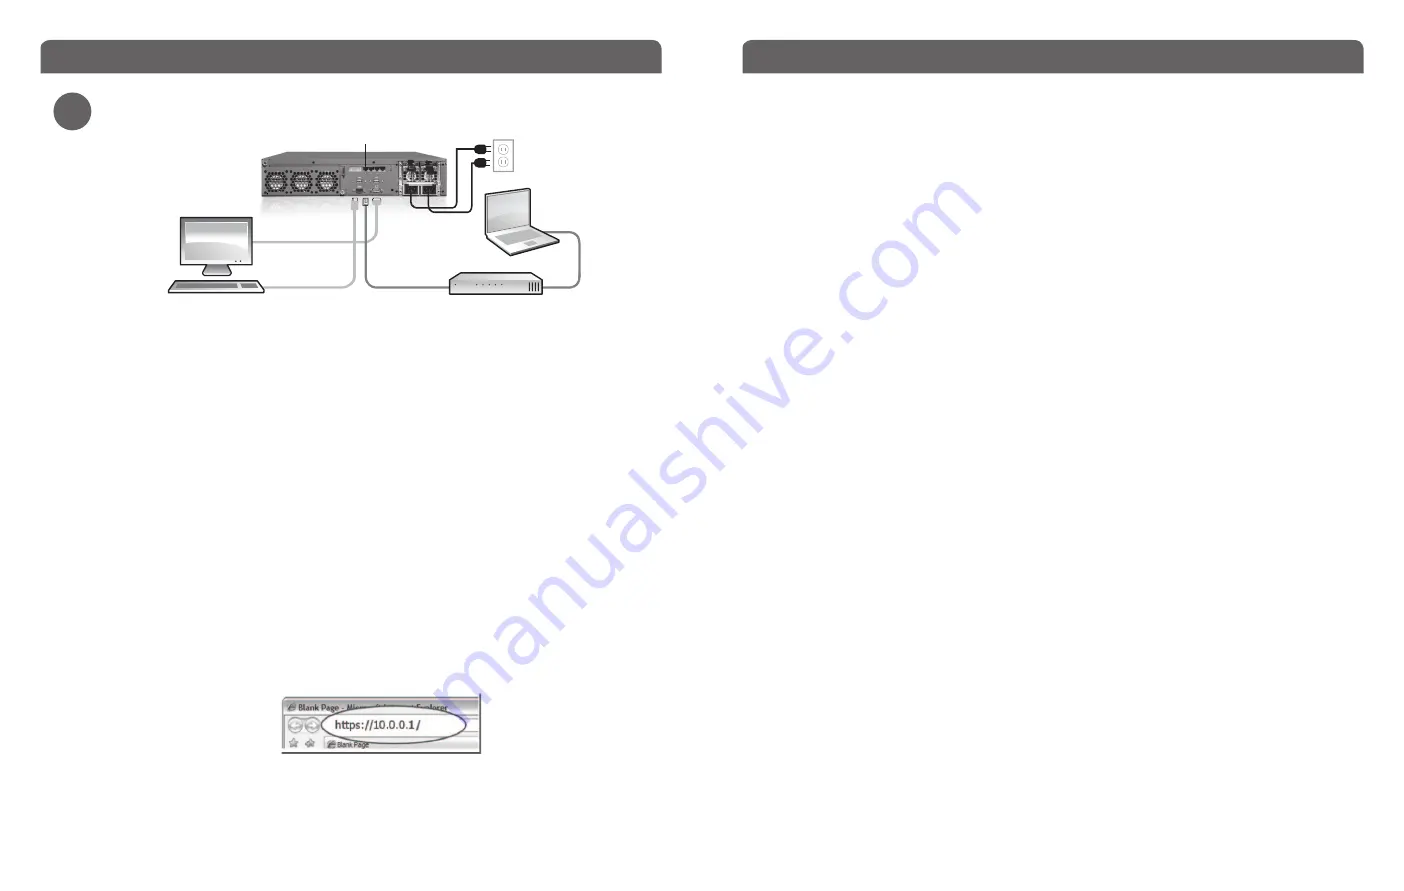
• Connect the power cord to the power socket on the back panel of the device.
• To access the Web UI Setup Wizard, connect to the WatchGuard XCS using one of these
methods:
o
Connect your computer to the same network as the WatchGuard XCS through a
network switch. Connect the WatchGuard XCS to the network switch using the
first onboard Ethernet connector (NIC 1) at the left side of the back panel.
o
Connect your computer directly to the WatchGuard XCS using a cross-over
Ethernet cable connected to the first onboard Ethernet connector (NIC 1) at the
left side of the back panel.
• The default IP address on the WatchGuard XCS is 10.0.0.1/24.
• Configure your computer to use the IP address 10.0.0.2 with a netmask of
255.255.255.0 to connect to the WatchGuard XCS.
• Power on your device. Wait at least five minutes for the system to initialize before you
try to connect to the WatchGuard XCS with a web browser.
NOTE: Ping is enabled on the configured network interface. You can ping the default address 10.0.0.1 to
check connectivity before you connect with a web browser.
• Open a web browser and type
https://10.0.0.1
to start the Web UI Setup Wizard.
NOTE: Because the XCS device uses a self-signed certificate, you may see a certificate warning in your
browser. It is safe to ignore the warning (Internet Explorer) or to add a certificate exception (Mozilla Firefox).
• On the Login page, type the default user ID (
admin
) and the default password (
admin
).
• Follow the instructions on the screen and complete the Wizard.
NOTE: Make sure you enter your feature key during the Wizard.
• Log in to the WatchGuard XCS Web UI with the user name
admin
and the new
password you set in the Wizard.
Connect your WatchGuard® XCS
3
Connection and Installation
Next Steps
Congratulations!
You have finished the basic setup of your WatchGuard® XCS. You can
use the Web UI to continue all configuration and management tasks.
WatchGuard XCS Configuration
• The XCS is initially configured for a deployment using a single interface on an internal
network. To configure additional network interfaces, select
Configuration > Network >
Interfaces
.
• A weekly full email report is scheduled to be emailed to the administrator each
Saturday. To configure additional reports, select
Activity > Reports > Schedule
.
Software Updates
• The Security Connection feature contacts WatchGuard’s support servers daily to check
for new software updates.
• To install new software updates for your device, select
Administration > Software
Updates > Updates
.
Additional Resources
For more information about how to configure your WatchGuard XCS:
• From the Web UI, select
Support > Online Manual
.
• Go to
http://www.watchguard.com/help/documentation
and download the latest
WatchGuard XCS documentation.
• Go to
http://www.watchguard.com/training/courses.asp
for training presentations and
additional training resources.
• Go to
http://www.watchguard.com/forum
to view an interactive online user forum for
the WatchGuard XCS moderated by senior WatchGuard support engineers.
• Go to
http://customers.watchguard.com
to view and search the knowledge base for
information on specific WatchGuard XCS product issues.
• For copyright information, please see the Copyright Guide located on the WatchGuard
XCS documentation page at
http://www.watchguard.com/help/documentation/xcs.asp
Switch
NIC 1
Ethernet cable
Ethernet
cable
[Optional monitor
and keyboard
for console access]
Содержание XCS 1180
Страница 14: ...1 2 B0F412345 1234 ...
Страница 15: ...3 NIC 1 ...
Страница 16: ...简体中文 1 2 B0F412345 1234 ...
Страница 17: ...3 NIC 1 ...
Страница 22: ...WatchGuard XCS Quick Start Guide WatchGuard XCS Quick Start Guide ...


