background image

31


WPL 304 User Manual 


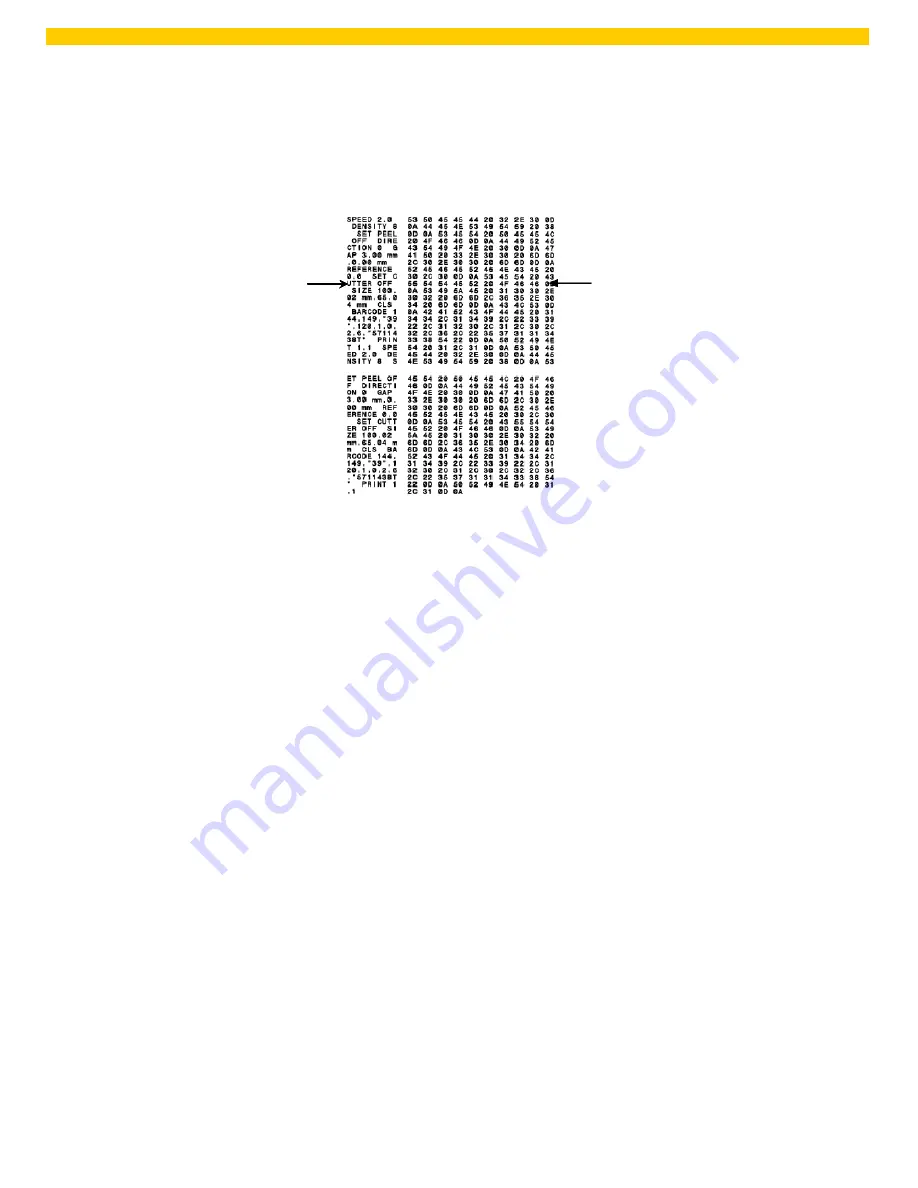
ASCII Data 

Hex decimal data related to


left column of ASCII data 

 Dump mode


Printer will enter dump mode after printing printer configuration. In the dump mode, all 
characters will be printed in 2 columns as following. The left side characters are 

received from your system and right side data are the corresponding hexadecimal value 

of the characters. It allows users or engineers to verify and debug the program. 


Note: 

1.  Dump mode requires 4” wide paper width. 
2.  Turn off / on the power to resume printer for normal printing. 
3. 

Press FEED button to back to the previous menu. 

4.3.3 Printer Initialization 

Printer initialization is used to clear DRAM and restore printer settings to defaults. The 
only one exception is ribbon sensitivity, which will note be restored to default.


Printer initialization is activated by the following procedures.


1.  Turn off the power switch. 
2.  Hold on the button then turn on the power switch. 
3.  Release the button when LED turns 

green


after 5 amber blinks. (Any green will do 

during the 5 blinks).


 The LED color will be changed as following:


Amber 

red (5 blinks) 

amber (5 blinks) 

green (5 blinks)

 - 

green/amber (5 

blinks) 

red/amber (5 blinks) 

solid green 

Содержание WPL304

Страница 1: ...WPL304...

Страница 2: ...4 2 External Label Roll Mount Installation Option 15 3 4 3 Loading Media in Peel off Mode Option 16 3 4 4 Loading Media in Cutter Mode Option 16 3 5 Diagnostic Tool 18 3 5 1 Start the Diagnostic Tool...

Страница 3: ...alibration Self test and Dump Mode 28 4 3 3 Printer Initialization 31 4 3 4 Set Black Mark Sensor as Media Sensor and Calibrate the Black Mark Sensor 32 4 3 5 Set Gap Sensor as Media Sensor and Calibr...

Страница 4: ...al create a derivative work from a licensed program or use a licensed program in a network without written permission from Wasp Technologies The user agrees to maintain Wasp Technologies copyright not...

Страница 5: ...A1 2001 A2 2003 IEC 61 000 4 Series EN61 000 3 2 2006 EN61 000 3 3 1 995 A1 2001 FCC Part 15 Class B UL CUL C Tick CFR 47 Part 15 CISPR 22 3rd Edition 1997 Class B ANSI C63 4 2003 Canadian ICES 003 T...

Страница 6: ...VERBRAUCHTE BATTERIEN IMMER VORSCHRIFTSGEM SS ENTSORGEN B Note Continuous printing will cause the printer motor to overheat The printer will stop printing automatically for approximately 10 15 minute...

Страница 7: ...er Please retain the packaging materials in case you need to reship the printer Unpacking the printer the following items are included in the carton One printer unit One Windows labeling software Wind...

Страница 8: ...SD card spec SD card capacity Approved SD card manufacturer V1 0 V1 1 128 MB SanDisk Transcend V1 0 V1 1 256 MB SanDisk Transcend Panasonic V1 0 V1 1 512 MB SanDisk Transcend Panasonic V1 0 V1 1 1 GB...

Страница 9: ...Transcend Panasonic V1 0 V1 1 miniSD 256 MB Transcend Panasonic V1 0 V1 1 miniSD 512 MB Transcend Panasonic V1 0 V1 1 miniSD 1 GB Transcend Panasonic V2 0 SDHC CLASS 4 miniSD 4 GB Transcend V2 0 SDHC...

Страница 10: ...b 2 Ribbon rewind gear 3 Gap sensor receiver 4 Media holder 5 Media holder lock switch 6 Gap sensor transmitter 7 Printhead 8 Ribbon supply hub 9 Top cover support 10 Media guide adjustment knob 11 Bl...

Страница 11: ...7 WPL 304 User Manual 2 2 3 Rear View 1 Ethernet interface 2 USB interface 3 Centronics interface 4 RS 232C interface 5 Power jack socket 6 Power switch 7 Fan fold paper entrance chute 1 2 3 4 5 6 7...

Страница 12: ...flat secure surface 2 Make sure the power switch is off 3 Connect the printer to the computer with the provided USB cable 4 Plug the power cord into the AC power cord socket at the rear of the printer...

Страница 13: ...n each side towards the front of the printer then lift the top cover to the maximum open angle 2 A top cover support at the rear of the printer will engage with lower inner cover to hold the printer t...

Страница 14: ...cess cover Note In normal printing mode ribbon access cover can be opened while opens the top cover Ribbon access cover can be closed while top cover is open or close In peeler and cutter mode please...

Страница 15: ...11 WPL 304 User Manual 4 Insert the paper core right side onto the rewind hub Align the notches on the left side and mount onto the spokes 5 Stick the ribbon onto the ribbon rewind paper core...

Страница 16: ...anual 6 Turn the ribbon rewind gear until the ribbon plastic leader is thoroughly wound and the black section of the ribbon covers the print head Close the ribbon access cover and the top cover Loadin...

Страница 17: ...pulling the tabs located on each side towards the front of the printer then lift the top cover to the maximum open angle 2 Separate and hold open the media holders 3 Place the roll between the holders...

Страница 18: ...b Disengage the top cover support and close the top cover gently 6 Use Diagnostic Tool to set the media sensor type and calibrate the selected sensor Start the Diagnostic tool Select the Printer Confi...

Страница 19: ...ernal label entrance chute And place the paper printing side face up through the media sensor and place the label leading edge onto the platen roller 6 Move the media guides to fit the label width by...

Страница 20: ...tool Select the Printer Configuration tab Click the Calibrate Sensor button Please refer to the diagnostic utility quick start guide for more information 5 Open the peel off panel by pulling it out 6...

Страница 21: ...ype and calibrate the selected sensor Start the Diagnostic tool Select the Printer Configuration tab Click the Calibrate Sensor button Please refer to the diagnostic utility quick start guide for more...

Страница 22: ...reate printer bitmap fonts and to send additional commands to the printer Using this convenient tool you can explore the printer status and settings and troubleshoot the printer Note This utility work...

Страница 23: ...______________ Setup the IP address subnet mask gateway for the on board Ethernet Please refer to next RTC Time Synchronize printer Real Time Clock with PC Print Test Page Print a test page Reset Prin...

Страница 24: ...nterface 1 Connect the USB cable between the computer and the printer 2 Turn on the printer power 3 Start the Diagnostic Utility by double clicking on the icon Note This utility works with printer fir...

Страница 25: ...clicks on the icon Note This utility works with printer firmware V6 00 and later versions 4 Select COM as interface then click on the Setup button to setup the serial port baud rate parity check data...

Страница 26: ...utton to setup the IP address subnet mask and gateway for the on board Ethernet 5 Click the Discover Device button to explore the printers that exist on the network 6 Select the printer in the left si...

Страница 27: ...n to exit the Ethernet interface setup and go back to Diagnostic Tool main screen Factory Default button This function will reset the IP subnet mask gateway parameters obtained by DHCP and reset the p...

Страница 28: ...d spec SD card capacity Approved SD card manufacturer V1 0 V1 1 128 MB SanDisk Transcend V1 0 V1 1 256 MB SanDisk Transcend Panasonic V1 0 V1 1 512 MB SanDisk Transcend Panasonic V1 0 V1 1 1 GB SanDis...

Страница 29: ...1 0 V1 1 miniSD 128 MB Transcend Panasonic V1 0 V1 1 miniSD 256 MB Transcend Panasonic V1 0 V1 1 miniSD 512 MB Transcend Panasonic V1 0 V1 1 miniSD 1 GB Transcend Panasonic V2 0 SDHC CLASS 4 miniSD 4...

Страница 30: ...nter Red Solid This illuminates printer head open cutter error Red Flash This illuminates a printing error such as head open paper empty paper jam ribbon empty or memory error etc 4 2 Regular button f...

Страница 31: ...n and Gap Black Mark Sensor Calibration Gap black mark sensor sensitivity should be calibrated at the following conditions 1 A brand new printer 2 Change label stock 3 Printer initialization Please fo...

Страница 32: ...2 Hold on the button then turn on the power switch 3 Release the button when LED becomes amber and blinking Any amber will do during the 5 blinks The LED color will be changed as following order Amber...

Страница 33: ...rinter model name Main board firmware version Printed mileage Main board firmware checksum Serial port setting Code page Country code Print speed Print darkness Label size width height Gap size vertic...

Страница 34: ...Country code ZPL setting information Print darkness Print speed inch sec Label size Control prefix Format prefix Delimiter prefix Printer power up motion Printer head close motion Note ZPL is emulati...

Страница 35: ...on the power to resume printer for normal printing 3 Press FEED button to back to the previous menu 4 3 3 Printer Initialization Printer initialization is used to clear DRAM and restore printer setti...

Страница 36: ...P Address DHCP 4 3 4 Set Black Mark Sensor as Media Sensor and Calibrate the Black Mark Sensor Please follow the steps as below 1 Turn off the power switch 2 Hold on the button then turn on the power...

Страница 37: ...BAS program immediately when turning on printer power The AUTO BAS program can be interrupted without running the program by the power on utility Please follow the procedures below to skip an AUTO BA...

Страница 38: ...oth power connections from the power cord to the power supply and from the power supply to the printer power jack if they are connected securely Solid Green ON The printer is ready to use No action ne...

Страница 39: ...setting may go wrong Please do the initialization and gap black mark calibration Paper Jam Gap black mark sensor sensitivity is not set properly sensor sensitivity is not enough Calibrate the gap bla...

Страница 40: ...int head 2 Allow the print head to cool for a minimum of one minute 3 Use a cotton swab and 100 ethanol to clean the print head surface Clean the print head when changing a new label roll Platen Rolle...

Страница 41: ...e and extend printer life Continuous printing will cause printer motor overheat Printer will stop printing automatically about 10 15 minutes until motor is cooling down Please don t turn off power whe...

Страница 42: ...38 WPL 304 User Manual...

Отзывы: